Integrate with WhatsApp to effectively communicate with your customers. By creating messaging templates in Meta’s (Facebook) business account, you can utilize this integration similarly to SMS and email notifications.
To activate WhatsApp integration, go to the Features & Integrations section in Trafft. Find WhatsApp and click on “Enable“. After enabling it, the card will refresh to show a “Set Up” button. Click this button to access the WhatsApp configuration page.
Configure Your Business Account
Visit this link to log in or create your Facebook Developer Account. You can use your personal account or your company’s Facebook account; simply log in with the appropriate credentials.
If you don’t have an account on Facebook yet, you’ll need to sign up first. Once you’ve created an account or logged in, you’ll be redirected to the homepage of Facebook for Developers. If you haven’t created any apps previously, click on the “Get Started” option in the upper right corner. If you already have an app created, you can click on “My Apps” in the same position.
Registering an Account
If you’re registering an account, you’ll need to agree to Facebook’s Terms and Developer Policies. Next, you’ll need to verify your account. This can be done by adding a valid phone number (you will receive a verification code via SMS, so it needs to be a real number you can access) or by adding a credit card to your account.
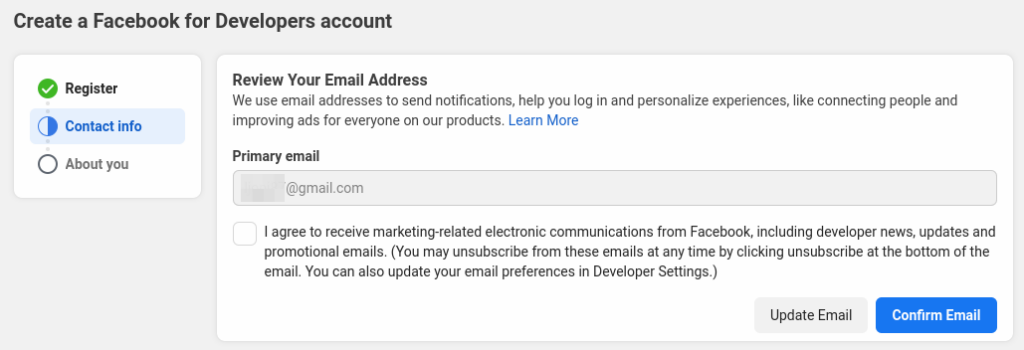
After verifying your account, ensure that the email linked to your Facebook account is valid. If you need to change it, click on “Update Email” in the lower right corner. If it’s the correct email address, click on “Confirm Email” to proceed to the final step.
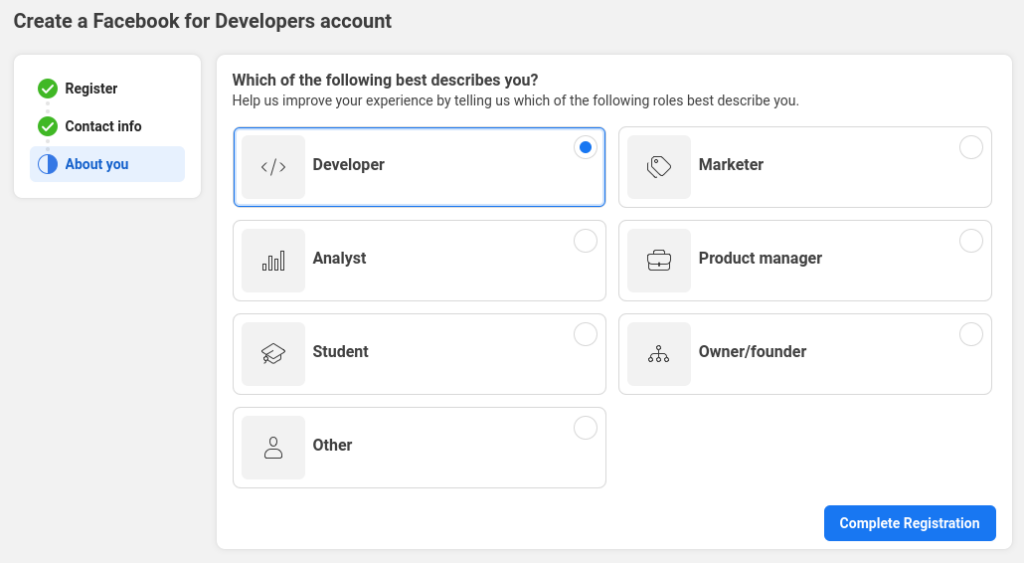
The last step is to help Facebook improve your experience with the Facebook for Developers account. You can select “Developer” as shown in the screenshot below, or choose another role that suits you. Once you’ve selected your role, click on “Complete Registration,” and you’re all set.
App Creation
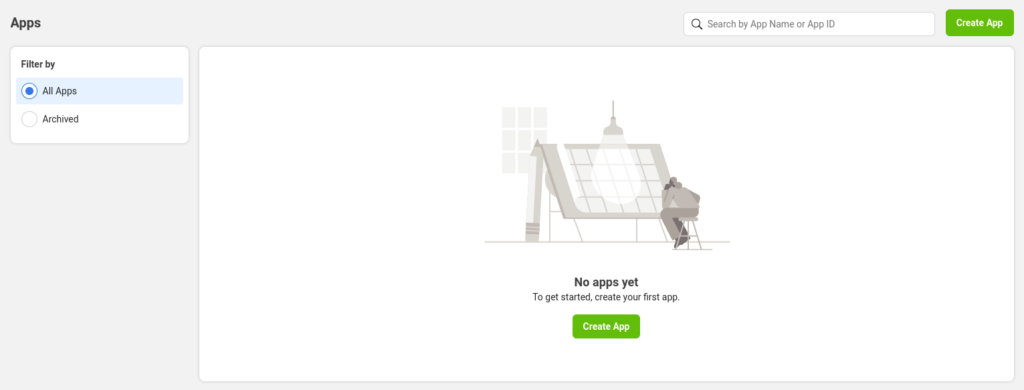
Within the Facebook developer account, you’ll either see a list of your apps (if you’ve used it before) or a blank screen, as shown in the screenshot below. Simply click on “Create App” located either in the top right corner, next to the search box, or in the App list section.
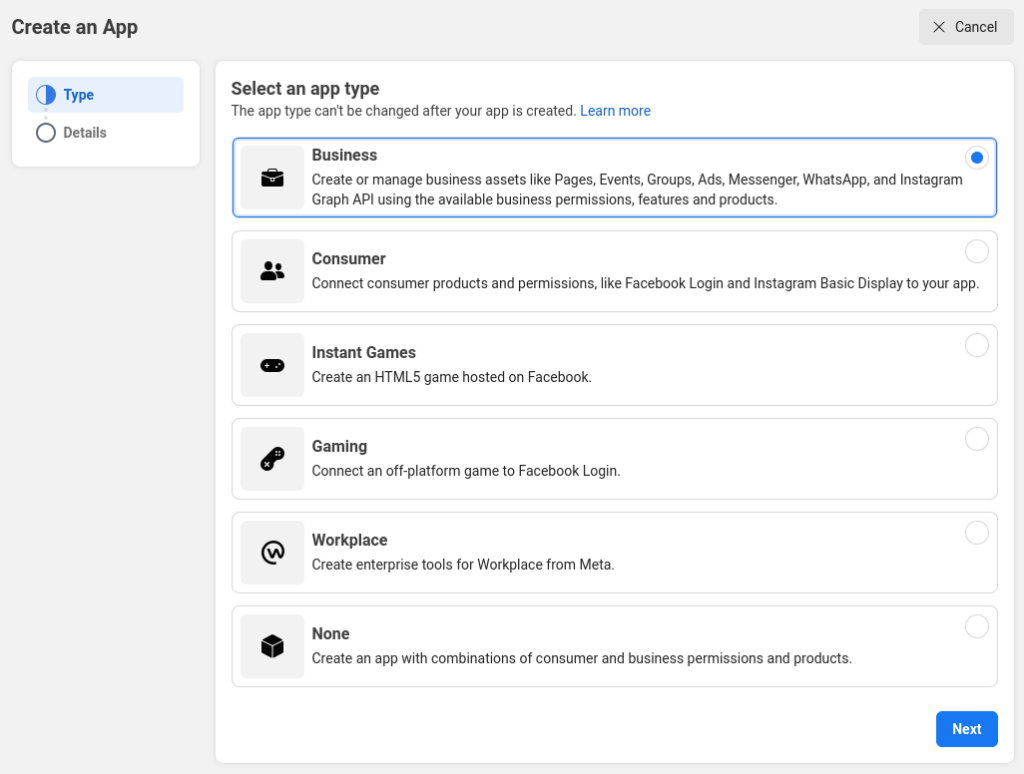
Select App type – Since you need to use WhatsApp for your business, regardless of whether you’re a “One-man show” or an enterprise, you should choose the “Business” type app option and click the “Next” button in the lower right corner.
Provide basic information – Here, you only need to choose the display name of your app (you can change this later). The email you’re logged in with is already populated, and the Business Account is not a mandatory option for using WhatsApp within Trafft. So, even if your account is linked to a Business Account, you don’t need to select it.
Once you click the “Create app” button, Facebook will prompt you to enter your Facebook password. Please enter your password and click “Submit” to proceed.
With the app created, the next step is to add a product to the app, specifically WhatsApp integration. To do this, scroll down to the end of the page and click on “Set up” in the lower right corner of the “WhatsApp” card.
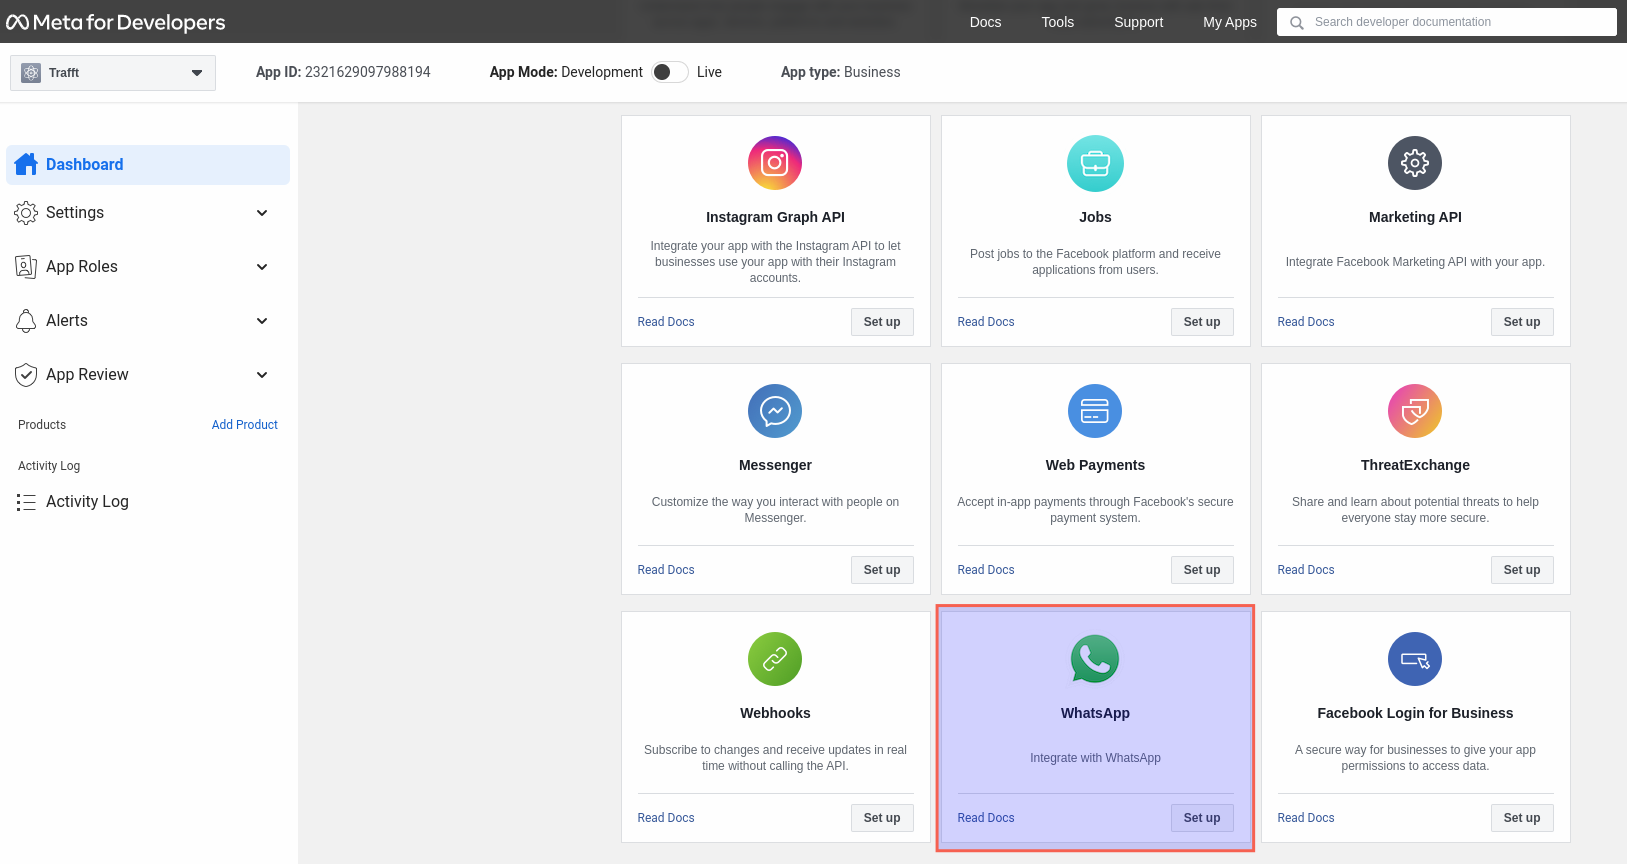
The next step provides information on what’s included in the Business Platform API. By continuing, you agree to the Facebook Terms for WhatsApp Business and the Meta Hosting Terms for Cloud API. Simply click on “Continue” to proceed.
Depending on whether you already have a Business account or if you just created a new account and this is your first App, the next screen will either be the Quickstart or the Getting Started section. If you land on Quickstart, you’ll need to click on the “Start using the API” button:

This will take you to the “Getting Started” section, which provides essential data for testing the app: a Temporary Access Token, Phone Number ID, WhatsApp Business Account ID, and the Curl command for sending messages.
Please note: The Phone Number ID and WhatsApp Business Account ID are necessary for configuring the WhatsApp Settings in Trafft, as demonstrated at the beginning of this article. Remember to return to this page after adding your phone number later in this article.
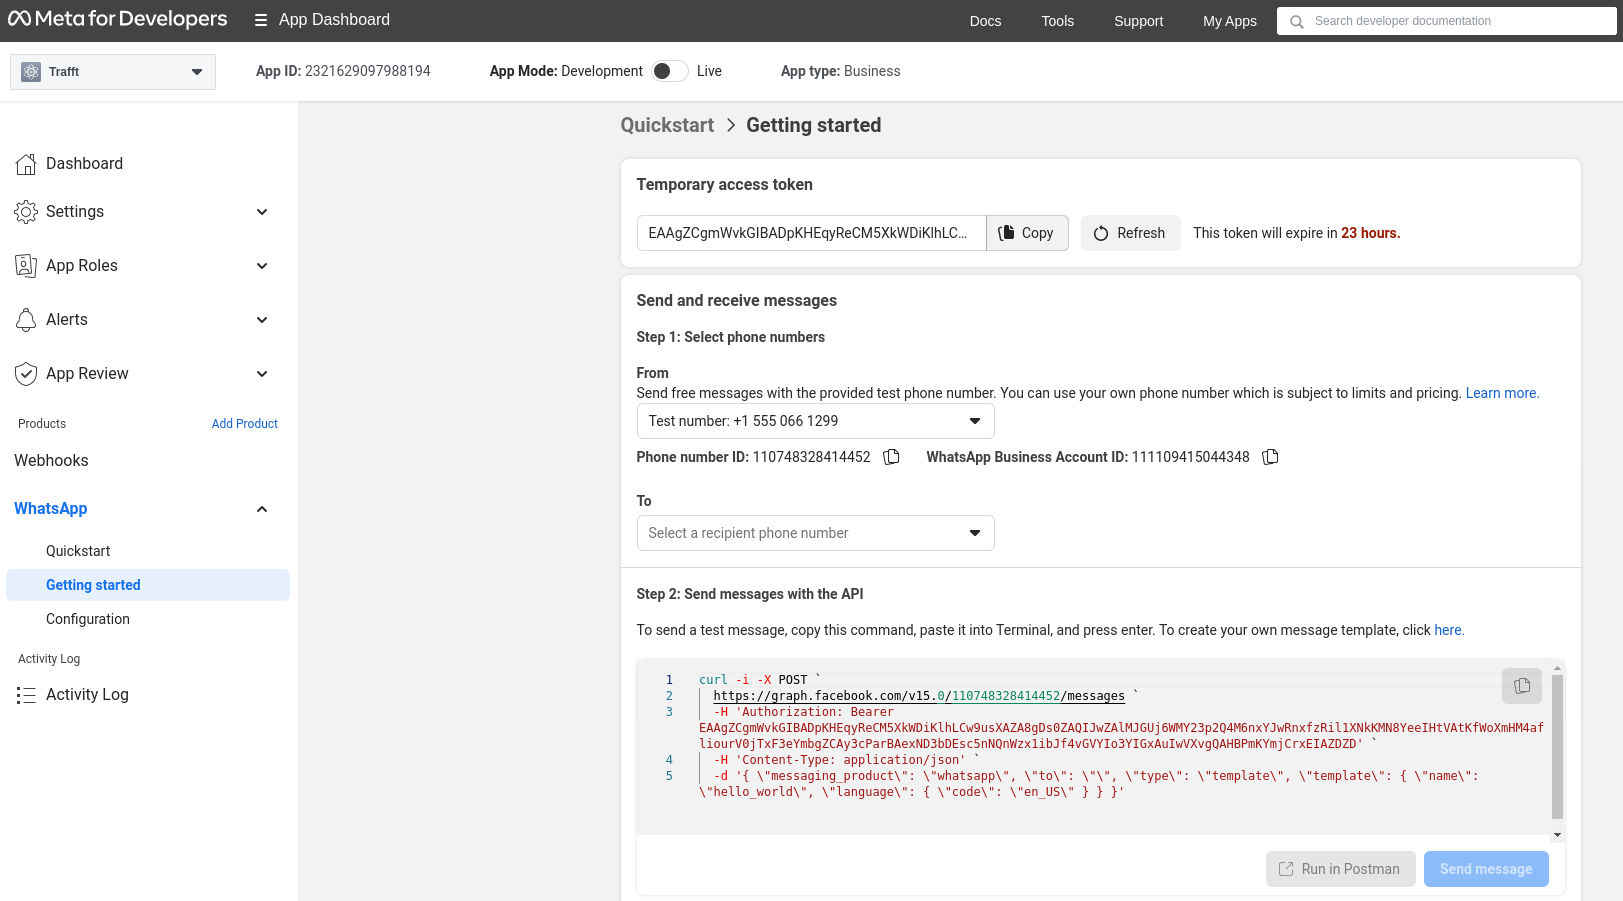
In the “From” section, you will find a test number assigned to your account.
In the “To” section, there is a drop-down menu initially empty. You can click on “Manage phone number list” to add up to 5 phone numbers for receiving free test messages.
Please note: WhatsApp will send a confirmation code to the phone number provided. You cannot add this number until you enter the 5-digit verification code received in the WhatsApp account linked to the phone number.
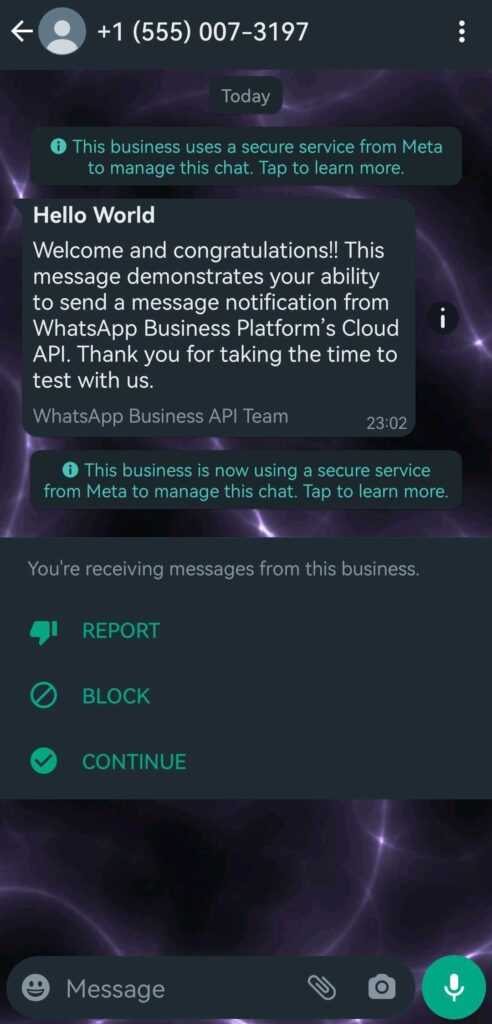
Once you’ve added your personal testing number, click the blue “Send message” button at the bottom right under Step 2. You should then receive a WhatsApp message similar to this:
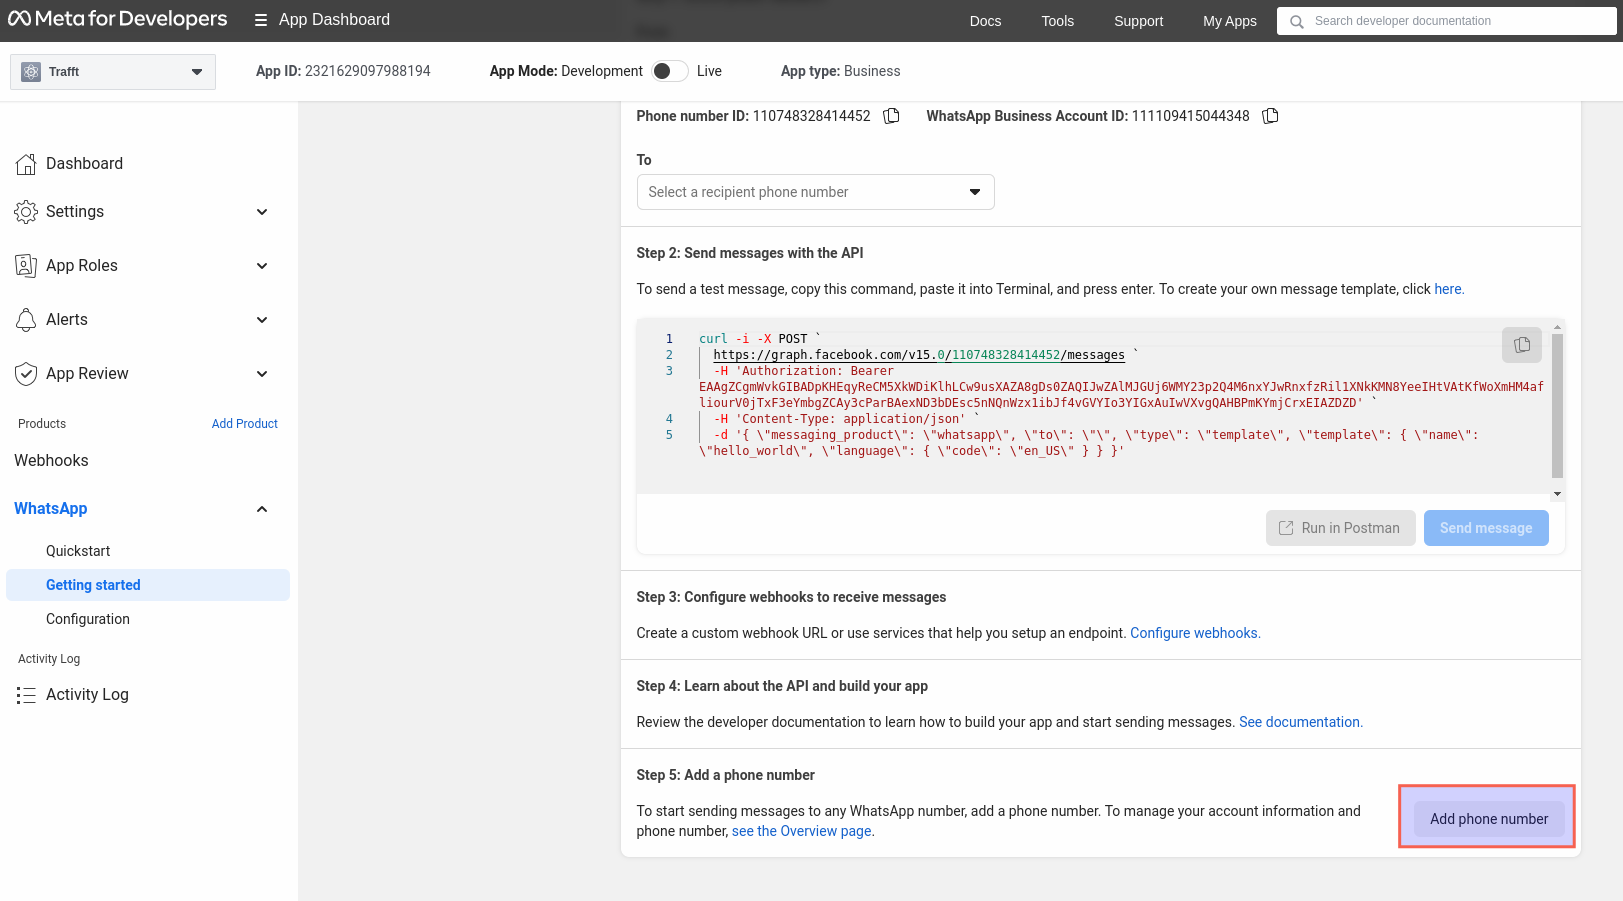
Once you receive the text message, scroll down on the Facebook for Developers page. Skip steps 3 and 4, and instead, click on “Add phone number” in the bottom right corner:
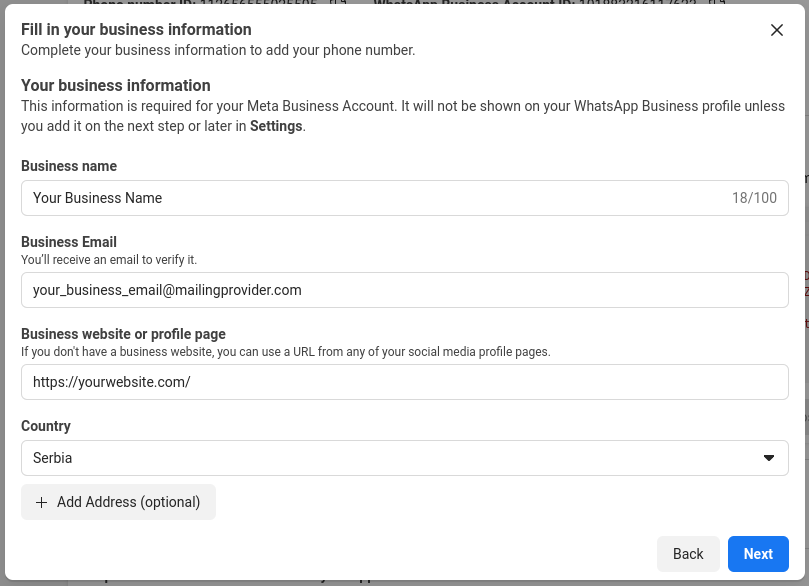
This will bring up a modal where you add your business name (this is the name your customers will see on WhatsApp when they receive a message from you), business email (needs to be a valid email, since you’ll need to confirm it), your country, and your business website.
Once you’ve filled out this information, click on “Next” in the bottom right corner:
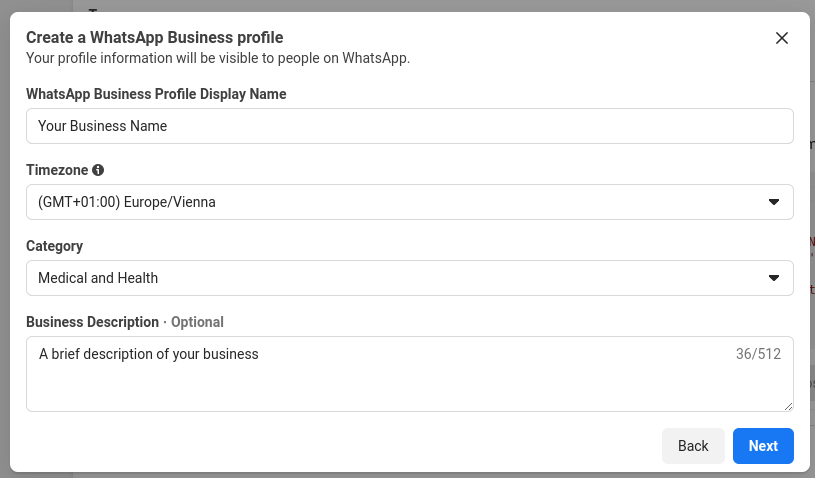
The next pop-up will ask for the timezone, business category, and business description. Fill in the details carefully and click the “Next” button in the bottom right corner.
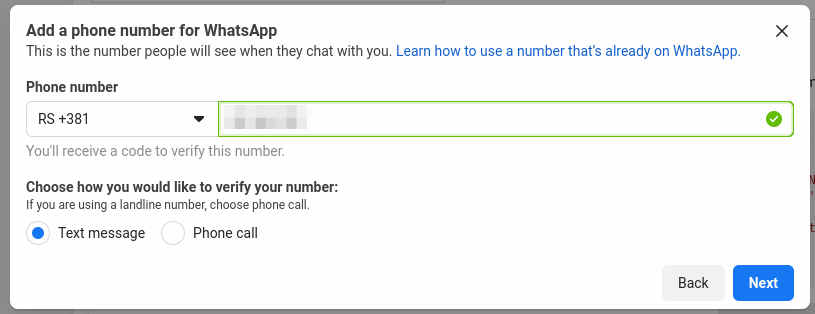
Enter your business’ official phone number that will be used for Trafft.
You also have the option to enter your business’s landline number. Simply select the “Phone Call” radio button to activate this option.
If you’re using a mobile number, choose the “Text message” option to receive the verification code.
After selecting “Next” in the bottom right corner of the pop-up, you will receive the verification code.
After clicking “Next,” you will receive an OTP (One-Time Password) message from WhatsApp to your WhatsApp business number. Enter the verification code (OTP number) and click the “Finish” button. Your number will be verified at this stage and linked to your WhatsApp business account.
Now that you’ve configured the phone number for WhatsApp messaging, let’s proceed to copy this information into Trafft’s settings. As mentioned earlier, you’ll need to return to the Phone Number ID and WhatsApp Business Account ID after adding your number.
- In Facebook for Developers, under WhatsApp/Getting Started, select the newly added phone number from the drop-down list in the “From” section.
- Below it, copy the Phone Number ID.
- In Trafft’s Features & Integrations/WhatsApp -> “Set Up“, paste the Phone Number ID into the designated field.
- Return to Facebook for Developers, copy the WhatsApp Business Account ID.
- Paste the WhatsApp Business Account ID into Trafft’s WhatsApp Settings.
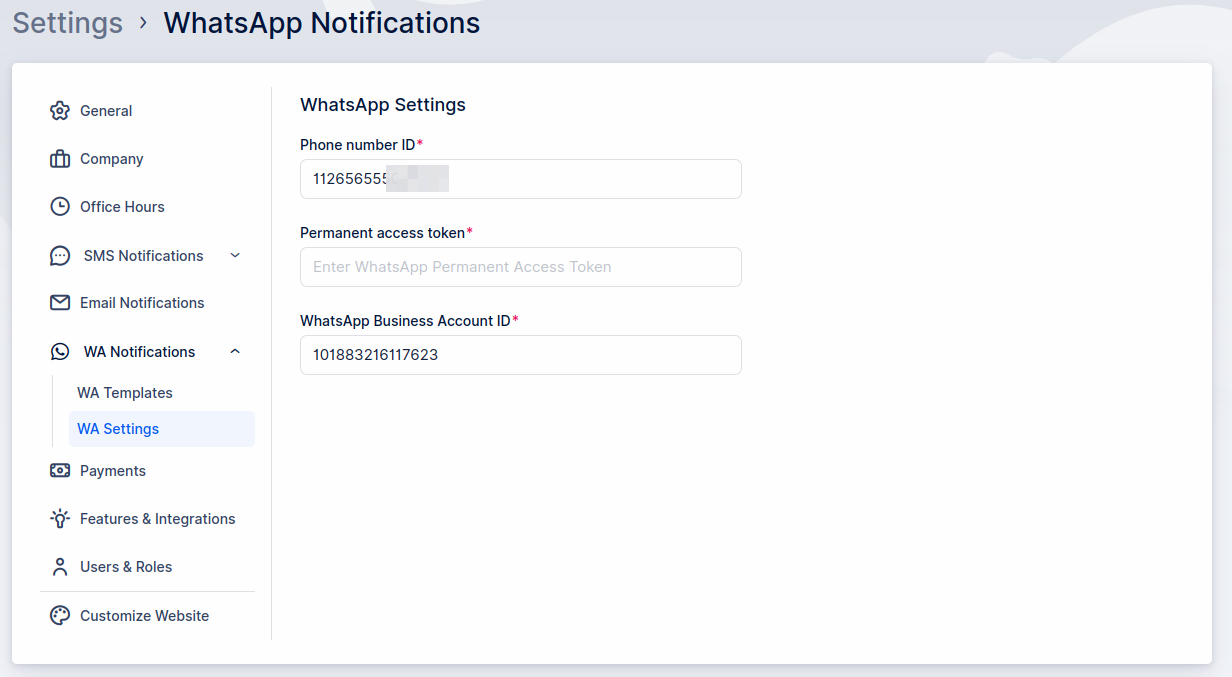
To integrate this number with Trafft, you’ll need a permanent access token.
In the “Getting Started” section, at the top, you’ll notice a “Temporary access token” and a message indicating it will expire in 23 hours. This temporary token won’t work for Trafft if you plan to send messages beyond 23 hours from now. Instead, we need to create a token that never expires.
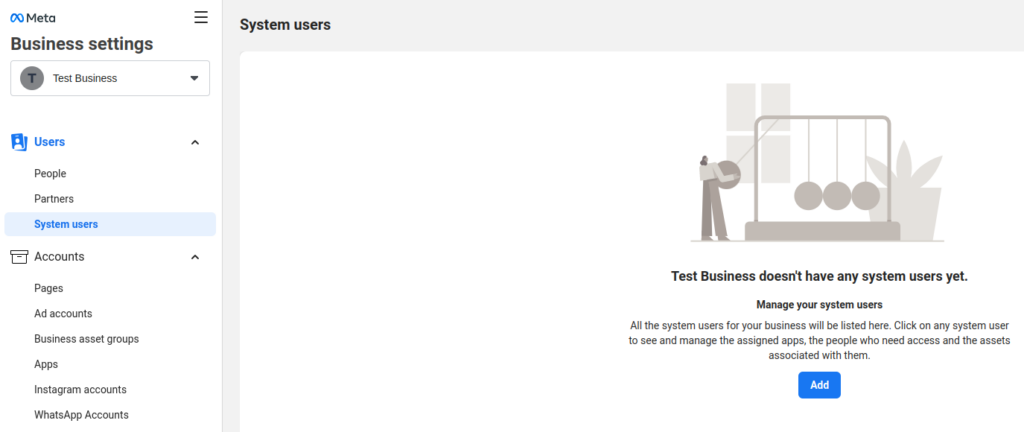
- While logged into your Facebook for Developers account, navigate to the Business Settings Page.
- In the left sidebar under the “Users” section, click on “System users.”
- You’ll see a blank page. Click on “Add” to add a new user:
You will, periodically, be prompted to accept Facebook’s Non-discrimination policy. Simply scroll through this modal, review the policy, and click on “I accept” in the bottom right corner of the pop-up.
Next, you’ll see a “Thank you” message from Facebook. Click on “Done” in the bottom right to continue creating a new user.
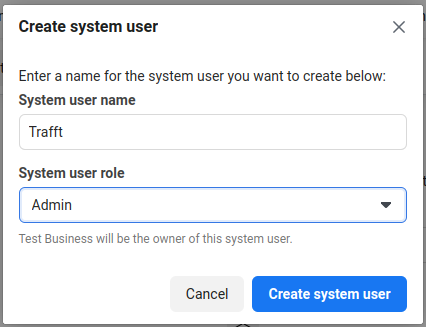
Enter the username and select the role as “Admin“. Once you’re finished, click on “Create system user“:
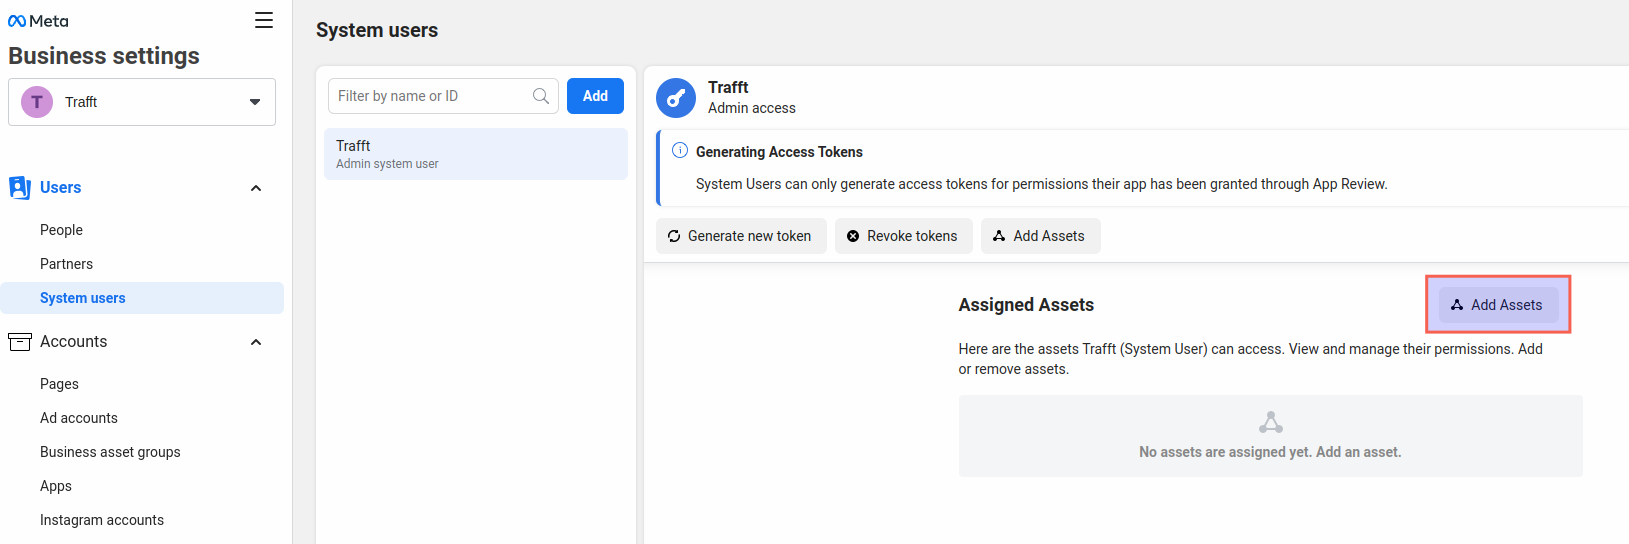
In the right section of the next screen, click on the “Add Assets” button:
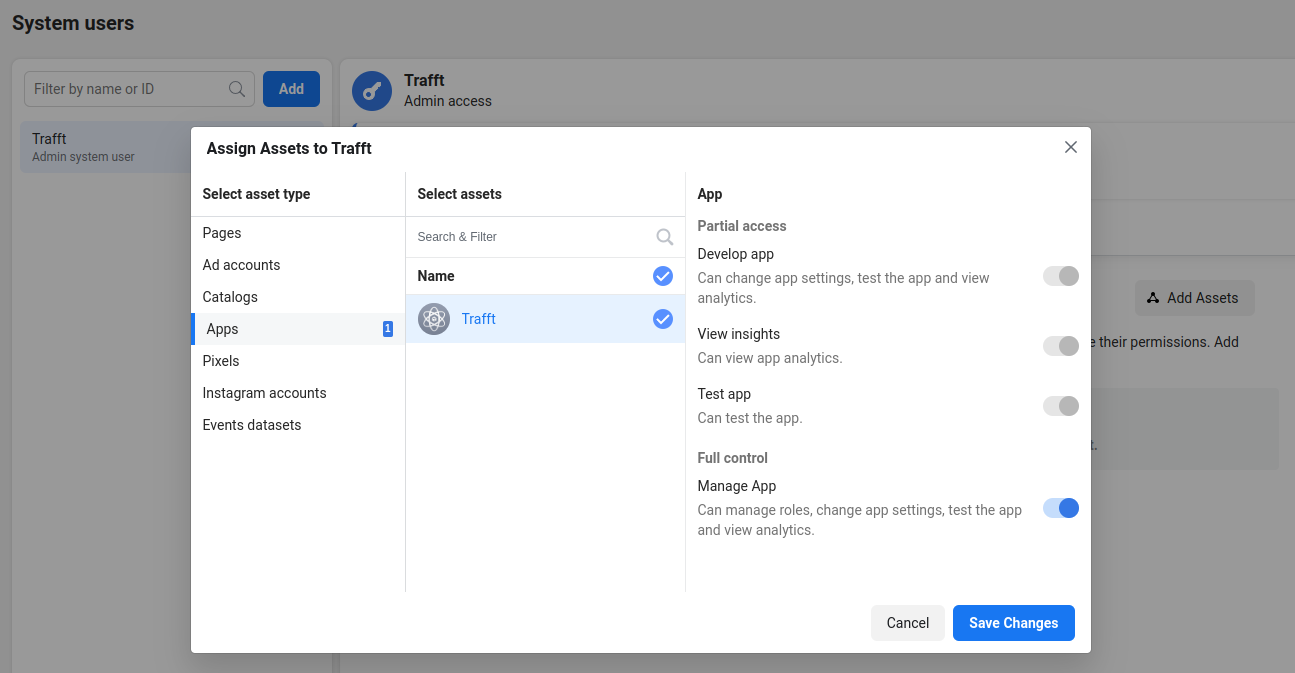
In the pop-up that appears, click on “Apps“, then select the app previously created for WhatsApp integration. Enable the Full Control (“Manage App”) slider, and click on “Save Changes”.
The next pop-up will inform you that a new asset has been added. Click on “Done” to proceed.
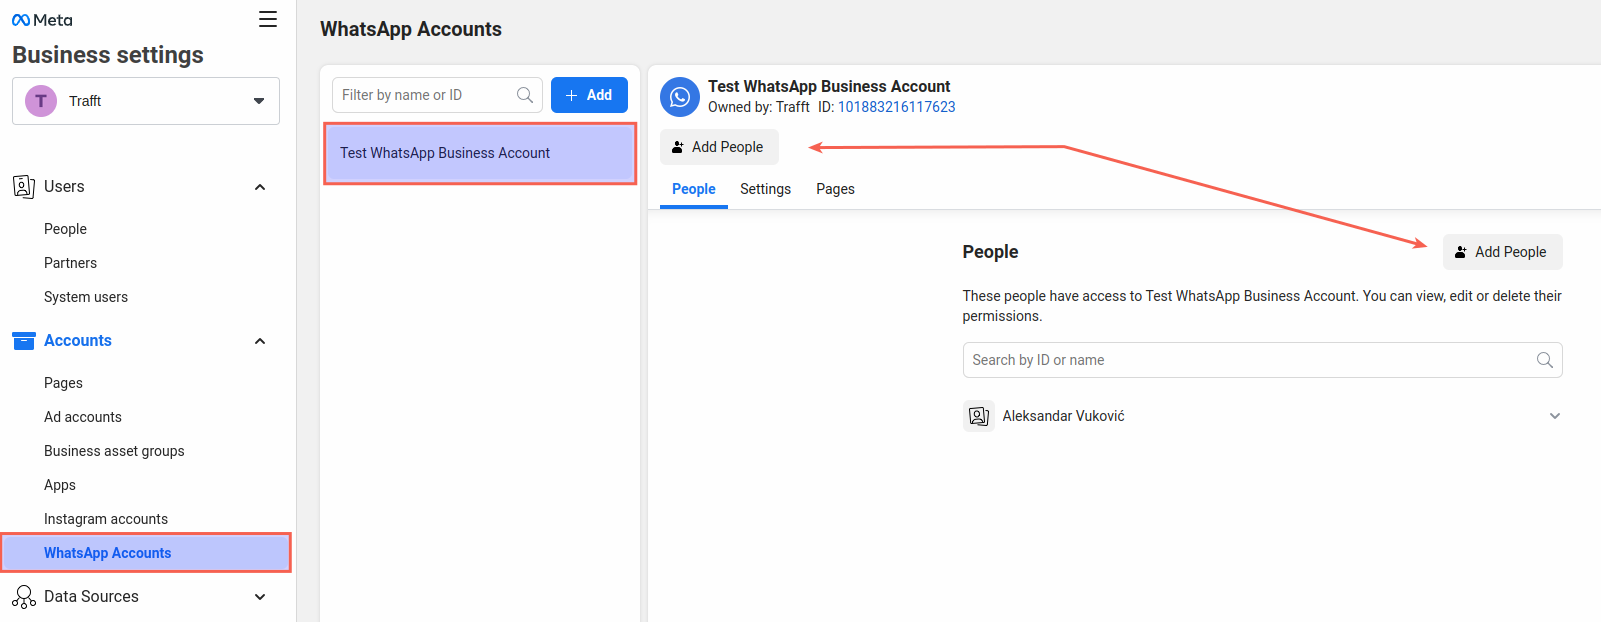
After that, in the left sidebar, under “Accounts“, click on “WhatsApp accounts“. Select the previously created business app (in our example, it’s named “Test WhatsApp Business Account”), and then click on one of the “Add People” buttons:
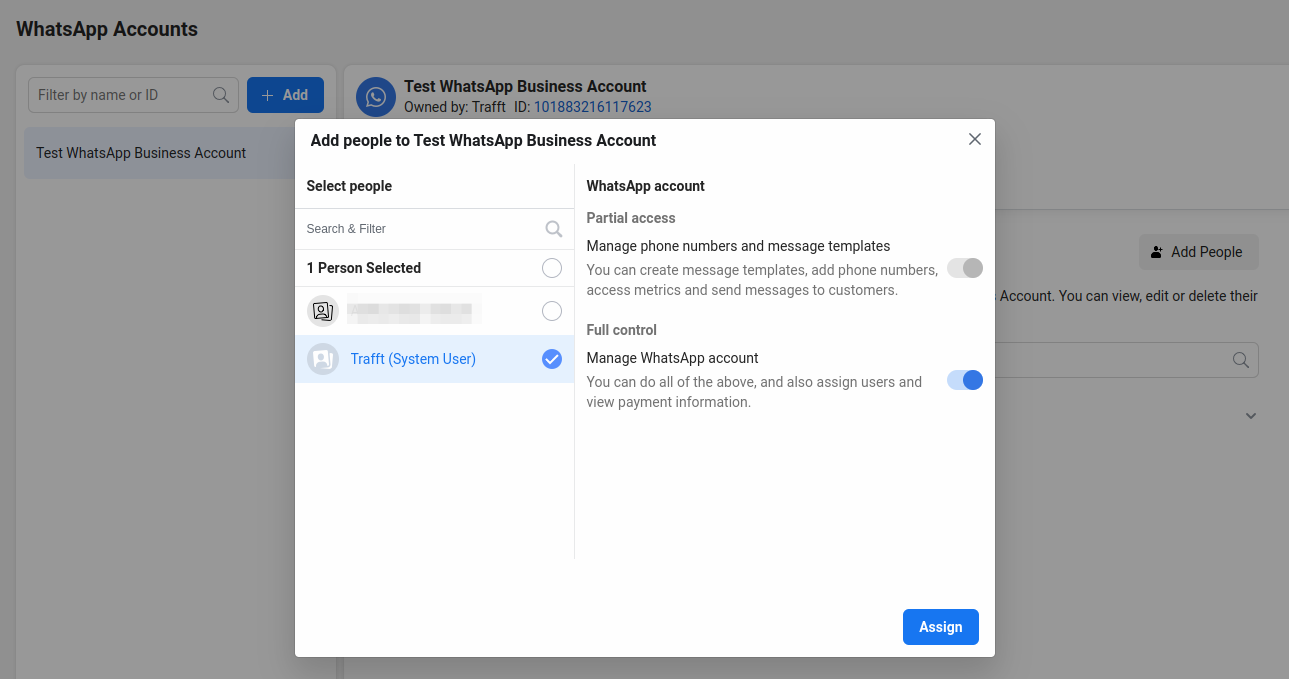
In the pop-up that appears, select the system user previously created, then enable the “Full Control” option, and click “Assign” in the bottom right corner.
You’ll see a prompt confirming that 1 Person has been added to the WhatsApp account, so simply click “Done”.
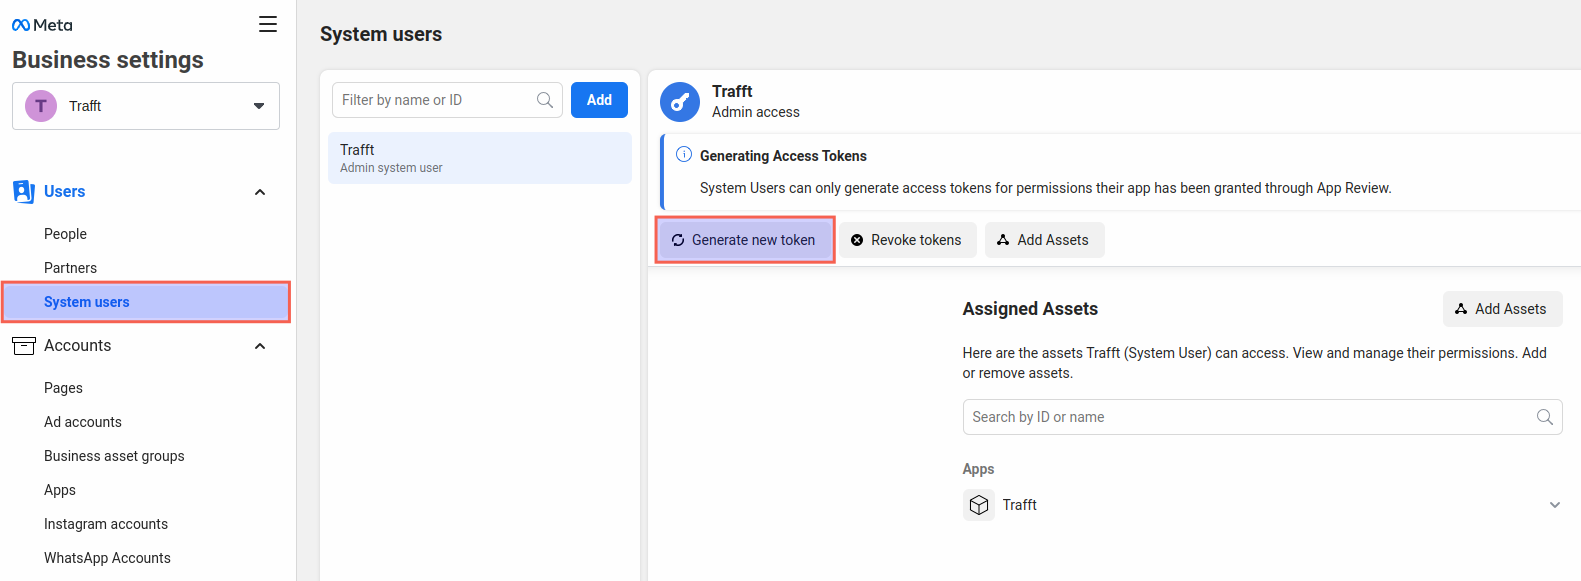
Next, return to the “System Users” section in the left sidebar (agree to Facebook’s Non-discrimination policy if prompted again), and click on the “Generate new token” button:
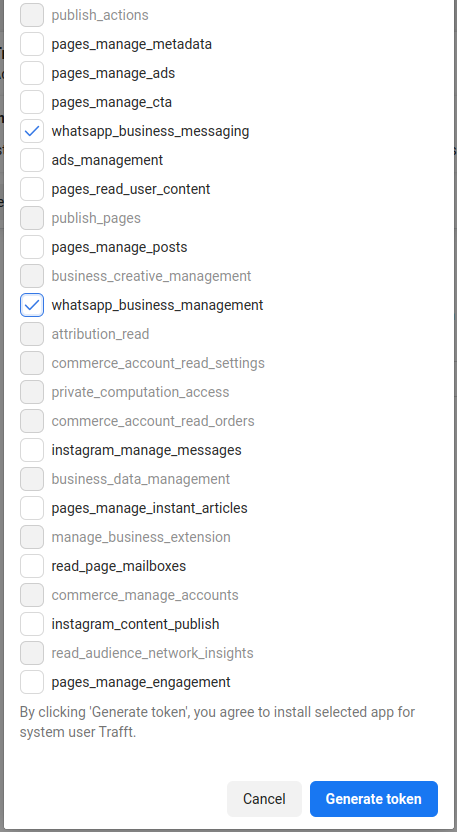
elect the App from the drop-down menu, and scroll down. You will see a few notices, and below them, you’ll find the list of available permissions.
Scroll down and enable these two permissions:
- whatsapp_business_messaging
- whatsapp_business_management
After selecting them, click on the “Generate token” button in the lower right corner of this pop-up.
Finally, you’ll see the token that will not expire and will remain active unless you choose to click the “Revoke Token” button.
It’s important to note that Facebook will not store this token, so be sure to copy it and save it in a secure location.
You can also verify the token scope using the Facebook token debugger tool to confirm that the token was added successfully.
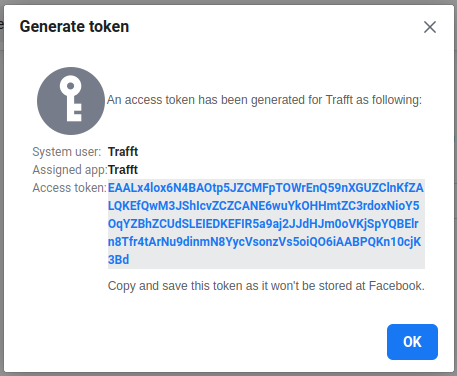
This is the last thing you need to add to Trafft’s WhatsApp Settings page, so paste this token in there:
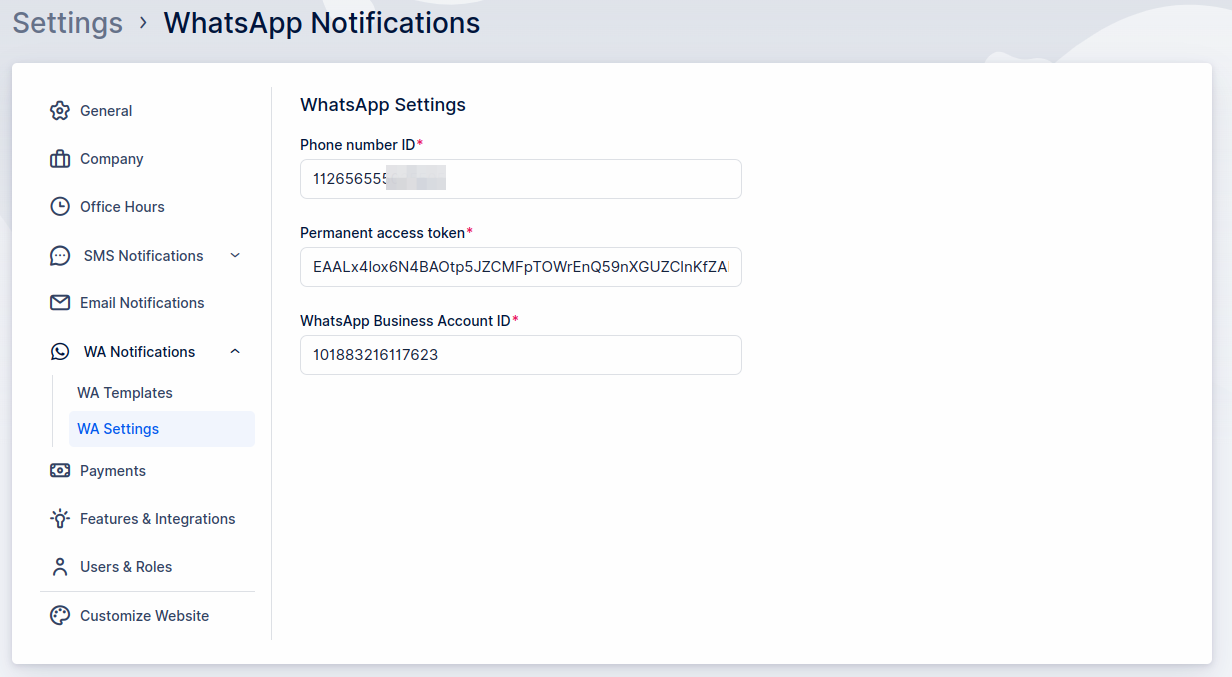
After saving these settings, navigate to the “WA Templates” section in Trafft’s left menu.
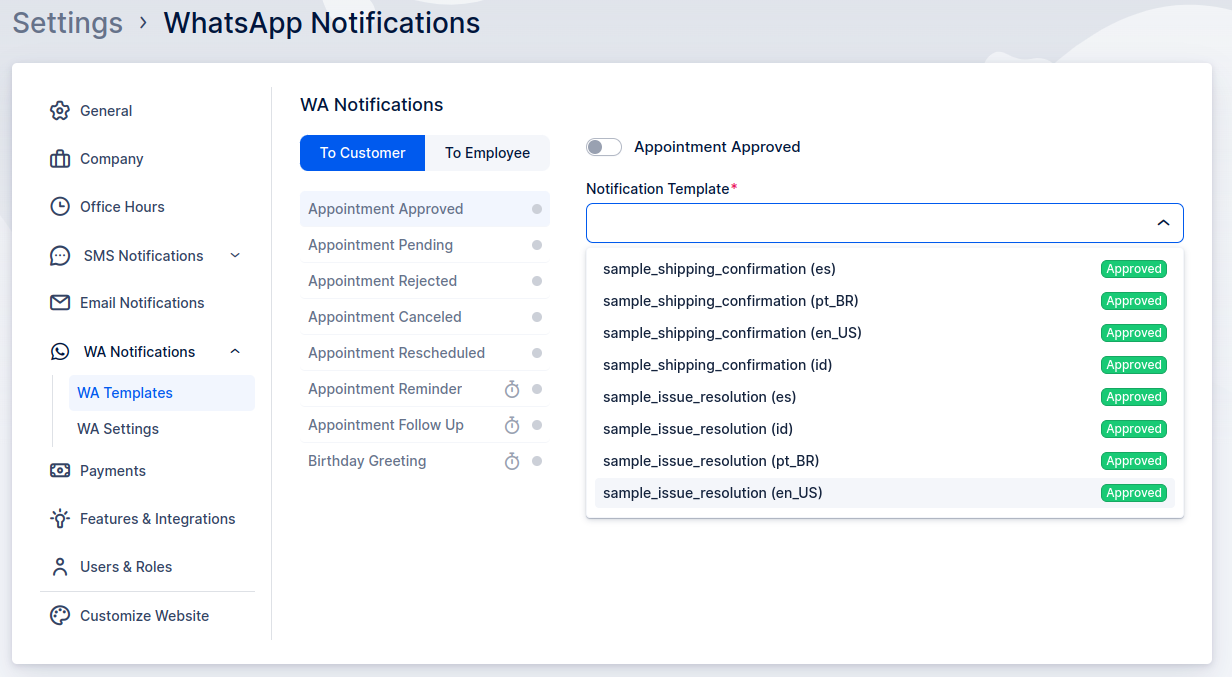
It’s important to note that WhatsApp templates cannot be configured directly in Trafft. Instead, you will need to configure them within the WhatsApp Business account. When you expand the “Notification Template” drop-down menu in Trafft, you will see some sample templates provided by WhatsApp:
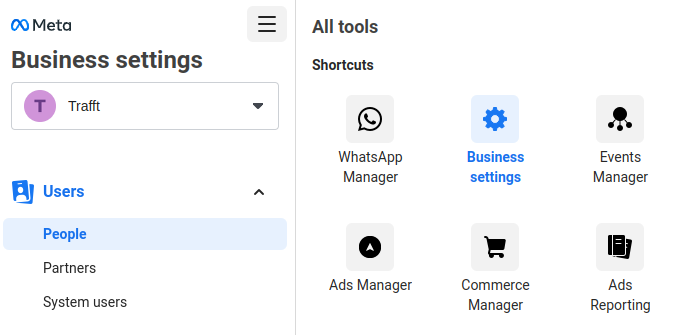
To create templates, you need to access your Business Settings Page, and in the left sidebar, click on the three lines and then click on “WhatsApp Manager“:
In the “Overview” section that appears next, click on the three dots on the right of the WhatsApp account you previously created, and then click on “Manage message templates“:

On the following page, you can create new templates that will be utilized in Trafft. Click on “Create Template” in the top right corner to begin.
When setting up a template, ensure the category is “Marketing“. Once it expands, select the “Custom” radio button.
Next, provide a name for the template (you can use the same names seen in Trafft, such as “customer_appointment_approved”, “employee_appointment_pending”, etc.) and select the language used in Trafft.
Once configured, click “Continue” in the top right corner to proceed.
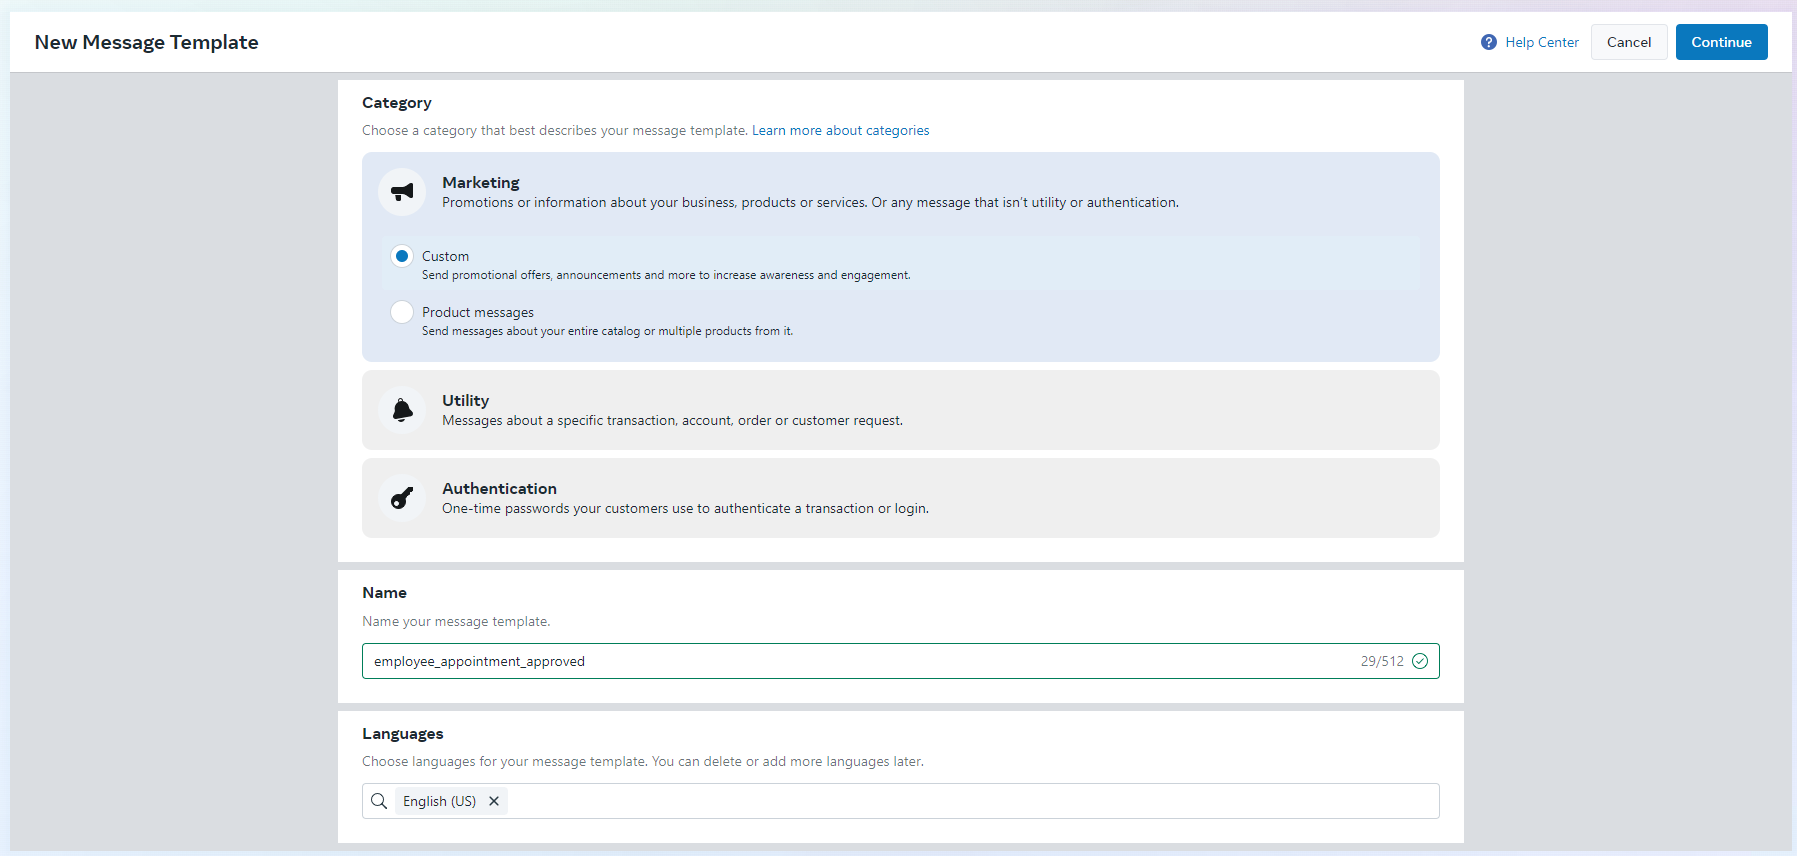
Templates in WhatsApp follow a similar structure to creating templates for Email and SMS notifications, with a few key differences.
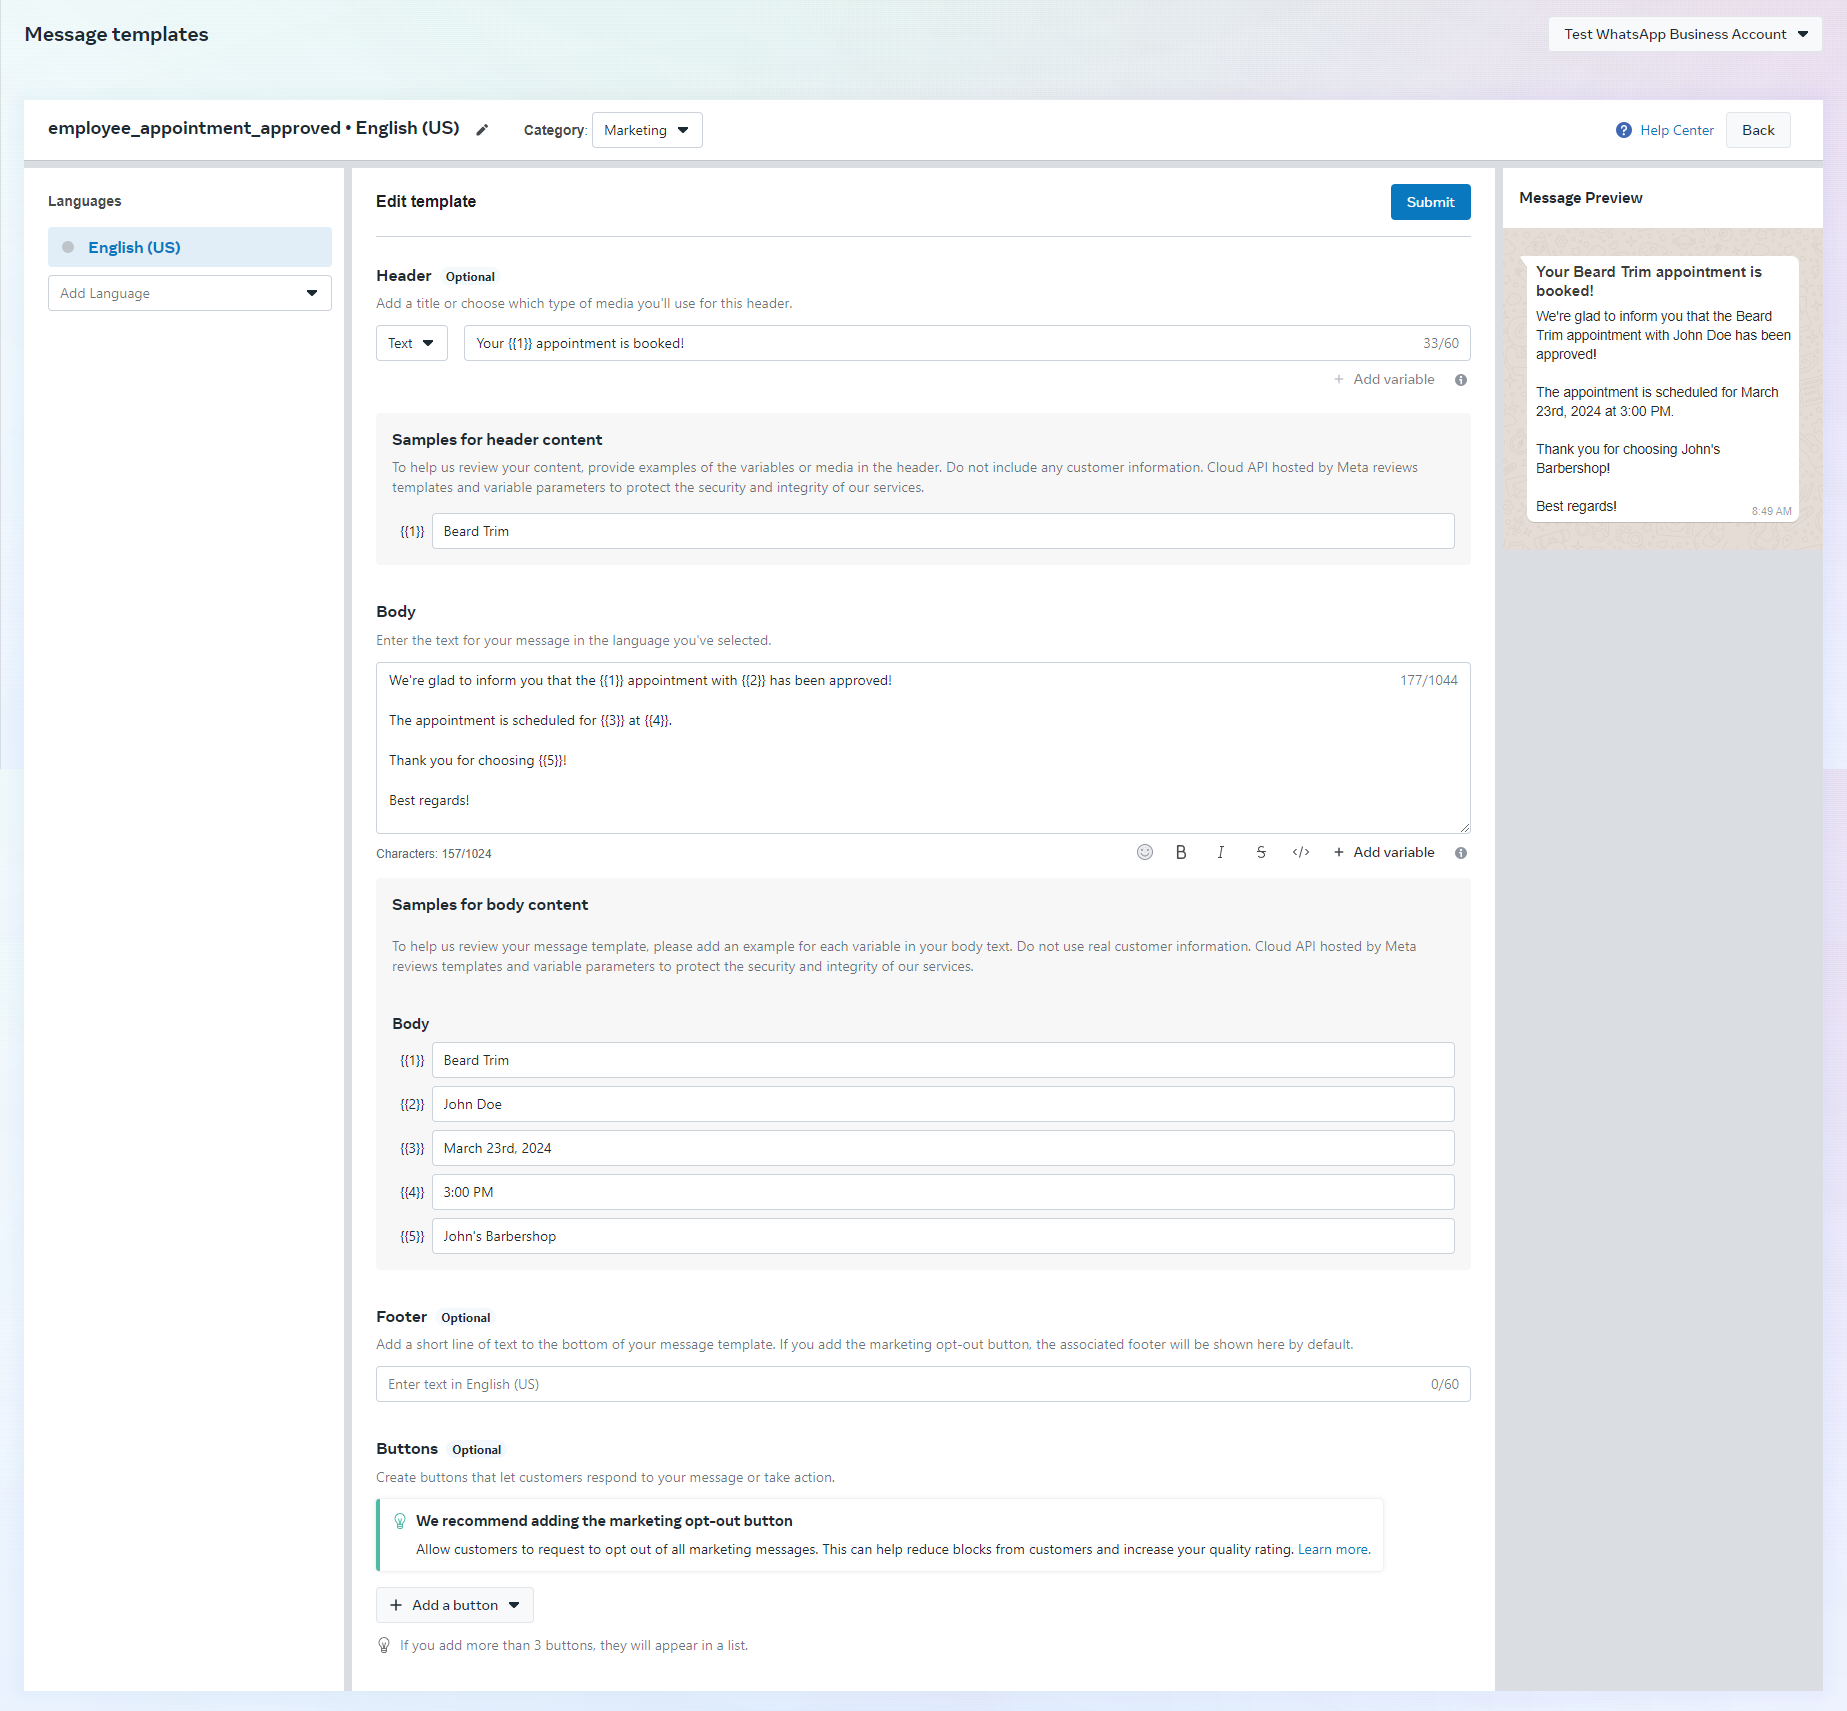
The primary distinction is the configuration of variables (placeholders) in the template, which can only be numerical. As illustrated in the screenshot below, these placeholders are formatted as {{1}}, {{2}}, and so forth, resembling Trafft’s placeholders enclosed in double curly brackets.
It’s crucial to understand which variable corresponds to which placeholder in Trafft. For instance, {{1}} in WhatsApp corresponds to {{service_name}} in Trafft.
While the Header and Footer sections are optional, the Header can include variables while the Footer cannot. If you choose to add a Header, select “Text” from the drop-down menu and input your header text as demonstrated in the example below. Note that the Header section only accepts “Text”, so you can either utilize this or omit the header entirely.
WhatsApp also requires you to define the examples for the placeholders, as it helps them speed up the validation of your templates.
Once you’ve created the template, click the “Submit” button located in the upper right corner.
Each template you create will undergo review by WhatsApp, typically taking about an hour for approval. An approved template will display a green status, marked as “Active – Quality pending,” while a template under review will appear gray with the status “In review,” as shown in the screenshot below:

Linking Variables with Trafft Placeholders
Back in Trafft’s Settings/WA Notifications/WA Templates (once you refresh the page), when you click on the “Notification template” drop-down, you will see the list of all templates created in the app (both approved and pending ones).
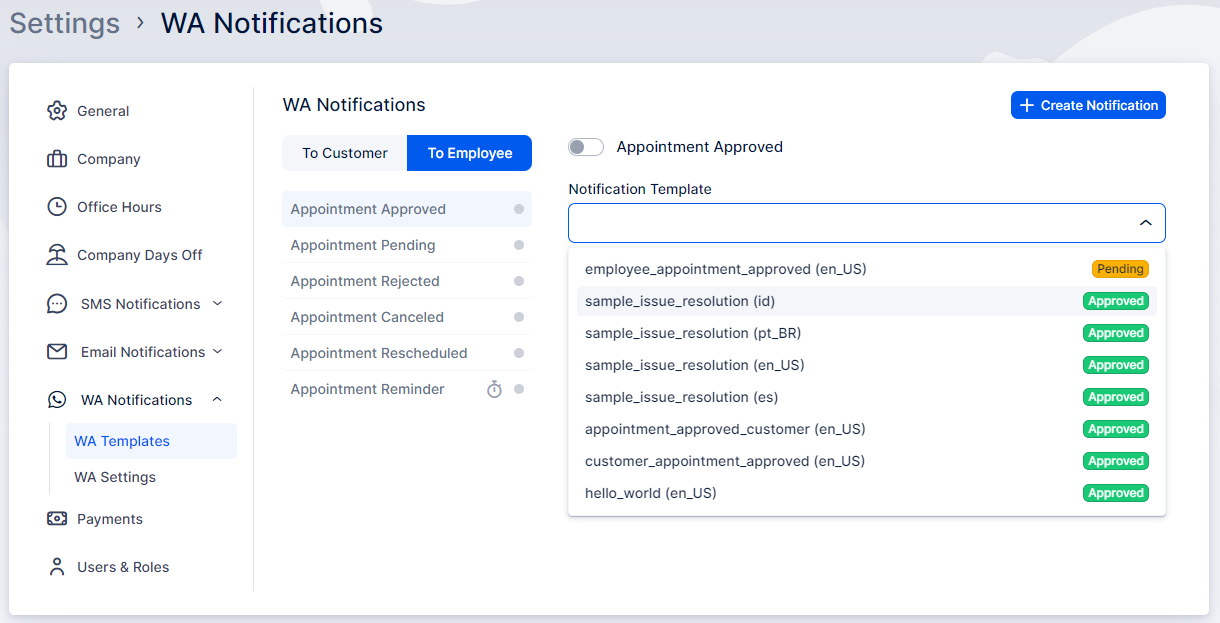
Select the template you want to associate with the Trafft template you clicked on (or created) and then you can continue linking the variables to placeholders.
Placeholders for Headers and placeholders for the message body are separate, so {{1}} in the header is not the same as {{1}} in the message body. All variables you added to the message template in WhatsApp will be selectable in drop-downs so all you need to do is link them properly.
First, the {{1}} variable needs to be linked to Category/Service/Name (in this example) in the header. Then, below that, you can see the message template pulled from WhatsApp, and below the template, you will be able to link the variables with placeholders in Trafft:
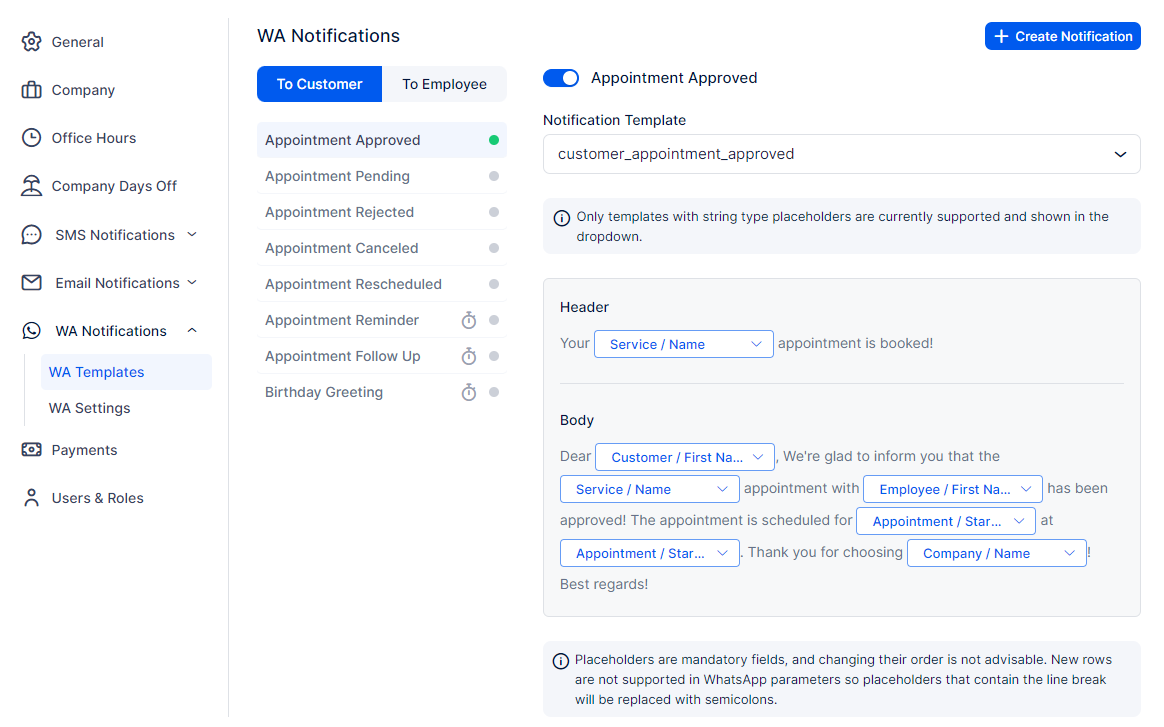
Don’t forget to click on Save Changes when you’re done linking the placeholders.
Have more questions?
If you face an issue, and cannot find an answer in the documentation, feel free to submit a support ticket!