


 Agency (White Label)Getting StartedConfiguring TrafftBooking Website
 Custom FeaturesIntegrationsAdmin Views
In addition to the default Email and SMS Notifications provided in your Trafft account, you have the option to create custom notifications tailored specifically to your business needs. These custom notifications can be configured for your employees or customers, allowing you to choose when they are sent and for which services they apply. This feature enables you to personalize your communication with customers and facilitate better communication among your team members.
Upon activating the Custom Notifications feature on the Features & Integrations page, when you click on the ‘Set Up’ button, you’ll be directed to the Email Notifications section where you’ll find a new button “+Create Notification” in the top right corner. It’s worth noting that activating this feature will also enable the same option on the SMS Notifications page, allowing you to create custom notifications for both Email and SMS.
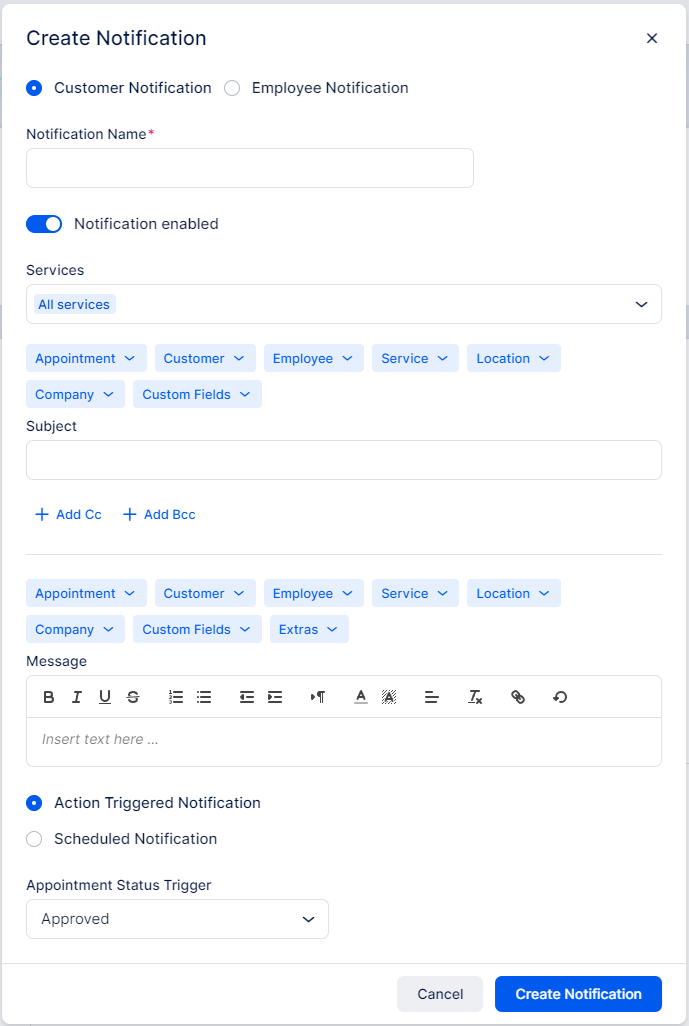
Clicking on the “+Create Notification” button will open a new module where you can configure your notification by setting up the following options:
- Customer/Employee Notification: Choose whether the notification will be sent to customers or employees.
- Notification Name: Enter a name for the notification, which will help you identify it among your other notifications.
- Notification enabled: Toggle this on to activate the notification. You can disable it later if needed.
- Services: Select the specific services for which this notification should be sent.
- Subject: Enter the subject line for the email notification.
- Message: Craft the message that will be sent, including placeholders for appointment-specific information.
- Action Triggered Notifications: If selected, define an action that triggers the notification, such as a change in appointment status. Choose the trigger status from the “Appointment Status Trigger” dropdown.
- Scheduled Notifications: If selected, set a specific time for the notification to be sent, relative to the appointment time. In the “Schedule” dropdown, choose whether the notification should be sent before or after the appointment. Then, in the “Choose when” dropdown, specify the time interval (minutes, hours, days, weeks, months) before or after the appointment for the notification to be sent.
Once you’ve configured these options, click “Save” to save your custom notification settings. You can always return to this section to edit or delete your custom notifications as needed. This feature provides flexibility in tailoring your communication with customers and employees based on your specific business requirements.
After clicking on “Create Notification,” your notification will be saved and sent out according to the settings you’ve configured. You’ll find your notification listed along with all other notifications under either the “To Customer” or “To Employee” section, depending on your selection.
You can edit the notification by clicking on it, even after it’s been created. This allows you to modify its settings or disable it if needed.
Have more questions?
If you face an issue, and cannot find an answer in the documentation, feel free to submit a support ticket!