


 Agency (White Label)Getting StartedConfiguring TrafftBooking Website
 Custom FeaturesIntegrationsAdmin Views
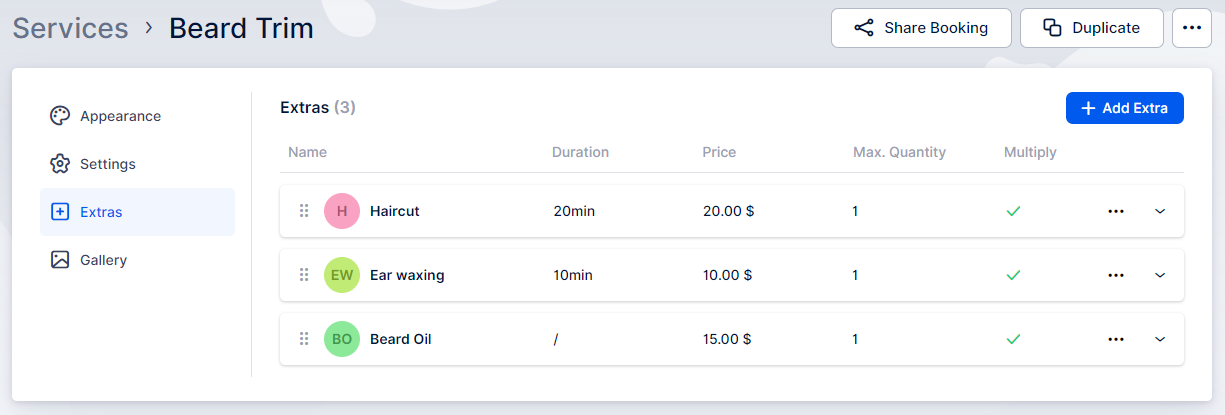
Extras are designed to provide you with the option to create additional services or products that complement your primary service. This allows your customers the flexibility to choose whether they want to add something extra to their appointment.
Extras are generated individually for each service. Simply access the Services page, select the service you wish to modify, click on “Edit Service” and you’ll find the Extras tab within it.
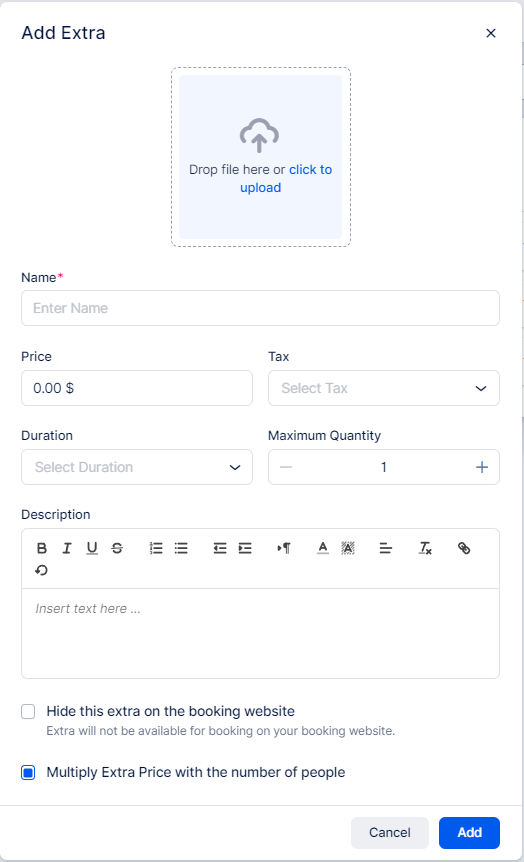
To create a new Extra for a service, click on the “Add Extra” button. This will open a new module where you can configure the details of the Extra, such as its name, description, price, and duration. You can also hide the extra on the booking website (so it can only be used in the back end bookings) and (if you define the price) you can choose whether its price will be multiplied with the number of people when group appointments are booked.
To create an Extra, follow these steps:
Open the tab and click on the “+ Add Extra” button. A popup will appear with the following options:
- Image: Upload an image for your extra to display on the booking form, providing customers with a visual representation of what you’re offering.
- Name: Enter a name for your extra. This field is mandatory; the extra cannot be created without a name.
- Price: Define the price for the extra service or product. By default, it’s set to 0 and you can leave it at that if you don’t want to charge customers for this extra. The currency position and the number of decimals and separators are determined by your Payment Settings. To make changes, navigate to Settings/Payment, and any adjustments will be reflected here.
- Tax: Select one of the taxes you’ve created to apply to the extra’s price (if any).
- Duration: Set the duration for the extra if it extends beyond the time required for the service. Offered time slots will depend on the Default Time Slot Step selected in General Settings. If the desired time frame isn’t available, return to General Settings and modify the Default Time Slot Step.
- Maximum Quantity: Define the maximum quantity of this extra that can be booked by a single customer during a reservation. By default, it’s set to 1, but you can increase it if needed.
- Description: Add and format an additional description for your extras. This information will also be displayed on the booking form, providing customers with more details about what you’re offering.
- Hide this Extra on the Booking Website: Enabling this option will hide the extra from the booking website, preventing customers from booking it there. However, you can still add it from your admin dashboard.
- Multiply Extra Price with the Number of People: If you check this option, the price of the extra will be multiplied by the number of people in the appointment for group bookings. This total will then be added to the service price. If unchecked, the extra price will remain the same, regardless of the number of attendees at the appointment.
Have more questions?
If you face an issue, and cannot find an answer in the documentation, feel free to submit a support ticket!