


 Agency (White Label)Getting StartedConfiguring Trafft
 Booking WebsiteCustom FeaturesIntegrationsAdmin Views
You can access your Trafft booking website in two ways:
- Click on the “Booking Website” button located in the top left corner of the admin dashboard. This will open the website automatically in a new tab.
- Alternatively, you can access it from the Customize page using one of two options:
- “Copy Website URL“: Clicking this option will copy the website link, allowing you to paste it directly into your browser.
- “Go to Website“: Clicking this option will open the website in a new tab instantly.
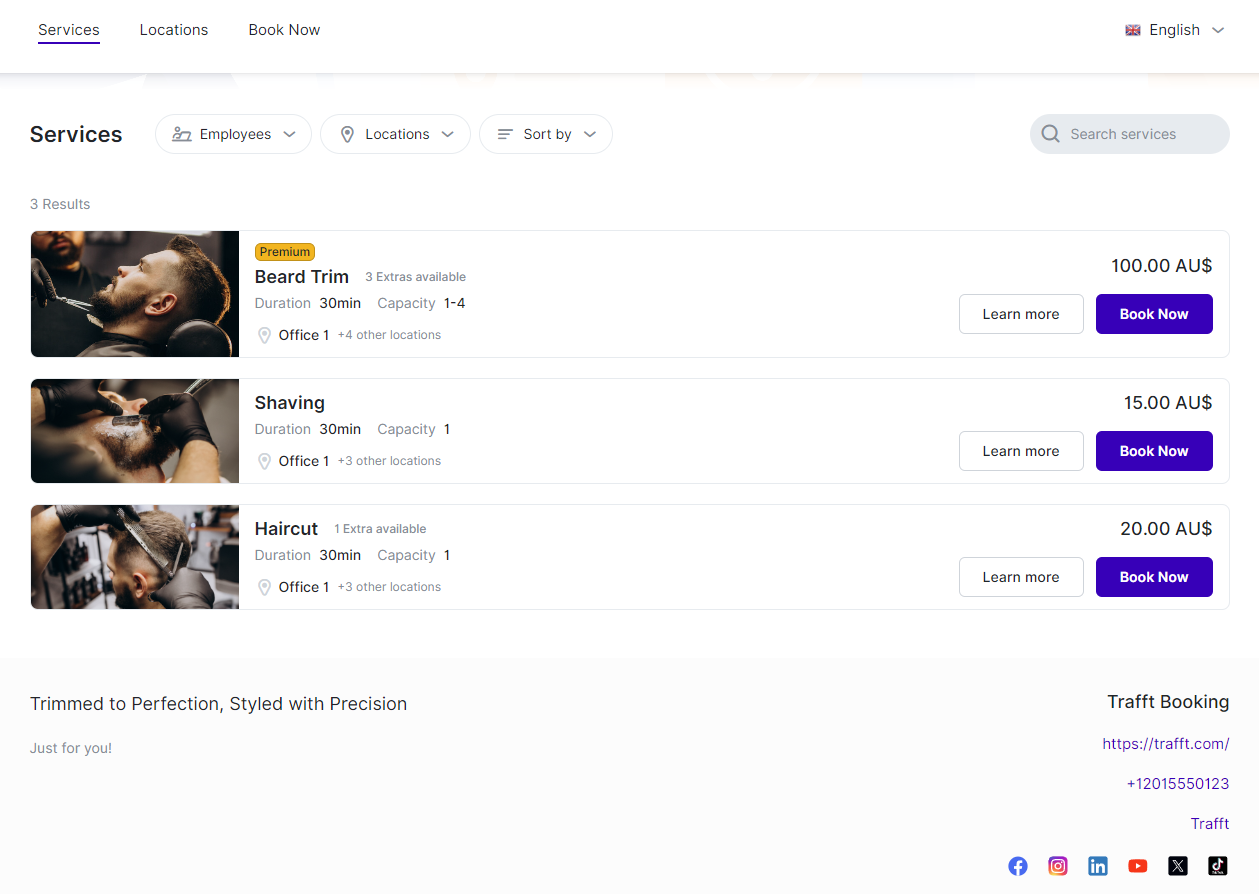
When you first open the Booking website, you’ll land on the Services page. Here, your customers can view all the services you offer, complete with images, names, badges, extras, durations, locations, prices, and capacities.
The duration displayed reflects only the service duration, excluding any additional extras. Prices shown encompass the service price along with any individual prices assigned to employees. If these prices vary, the display will indicate “From X,” featuring the lowest defined price. For more details, customers can explore the “Learn More” section, where they’ll find service descriptions and a list of extras available for selection during booking. This comprehensive information ensures customers are well-informed before finalizing their bookings.
Furthermore, customers can conveniently filter the booking website by categories, employees, and locations, and even sort results by price (lowest and highest), popularity, or name (ascending and descending). Additionally, a search bar is provided for quick service searches.
The footer of the website will display the information you chose to show in the Customize/Layout Settings/Footer Section.
Learn More
Here’s how the “Learn More” page appears on the Booking Website, featuring the service’s name, duration, location, extras, employees, and a detailed description of the service. If online payment is available, icons of the payment provider(s) will be displayed beneath the “Book Now” button.
When multiple locations are available, this button will be clickable. Clicking it will reveal all the locations where the service is provided.
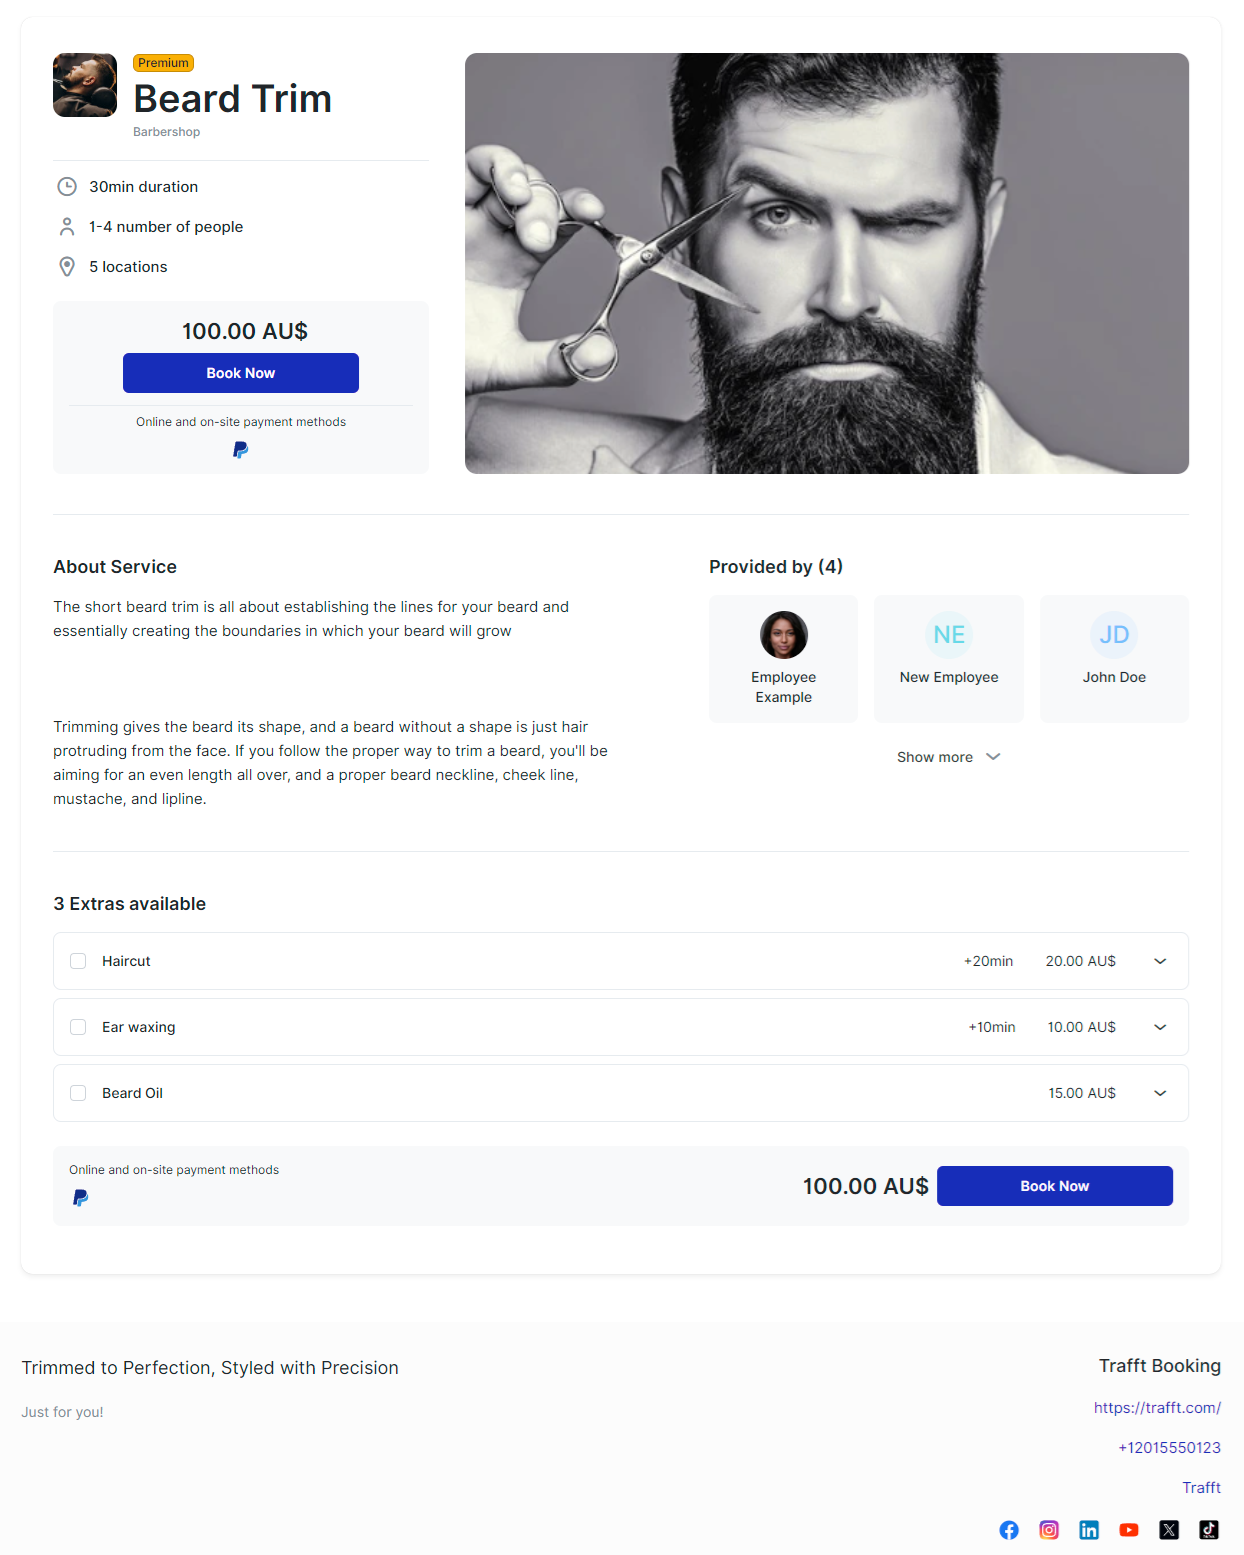
The footer of the page will display the information you choose to display. You have the option to choose between 2 or 3 columns for your footer layout. To make this adjustment, and to define the information that will be shown, navigate to the “Footer Section” in the admin section’s Customize page.
Booking an Appointment
When your customers visit your booking website, they have two convenient options to book an appointment:
- “Book Now” from Top Navigation: Customers can click the “Book Now” button in the top navigation menu. If you have multiple categories, they will first select a category and then the specific service they wish to book. The number of available services will be displayed in each category. Once a category is selected, the “Choose” button will become active next to each service. A simple click on the “Choose” button will initiate the booking process for the selected service.
- “Book Now” Next to Service: Alternatively, customers can click the “Book Now” button next to a specific service on the Booking Website‘s landing page. This will immediately start the booking process for that service. Trafft’s booking form will then follow the flow you have configured in the Customize > Look and Feel > Layout Settings section.
These options provide flexibility for your customers to easily navigate and book the services they desire on your booking website.
The following steps in the booking process may vary depending on your setup. If there are Extras added to your services, they will be offered first. Customers will see the durations, prices, and descriptions of these Extras, allowing them to make informed choices about additional services they may wish to include with their booking.
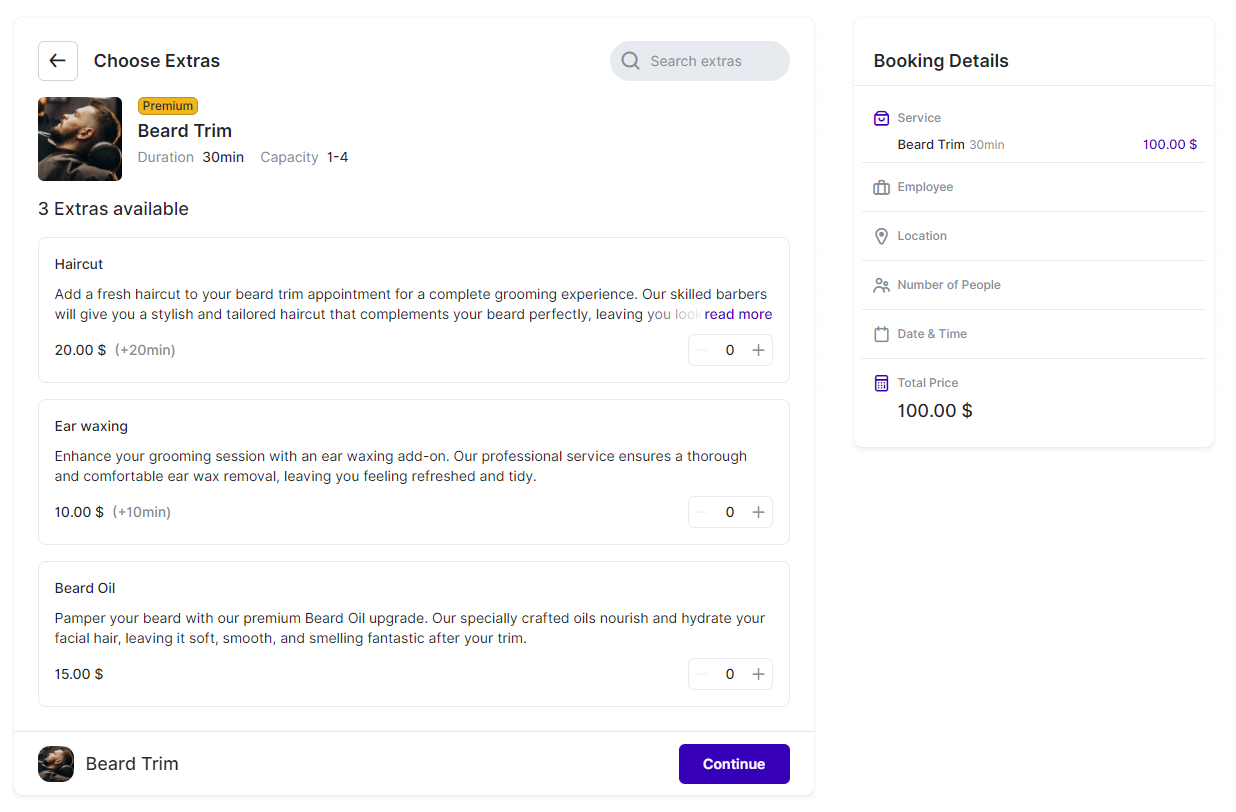
If a customer adds an Extra (you define the quantity they can select), the price and duration of the appointment will automatically adjust in the right-hand menu. This ensures that customers are informed about the updated price and duration before proceeding. Clicking on the “Continue” button will then take your customers to the next step, which may vary based on your setup.
By default, customers will have the option to choose the employee, unless you have disabled this feature in the Customize section. This allows customers to select their preferred service provider if multiple employees are available for the chosen service.
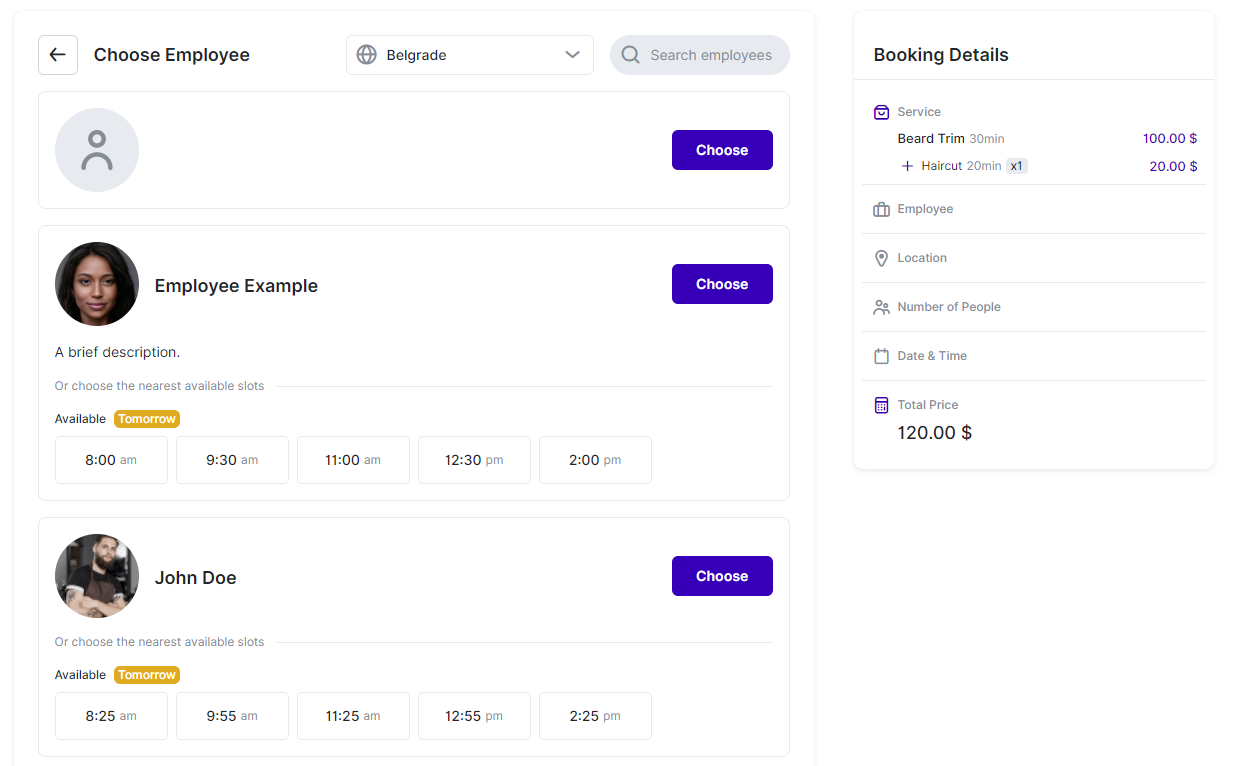
Below each employee, customers will see the employee’s description (if added), along with the nearest available time slots. This is designed to save time for customers, providing convenient options if the proposed nearest slots fit their schedule. If customers need more options or the proposed nearest slots don’t suit their needs, they can click on “Choose” next to each employee to select their preferred employee and proceed to the next step.
By default, the next step is selecting the location where the chosen employee provides the selected service. This assumes you have multiple locations configured in the employee’s Working Hours settings.
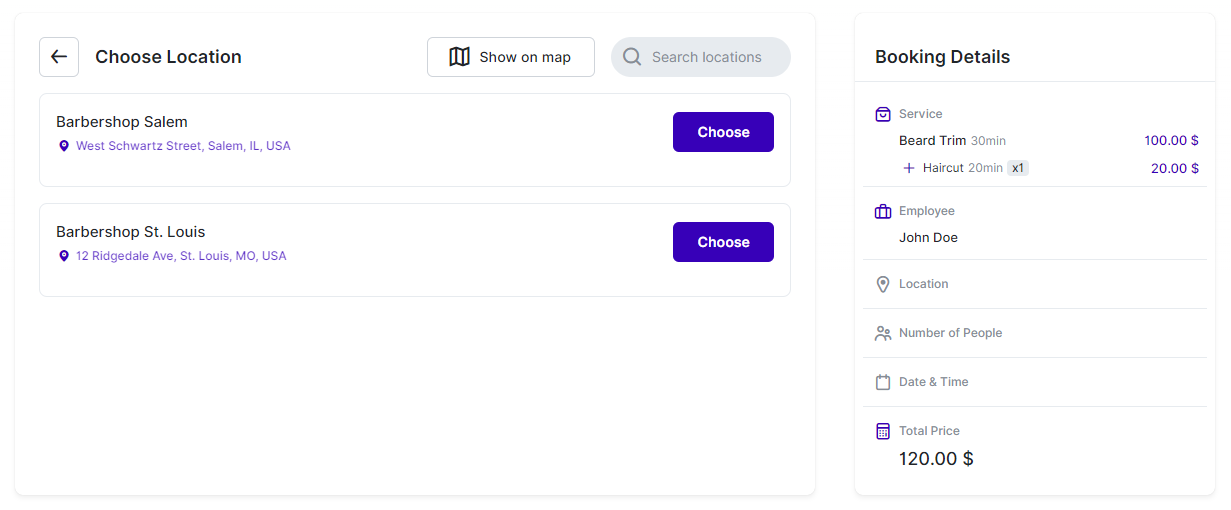
If you have multiple physical locations, you can define their addresses in the “Locations” section within the back-end. Google Maps integration is available to assist you in selecting the correct location. Once these locations are configured, customers visiting your booking website will be able to select their preferred location for their appointment. Clicking on “Choose” allows customers to select the location and proceed to the next step in the booking process.
In this scenario, the next step in the booking process involves selecting the number of participants if the service is configured as a Group Service. Customers have the option to choose whether they are booking an appointment only for themselves (“Just me”) or if they are bringing additional participants by clicking on “Choose a number of people.” Here, they can select the number of participants they are booking for, with the maximum capacity being set by the service and employee. Once this capacity is reached, the “+” button for adding more people will become disabled. The minimum number available for selection will also be displayed in the field.
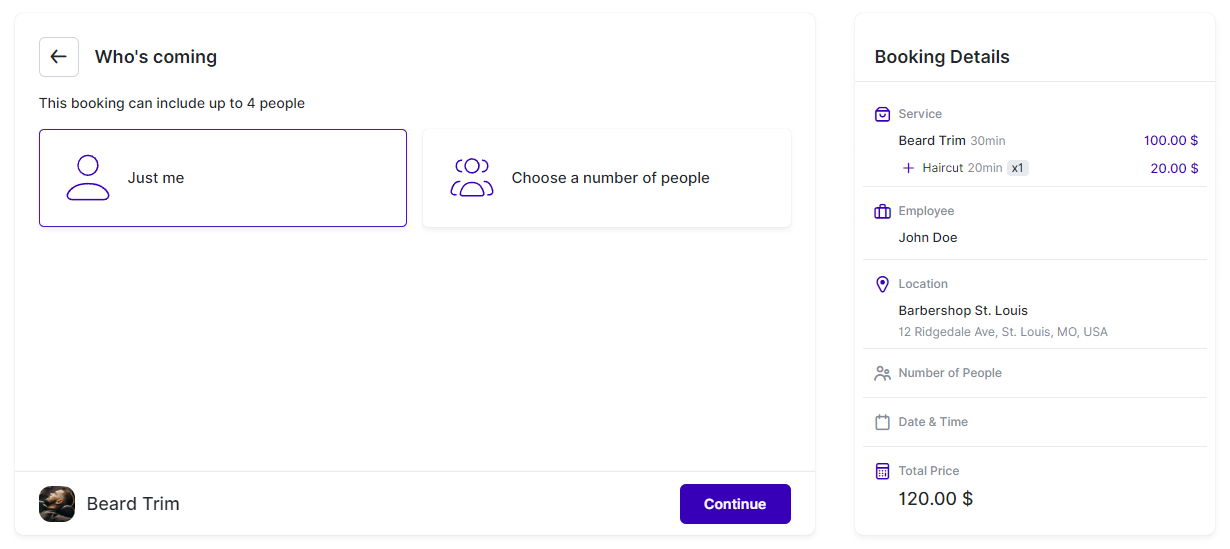
Once the customer selects the number of participants, they can click on the “Continue” button to proceed to the next step.
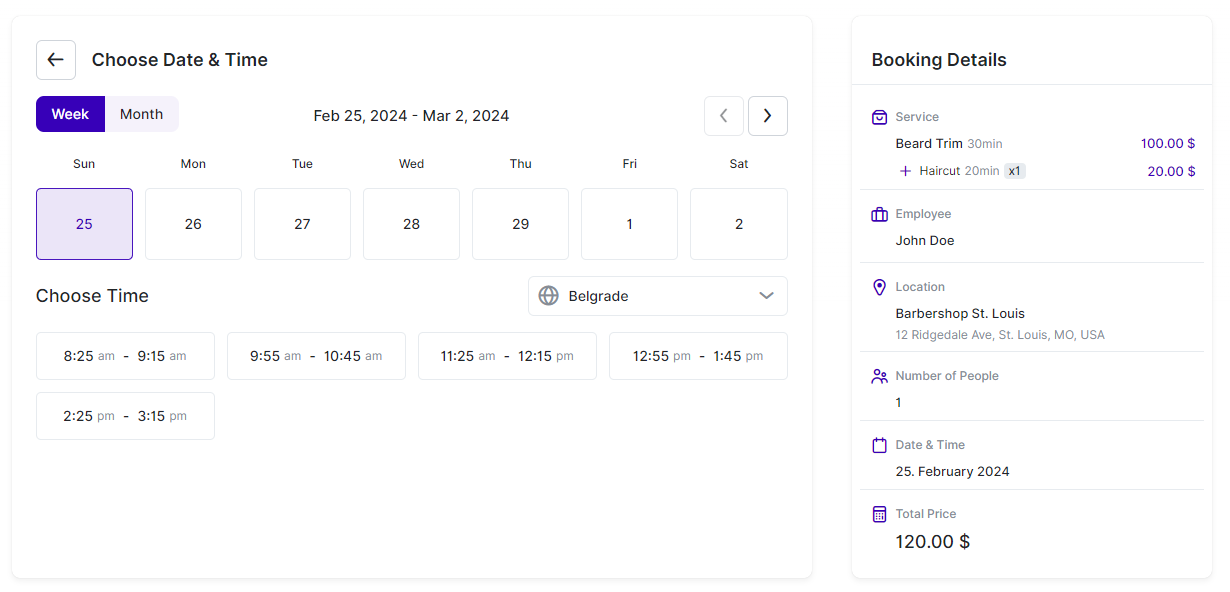
In this example, it’s the Date & Time selection. By default, the first available week when the selected employee is available is shown, and below it, the available times for the selected date are displayed. Your customers can cycle through weeks by using the < and > arrows for navigation above the dates. Additionally, they can switch to the Monthly view if they need to select a date further in the future.
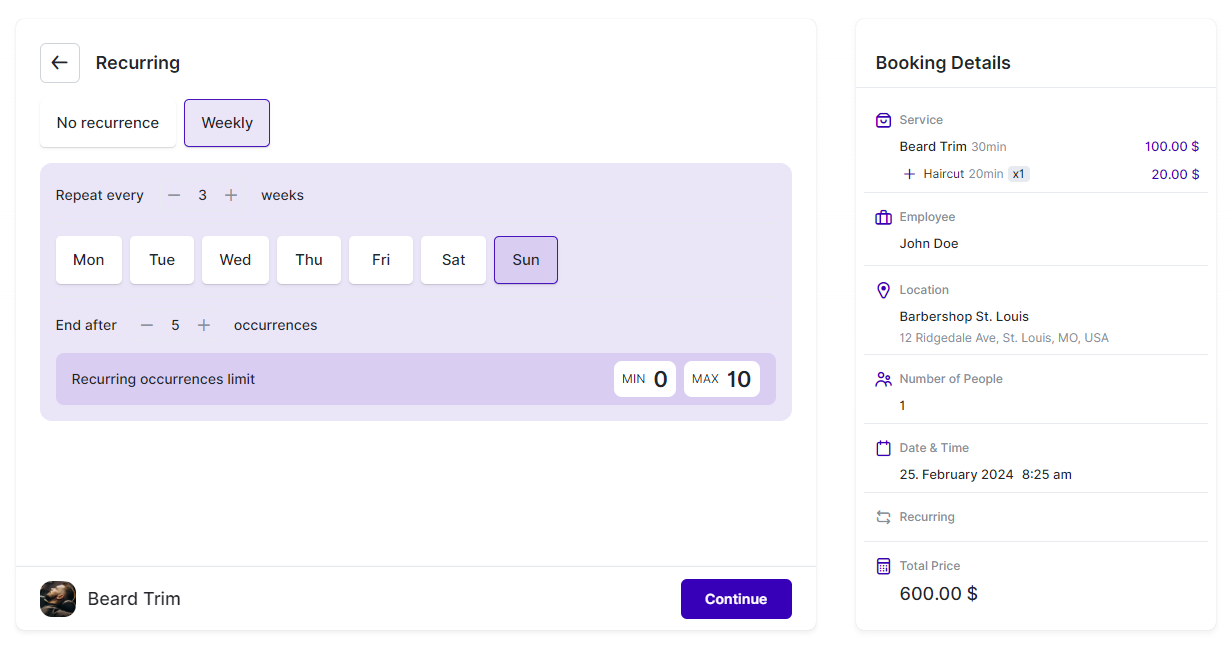
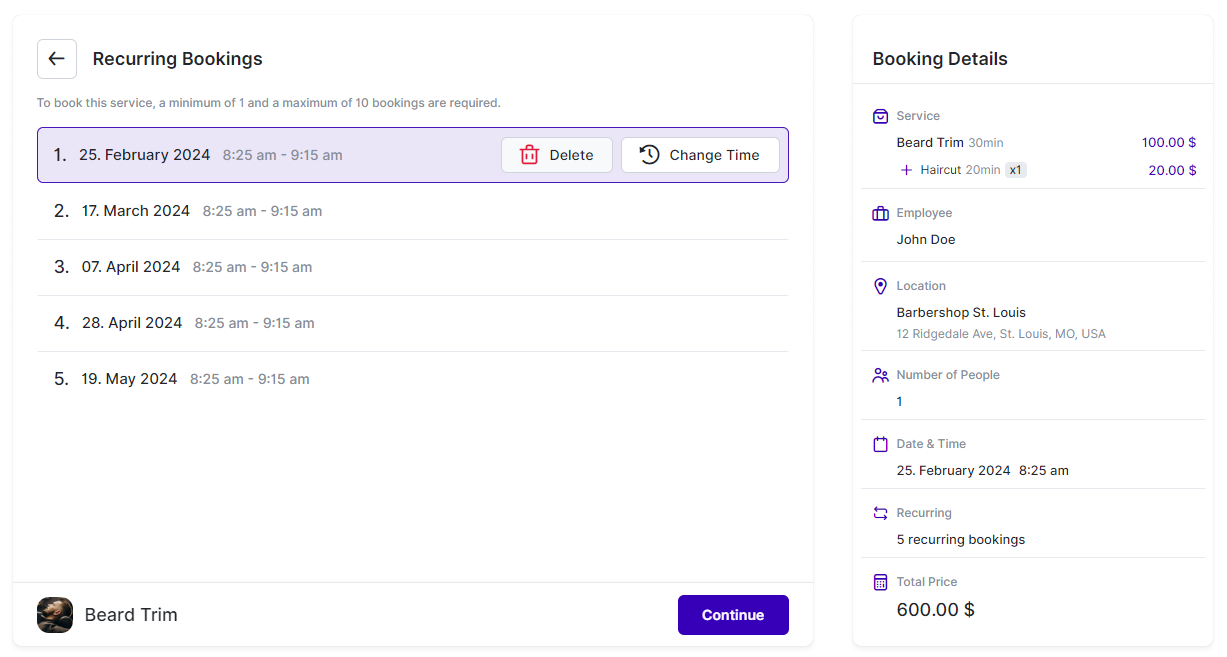
Once the customer clicks on a time slot, it will automatically be selected, and the form will proceed to the next step. If you have configured the Recurring Appointments feature, this will be the next step in the process. This feature allows customers to set up regular appointments with ease. You can define how many appointments the customer can book in a recurring cycle, how they will recur (daily, weekly, or monthly), and in what intervals (once a week, once every 3 weeks, once every 2 months, etc).
Clicking on “Continue” provides customers with a list of all their appointments, including the first one and all the following recurring appointments. If any time slots are already filled by other appointments or if the exact date of a recurring appointment is blocked by a linked Calendar or Day Off setting, Trafft will automatically move the appointment to another available time or date based on your configuration in the Service Settings for Recurring Appointments.
They also have the ability to delete appointments or change their date/time by hovering over each offered time slot.
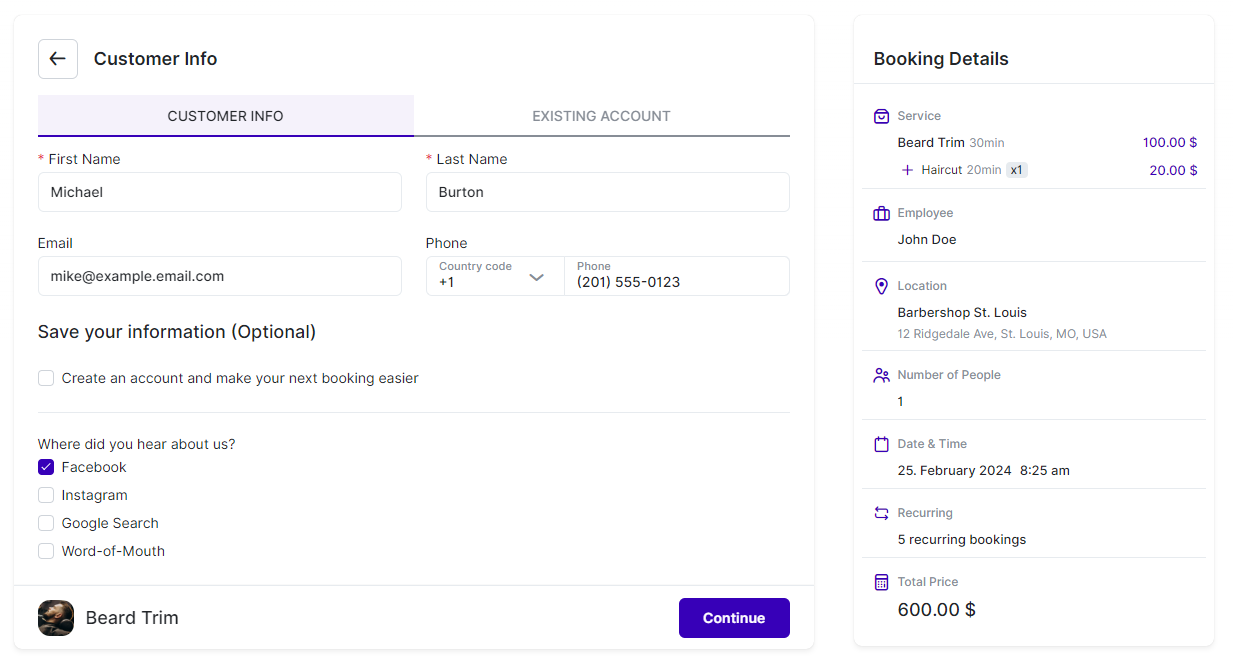
The next step is the “Customer Info” step, where customers enter their details such as First Name, Last Name, Email, and Phone Number. The First and Last Name fields are mandatory, while Email and Phone Number can be optional or hidden based on your settings in the Customize section. If you’ve added Custom Fields to your services, they will also appear below the customer’s basic details. Additionally, if you allow both Guest and Registered customers to book, there will be an option to automatically create an account displayed below the customer’s information. You’ll notice two tabs at the top of the Booking Form – “Customer Info” (the current step) and “Existing Account” where existing customers can log in to proceed with their booking as registered users.
Once all the necessary details are filled in, customers can proceed by clicking “Continue” to move to the next step in the booking process.
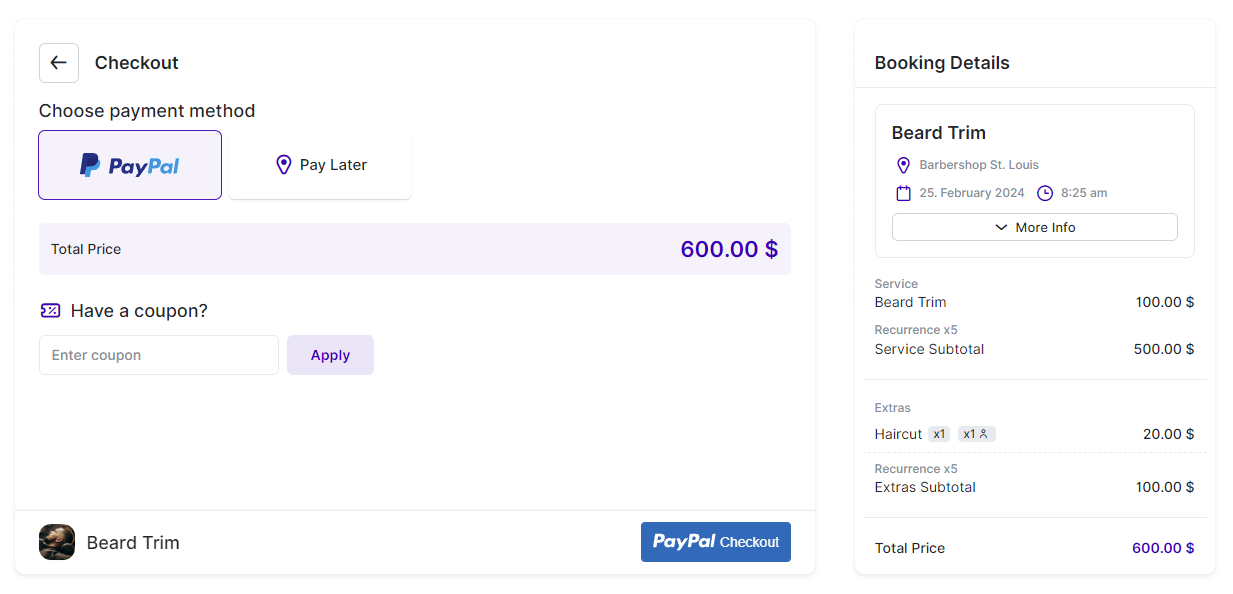
If your setup includes only “On-Site” payments, meaning you haven’t configured any Online Payment methods, this will be the final step and the “Continue” button will be replaced with “Book Now.” However, in this example, there are multiple payment options available, so the next (and final) step in the booking form is the “Checkout” step.
In the “Checkout” step, the payment methods you’ve defined for this service in the Service Settings will be presented to the customer. They can then choose their preferred method of payment from the options available.
If the “Coupons” feature has been enabled in the Features & Integrations section, and if a coupon has been set up for the service being booked, the “Coupon” field will also be displayed. Customers can use this field to apply any discounts you’ve configured in the Finance section.
Additionally, on the right-hand side of the menu, customers can review their booking details – including the selected service, date, time, location, information about recurrences (if applicable), any added Extras, and more. This allows customers to ensure all details are correct before finalizing their booking by clicking “Book Now.”
The final screen in the booking process is what we refer to as the “Congratulations” screen. Here, customers will see either the default “Thank You” image, along with the default heading and description, or any custom image, heading, and description you’ve set up in the Customize section. Customers also have the option to select Google, Outlook, Yahoo, or iCal Calendar to add the appointment directly to their personal calendar.
This calendar integration is particularly useful if you don’t have Google, Outlook, or Apple Calendar integration configured, as it allows customers to easily add the appointment to their calendar. However, please note that not all information will be populated in these calendars. The event will be added with details such as the Service title, date, time, and location. Additional information about extras, custom fields, and so on will not be included.
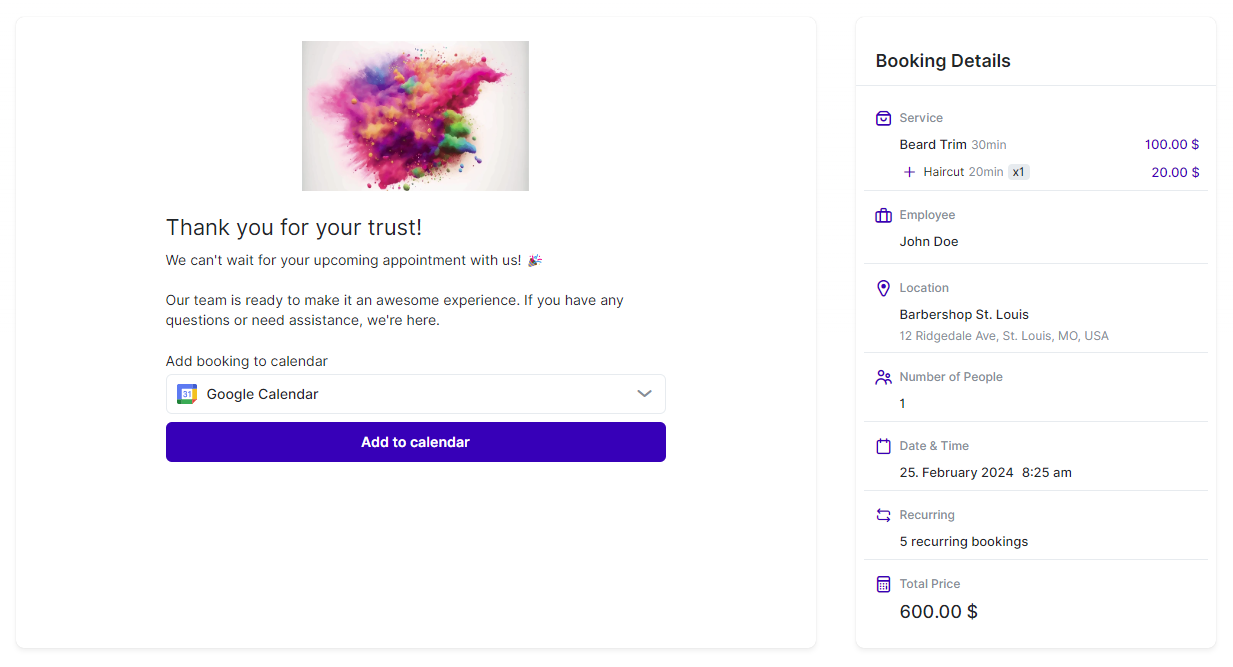
If you have set up email notifications, once the customer reaches the “Thank You” page, notifications will be automatically sent to both the customer and the employee. These notifications will include all the relevant appointment details, which are added through the use of placeholders in your email templates. This ensures that both parties receive all the necessary information about the booked appointment.
Have more questions?
If you face an issue, and cannot find an answer in the documentation, feel free to submit a support ticket!