


 Agency (White Label)Getting Started
 Configuring TrafftBooking WebsiteCustom FeaturesIntegrationsAdmin Views
Employees are the individuals who deliver services within your company. Depending on your chosen license plan, you may be a solopreneur where you are the sole employee, or you can have a certain number of employees. As an admin, you can easily set their unique schedules and monitor their business activities.
If you are the sole service provider, there’s no need to worry. Your admin details were used during the onboarding process to create the first employee. However, it’s important to ensure that this employee is connected to at least one service. If you didn’t set this up during onboarding, you can continue reading to learn how to do it.
Video Version
Creating Employees
To add a new employee, go to the Employees page by clicking the icon in the sidebar. Then, click on the “+ Add Employee” button to open the employee details page.
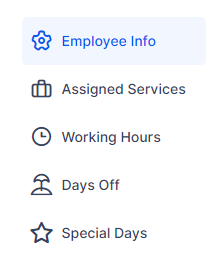
As a new user, you’ll see five tabs with options to configure. Keep in mind that the “Special Days” tab is a Custom Feature, which needs to be enabled in the Features & Integrations section to use.
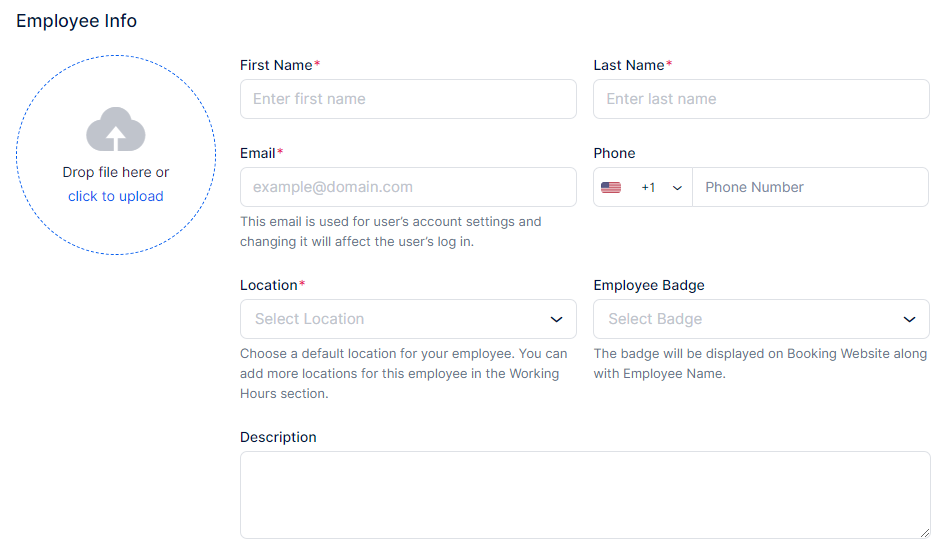
Employee Info
When creating a new employee profile, it’s important to start by configuring the employee’s basic information:
- Profile Image: Upload an image to help identify the employee in the Calendar, Employees, and Appointments pages. This provides customers with a visual during their booking process, making it easier to recognize the employee.
- First Name: This field is mandatory and must be filled out.
- Last Name: Also mandatory, ensure this field is completed for accurate identification.
- Email: The email address is used to register the employee as a user in Trafft. It is mandatory and serves as the primary contact for notifications and login purposes. Each email must be unique across all users.
- Phone: The default country flag is set in General Settings, but you can adjust it here for individual employees if needed.
- Location: Note that this field will not be visible until at least one location is created in the Locations section of Trafft. While an employee can cover different locations during Working Hours, selecting a Default Location is mandatory, especially if you have multiple business locations.
- Employee Badge: Trafft provides 3 default badges (Best Value, Most Popular, and Premium) which can be edited or changed. Additionally, you can create new badges to promote an employee’s services on the booking website.
- Time Zone: The default Time Zone is configured in Trafft’s General Settings. However, since you may have employees from various regions, you can set the time zone per employee. This ensures that when the employee logs into their account, they will see appointments in their local time zone. As an admin, you will view appointments in your time zone, facilitating scheduling and management.
- Description: Use this field to provide a brief but informative description of the employee. Including details such as their experience, working style, and specialties helps customers choose the right employee for their specific needs and preferences. This personal touch enhances the customer’s booking experience and builds trust in the services offered.
Assigned Services
In the “Assigned Services” tab, you can manage which Categories and Services the employee will provide by enabling or disabling them. Once services are assigned to the employee, you can configure different prices for those services specific to that employee, as well as set different minimum and maximum capacities.
This feature allows you to tailor employees’ offerings, pricing, and capacities to suit their specialties. Should you decide to adjust the default service price and capacity, it’s a straightforward process. When updating the prices or capacities for an employee, Trafft will prompt you to decide whether the changes should apply to all employees or just the specific ones. This flexibility is especially useful for managing large teams with unique pricing or capacities.
On the Booking Website, services with different prices will be marked with “From” next to the lowest available price, while the “Choose Employee” step will show “+” or “-” followed by the price increase/decrease within parenthesis, ensuring transparency for customers when selecting both the service and employee.

Working Hours
This section enables you to configure your employee’s working schedule, which can be a fixed schedule throughout the week or one that varies based on services and/or locations.
By default, the working hours set during the onboarding process will mirror the Office Hours and apply to all Assigned Services and the Default Location. However, you have the flexibility to make adjustments as needed.
At the top of this page, you can also set limits on the number of appointments the employee can have per day, week, or month. These limits will override the available time slots in the employee’s schedule.
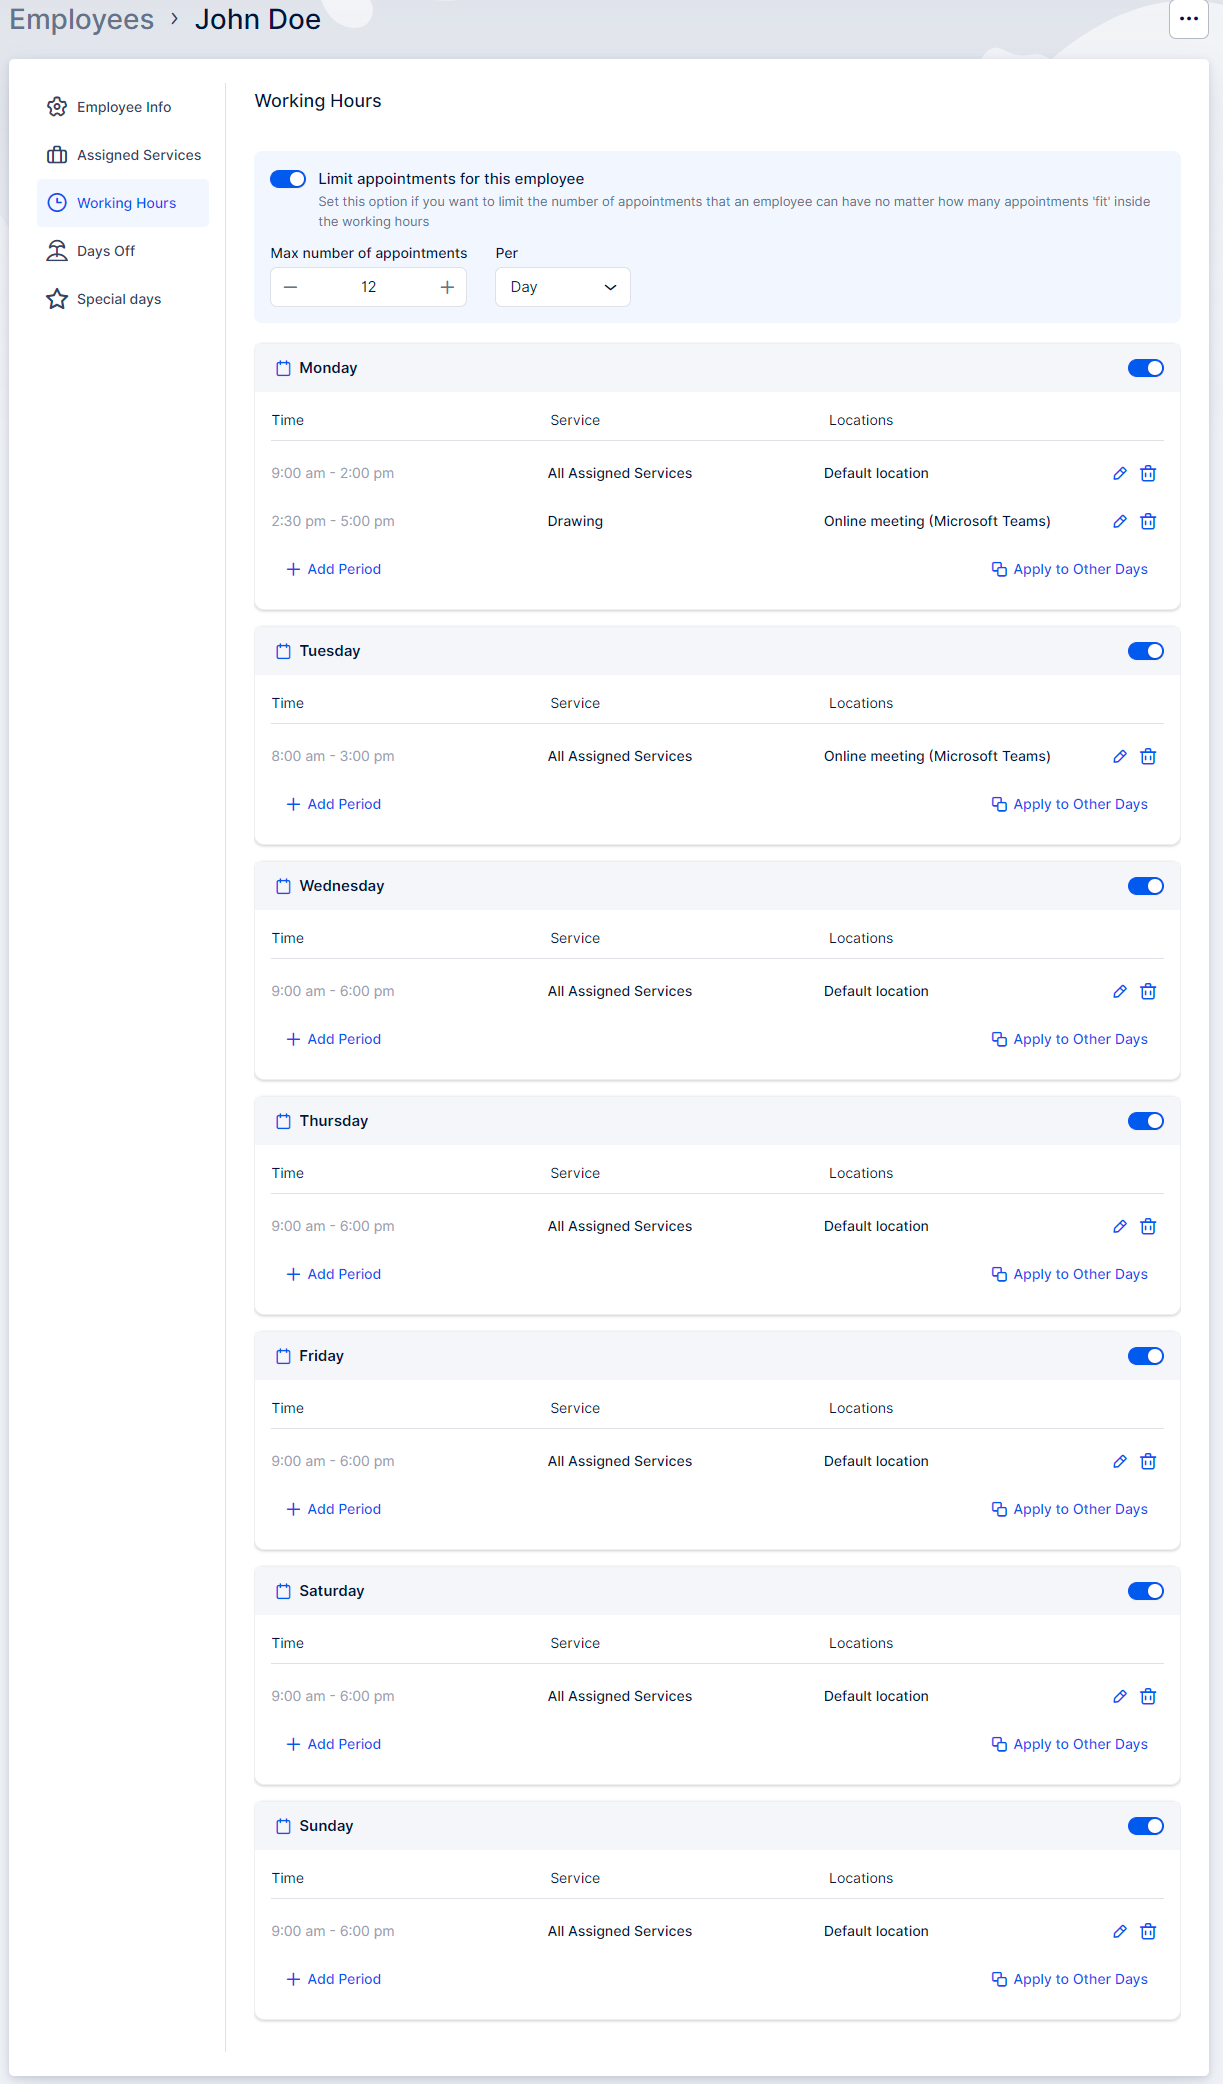
The “Apply to Other Days” feature, located in the bottom right corner of each daily schedule, allows you to efficiently replicate working periods from a single day to multiple days. Clicking this option opens a popup where you can choose to apply the configured working hours to all days or select specific custom days.
Break Periods:
Currently, there’s no direct method to configure break periods within the Working Hours interface. However, you can simulate breaks by creating multiple working periods. The time between these periods will be considered as break time, during which the employee will not be available for appointments.
For example:
- If you create two working periods: 09:00 – 11:00 and 12:00 – 15:00,
- The time between these two periods (11:00 – 12:00) will act as a break period for the employee.
Days Off
The “Days Off” section is where you can easily manage your employees’ time off, whether it’s for vacations, holidays, or sick days.
To add a Day Off or a range of days:
- Click on the “+ Add Day Off” button in the top right corner.
- This opens a popup where you can:
- Name the Day Off.
- Select a single day by double-clicking the date.
- Select a range of dates by clicking on the start and end dates.
- Choose whether this day will be repeated annually (like Christmas) or a one-time event (like a vacation).
This feature helps you keep track of your employees’ time off and ensures their schedules accurately reflect their availability.
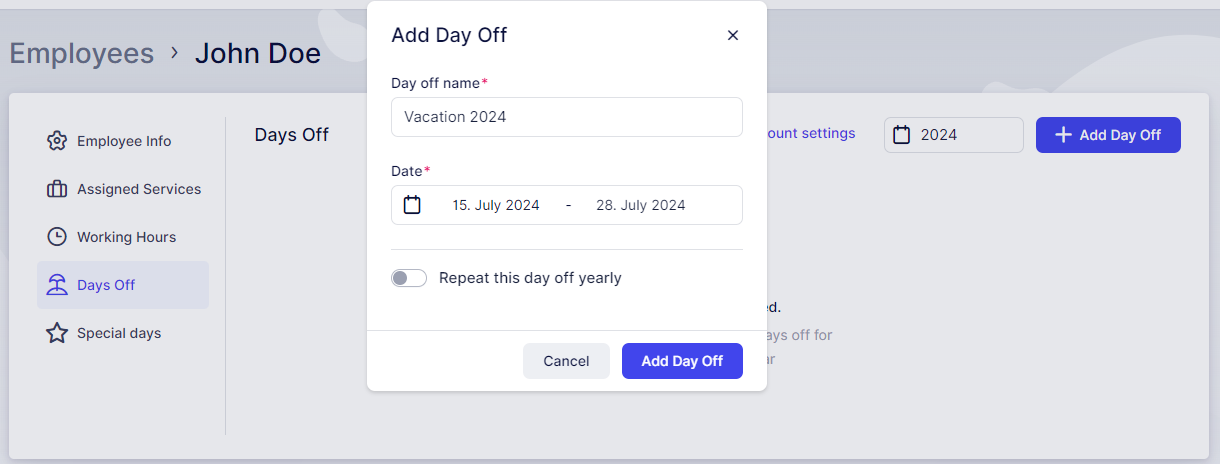
Once you click on “Add Day Off”, you’ll see a popup at the bottom of the screen, where you’ll need to Save Changes.

Special Days
Sometimes employees have unique events or appointments that affect their regular working hours. This is where “Special Days” come in.
To handle these situations:
- Click on the “+ Add Special Day” button in the top right corner.
- A popup will appear where you can:
- Select a single day or a range of dates.
- Adjust the time periods for these special days.
- Ensure the time periods cover the employee’s absence or altered schedule.
For instance, if an employee has a doctor’s appointment on August 2nd from 10:00 – 12:00, create a Special Day for that date with time periods that accommodate the absence. This feature ensures your schedules remain accurate even during special circumstances.
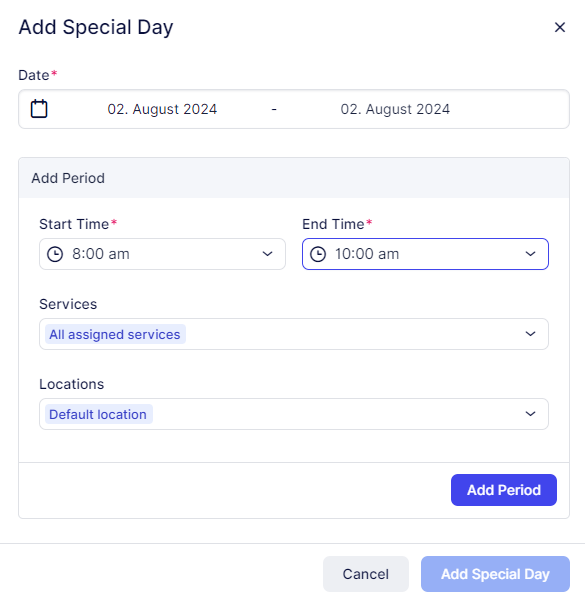
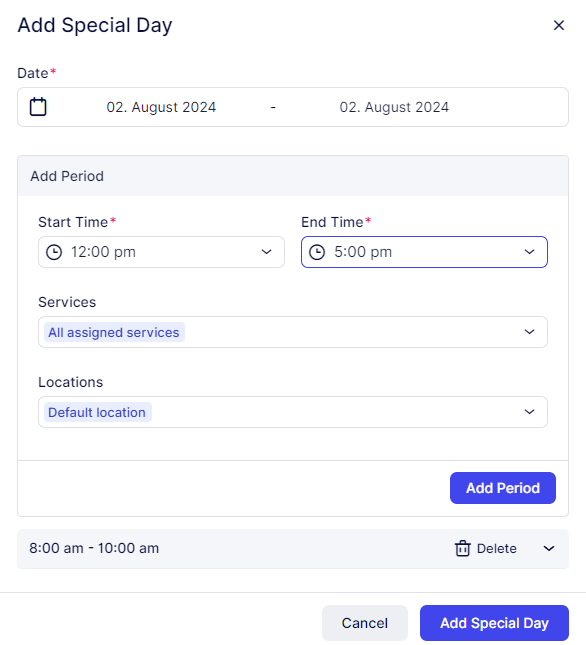
Click on Add Period in order to add this period to the Special Day. You’ll notice that this period has been minimized in the popup. Clicking it will allow you to edit it.
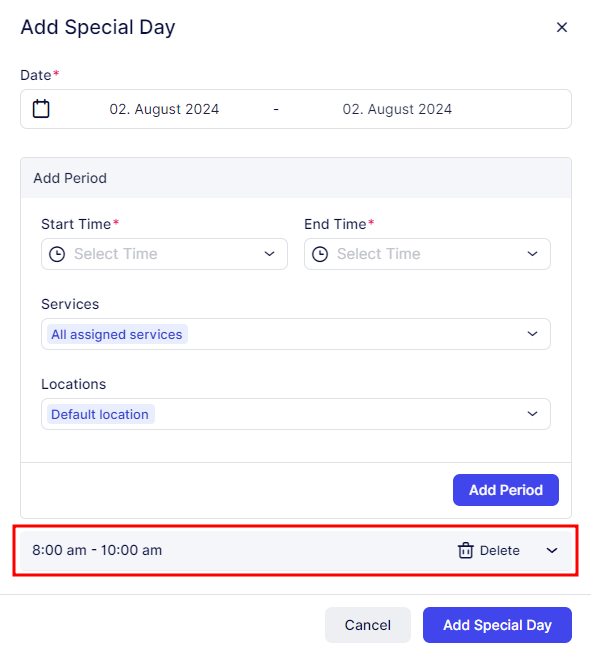
After adding the first period, such as 08:00 – 10:00, proceed to add the next period, like 12:00 – 17:00. Click on “Add Period” again if there are additional time slots needed. Once all the necessary periods are added, click on “Add Special Day” to save the entire schedule. It’s crucial to remember to click “Add Period” for each new time slot; otherwise, the Special Day will be saved with only the first period included
After clicking “Add Special Day,” a popup will appear at the bottom of the screen. Here, you’ll need to click “Save Changes” to ensure that the Special Day is saved with all the configured time slots and details.
Working with employee list and tracking their business
On the Employees page, you’ll find a comprehensive list of all your employees along with their essential details such as photos, names, emails, and phones. If you have numerous employees spread across multiple pages, you can efficiently search for employees by name or utilize the Filters option to search by Services or Locations they are assigned to.
To manage your employees, you have a few options:
- Bulk Delete: Select multiple employees using the checkboxes next to their names and use the “Delete” option at the top of the page.
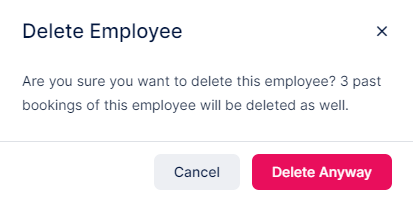
- Individual Deletion: You can also delete employees one by one by selecting the checkbox next to their name or by clicking on the three-dots menu on the right side of the employee bar and choosing the “Delete Employee” option.
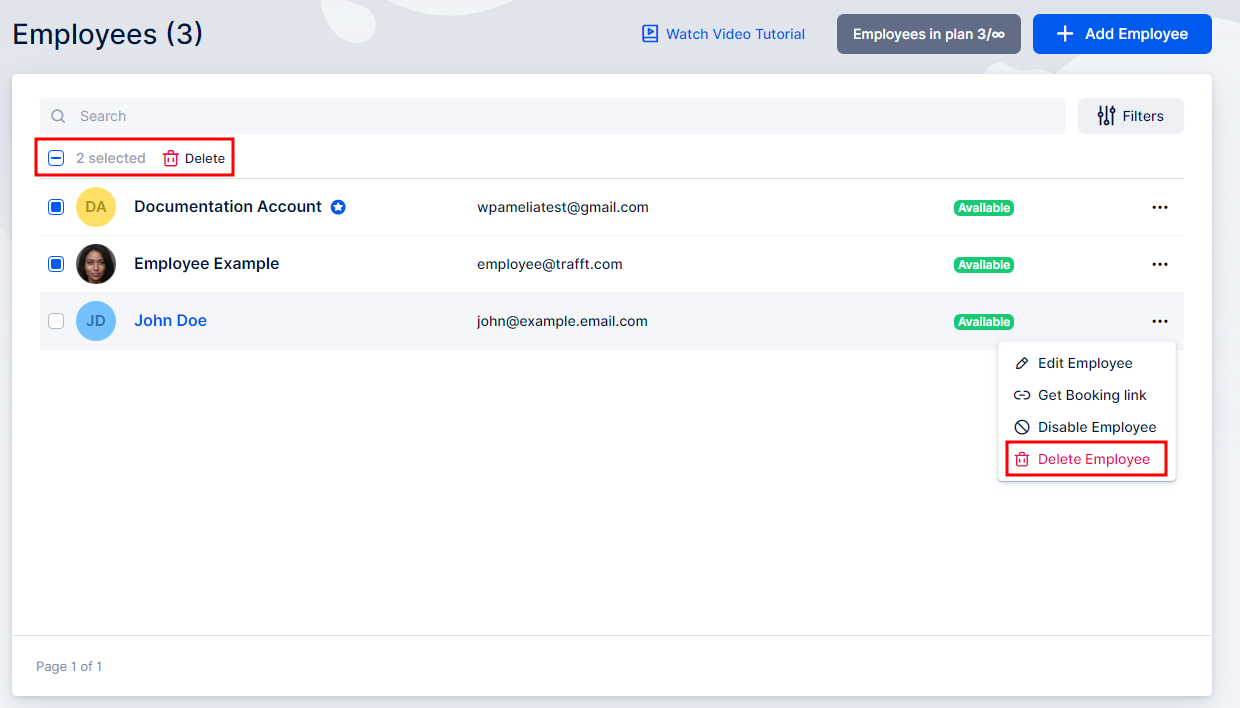
The three-dots menu (…) also allows you to “Edit” an employee and change the employee’s info, assigned services, or working hours.
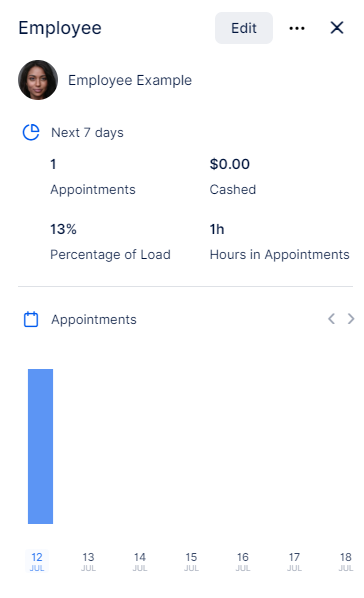
As for tracking employees’ performances, this can be done by simply clicking on one employee from the list. Once you click on the employee, the sidebar with additional info will open and show:
- Employee’s picture,
- First and last name,
- Working hours,
- Employee’s business for the next 7 days including:
- Number of appointments,
- Cashed (earned money, counting only paid appointments)
- Percentage of load (counting the number of booked hours compared to the total number of available hours set in working hours)
- Hours in appointment (number of booked hours)
- The three-dots menu (…) from where you can generate a Booking Link, Edit, or Delete the currently selected employee.
Have more questions?
If you face an issue, and cannot find an answer in the documentation, feel free to submit a support ticket!