


 Agency (White Label)Getting StartedConfiguring TrafftBooking WebsiteCustom FeaturesIntegrations
 Admin Views
Appointments are at the heart of Trafft, making scheduling easier and more efficient for you. With Trafft, you’ll experience fewer phone calls, allowing you to easily track and manage your entire appointment list.
Creating Appointments
Trafft focuses on simplifying the booking process for you and your team. Its primary feature is front-end booking, where customers can easily visit your booking website, select their desired service, and make an appointment.
In cases where you need to create an appointment on behalf of a customer, you can do so through the admin section. This can be accessed via either the “Appointments” or “Calendar” page. Clicking the “+ Add Appointment” button in the top-right corner will open a popup with a simplified booking form. Here, you will need to select the Service, Employee, date, time, location (if multiple locations are configured), and Customer.
Additionally, this popup allows you to choose whether you want to send an email notification to the customer or not. The notification sent (“Appointment Approved” or “Appointment Pending”) will be based on the default status configured in the General Settings.

Depending on your configuration, some services may have the Group Booking feature enabled. This feature allows you to select multiple customers for a single appointment, as illustrated in the screenshot above.
The back-end booking form provides additional options beyond the front-end booking. Here, you can add Extras, fill out custom fields, apply discount coupons, and enable Recurring Appointments if this feature is enabled for the chosen service.
While on the initial simplified popup form, you can access these additional options by clicking the “More Options” button. In this extended form, along with the previously mentioned booking details and options, you’ll see an overview of the appointment, including:
- Service Name
- Service Duration
- Service Price
- Assigned Employee
- Date & Time
- Location
- Customers
- Pricing
Clicking the “+ New Customer” button within the form will open another popup window, allowing you to create a new customer profile during the booking process.
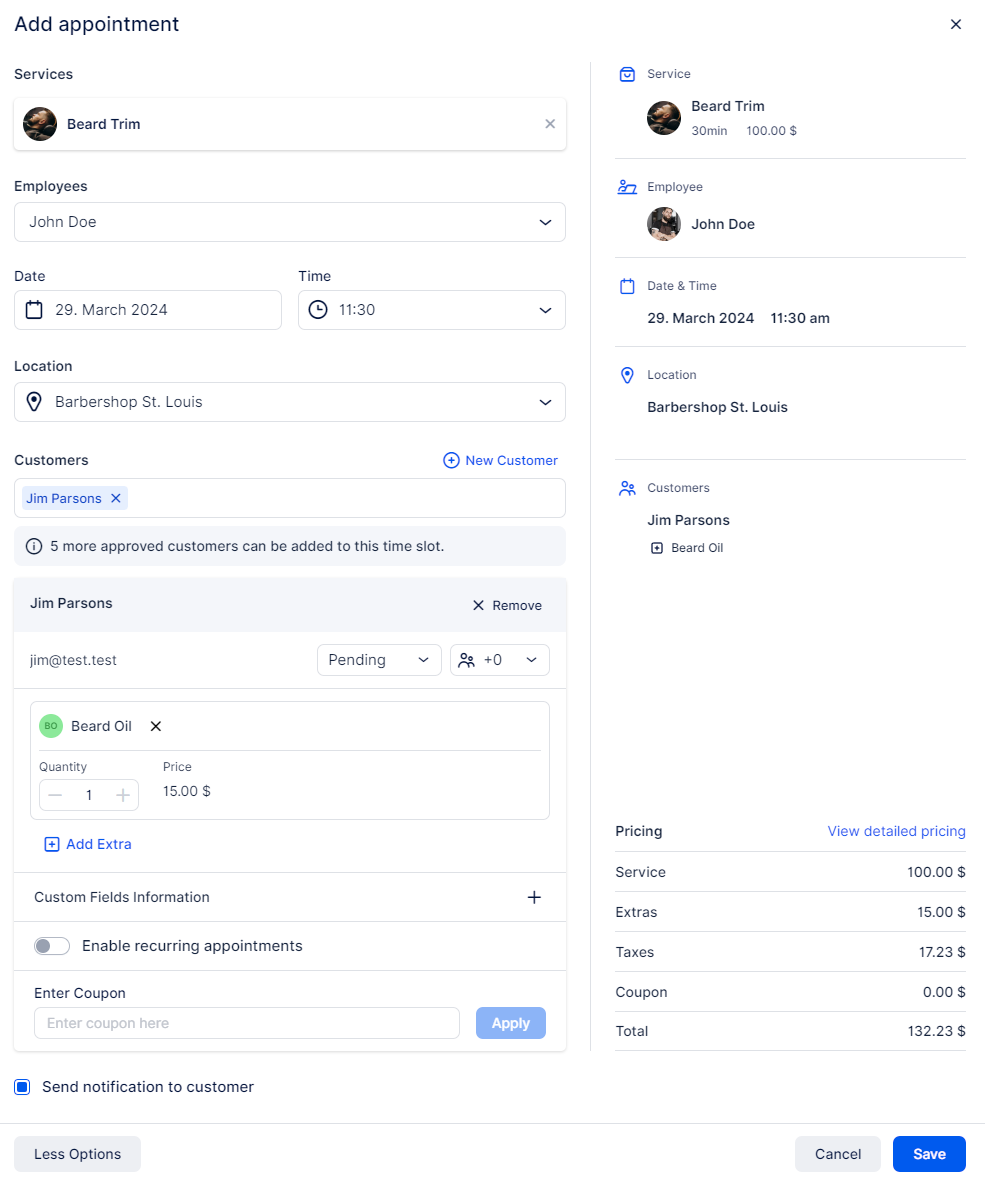
Once you have selected all the options for the appointment, simply click “Save” in the bottom right corner. The appointment(s) will then be saved and displayed in both the “Appointments” and “Calendar” sections.
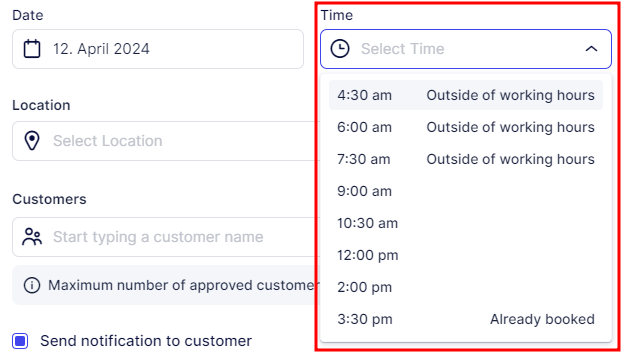
Booking Outside of Working Hours and Over Existing Appointments
By default, all users can only book appointments during the working hours of the selected employee. However, there is a way to adjust this logic for Admins, Superadmins, and any Custom Roles you create.
To modify these settings:
- Navigate to Settings -> Users & Roles -> Roles.
- Click on the three-dots menu next to the role you wish to edit.
- Select Edit.
- In the Role Settings screen, scroll down and locate the following options:
- “Allow bookings outside working hours”
- “Allow overlapping appointments”
- Enable one or both of these options as needed.

The options are relatively self-explanatory, but here is a brief overview:
- The first slider allows you to book appointments throughout the day, disregarding the employee’s working hours.
- The second slider allows you to book overlapping appointments through the back-end booking form.
During the creation of an appointment through the back end, the “Time” dropdown will display notifications next to time slots that are already booked or outside of the employee’s working hours.
Working With the Appointments List
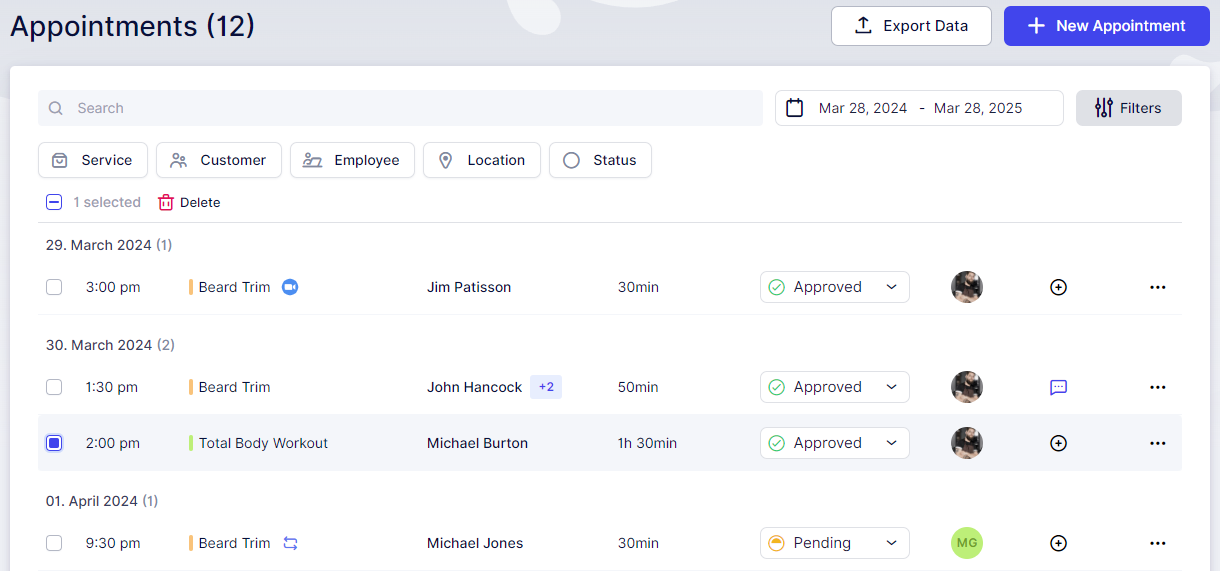
The Appointments List page displays all appointments booked for the upcoming year by default. However, you can adjust the dates you’re viewing by changing the date range filter. To view all appointments ever booked, simply click on the “X” that appears when you hover over the right part of the date range filter.
Features on the Appointments List Page:
- Search Field: You can search for Service Name, Customer Name, and Employee using the search field.
- Filters Button: This button allows you to filter appointments by Service, Customer, Employee, Location, and Status.
Columns in the Appointments List:
- Time: The scheduled time of the appointment.
- Service: The service for which the appointment is booked. If the appointment is booked as an Online appointment (Zoom, Google Meet, or Microsoft Teams), there will be an icon of the selected integration next to the service name. Also, if the appointment is recurring, it will have the corresponding icon next to the service name.
- Customers: The customers who booked the appointment.
- If the appointment is a Group Appointment, you’ll notice a “+X” next to the name of the customer who initially booked the appointment. Here, “X” represents the number of additional customers in the group.
- When a customer is allowed to select multiple people during the booking process, their name won’t display the “+X” next to it. Instead, you can see how many people they are bringing with them in the right-side menu that opens when you click on the appointment.
- Duration: This shows the duration of the appointment. If an Extra with a duration is selected, it will extend the appointment’s duration.
- Status: The interactive Status column lets you quickly change the status if needed.
- Employee: The employee assigned to the appointment.
- Note: Here, you can add new notes or view existing appointment notes.
Additional Appointment Management Options:
- Appointment Details: Just like on other pages within the Trafft booking system, you can view detailed information about an appointment by clicking on it. This action opens a sidebar where you’ll find:
- Appointment Status
- Service Name
- Appointment Start Time
- Assigned Employee
- Details of the Customer who booked the appointment
- Total Payment
- Option to view a detailed payment summary by clicking “View Detailed Pricing”
- Extras selected
- Custom Fields related to the service.
- “Three Dots” Menu: This menu provides several options to manage appointments:
- Edit Appointment: Modify the appointment details.
- Duplicate Appointment: Create a new appointment with the same information. The date and time will be cleared, allowing you to select a new one.
- View Activity Log: Displays a log of activities related to the appointment, such as who booked it, when it was booked, status changes, rejections, cancellations, or rescheduling.
- Export Data: This feature allows you to export appointments from the list. When you click “Export Data,” a popup appears where you can choose either a Coma or Semicolon delimiter for the CSV file. You can also select which columns to include in the export. Please note:
- Appointments will only be exported for the selected date range.
- If you need appointments for a different period, adjust the date range before exporting.
User Roles Able to Work With Appointments
The user roles that have access to the Appointments section are Admin, Superadmin, and Employee. Here’s a breakdown of their access levels:
- Admin and Superadmin:
- Can add, edit, and view all appointments in the list.
- Have full access to all features and appointments.
- Employee:
- Can add, edit, and view only the appointments that are assigned to them.
- Can see only the services they are assigned to.
- Can view the customers who booked with them in the past, but not the entire customer list.
Custom Role for Full Access:
- If you want to allow employees to see all appointments and customers, you would need to enable the “Custom Roles” feature.
- Create a new custom role with the following capabilities:
- View all appointments
- View all employees
- View all customers
- View all services
- View all locations
Customizing Roles:
- In the Roles section, you can enable or disable other capabilities as per your preferences.
- This allows you to tailor access levels to suit your organization’s needs.
Have more questions?
If you face an issue, and cannot find an answer in the documentation, feel free to submit a support ticket!