


 Agency (White Label)Getting StartedConfiguring TrafftBooking WebsiteCustom FeaturesIntegrations
 Admin Views
The Finance page is your hub for managing all things related to your finances, including Invoices, Transactions, Taxes, and Coupons. Here, you can easily track all payments made in relation to the appointments booked through Trafft.
Invoices
When you navigate to the “Finance” tab in Trafft’s admin section, you’ll be directed to the “Invoices” section. Invoices in Trafft are automatically generated for each appointment booked, regardless of whether it’s been paid for yet or not. If you’ve configured Recurring Appointments with payment set up for all appointments in the series, this will be consolidated into a single invoice.
In the invoice list, you’ll find details such as the invoice number, the customer’s full name, the invoice date (which corresponds to the booking date), the service provided, payment status, and the total amount due.
The Search field located above the invoice list enables you to search for invoices using their ID (Invoice number), customer name, and service name. Additionally, clicking on the “Filters” button next to the search field expands four filtering options. These filters allow you to narrow down your invoice search based on:
- Customer: Filter invoices by a specific customer or multiple customers.
- Employee: Filter invoices by a particular employee or multiple employees.
- Service: Filter invoices related to a specific service or multiple services.
- Invoice Status: Filter invoices by their payment statuses.
These search and filtering options provide you with the flexibility to quickly locate and manage invoices according to your specific criteria.
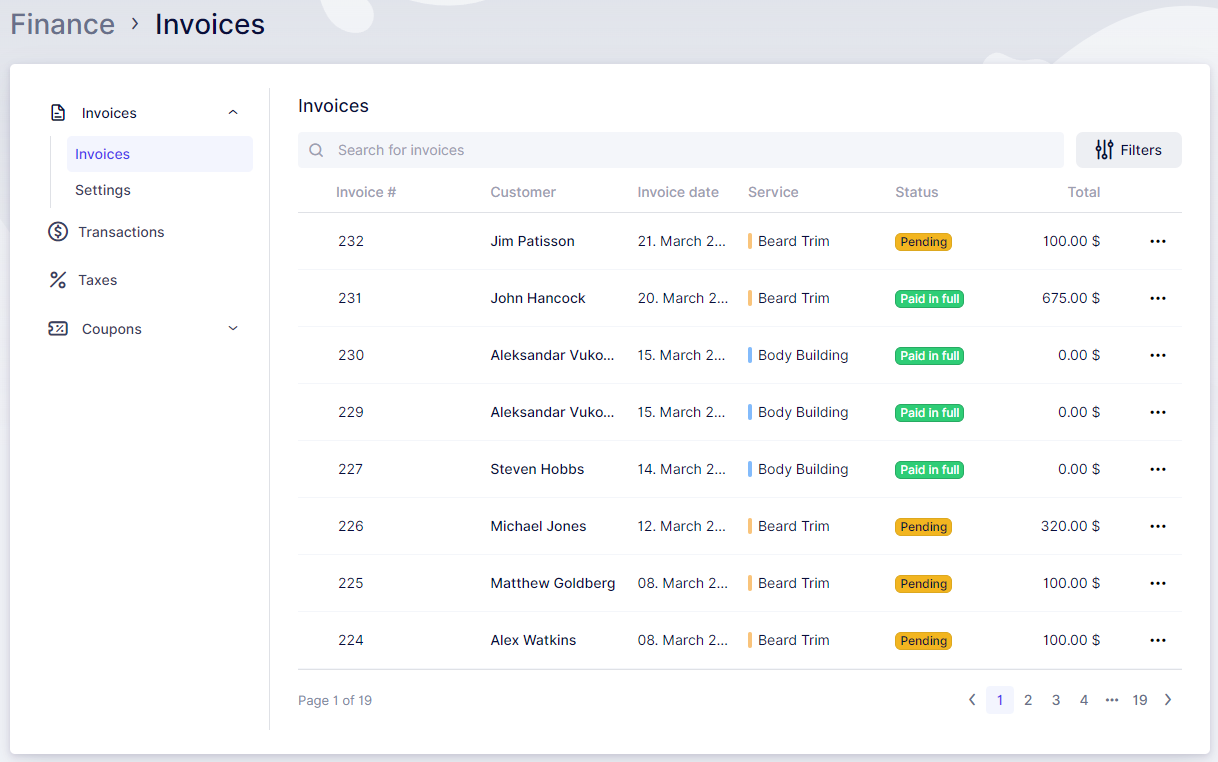
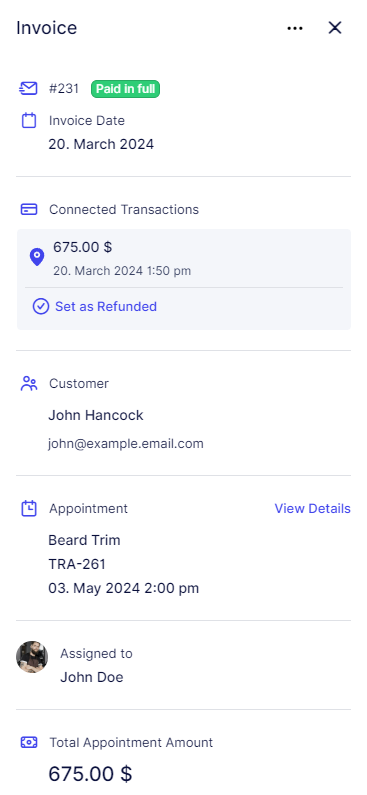
When you click on the three-dots menu for an invoice, you’ll find several options available. You can mark the invoice as paid (if it was previously in pending status), download the invoice, and send it directly to the customer’s email or to another specified email address.
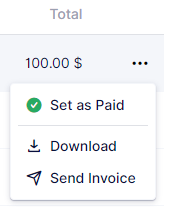
Clicking on an invoice will bring up a detailed view in the right-side menu. This view presents information such as the invoice number, date, and status, as seen in the list overview. Additionally, you’ll find details related to the payment, including the appointment date and time, the service provided, and the employee assigned to the appointment. If you click on “View Details” next to the appointment section, it will take you directly to the appointment related to that invoice. This makes it easy to access specific appointment details directly from the invoice view.
Invoices Settings
Under “Invoice Settings,” there are two tabs that offer customization options for your invoices.
Settings Tab:
- Automatically send Invoice to Customer: This option automatically sends an email notification using the “Appointment Invoice” template along with the “Appointment Approved” email template when a customer books an appointment.
- Invoice Title: Customize the title of your invoices to better suit your needs.
- Next Invoice Number: This setting allows you to set the starting point for the next invoice number. Trafft automatically adjusts this based on the last invoice number issued by the app, but you can modify it as needed.
- Invoice Prefix: Add a prefix before the invoice number to align with your company’s naming conventions and standards.

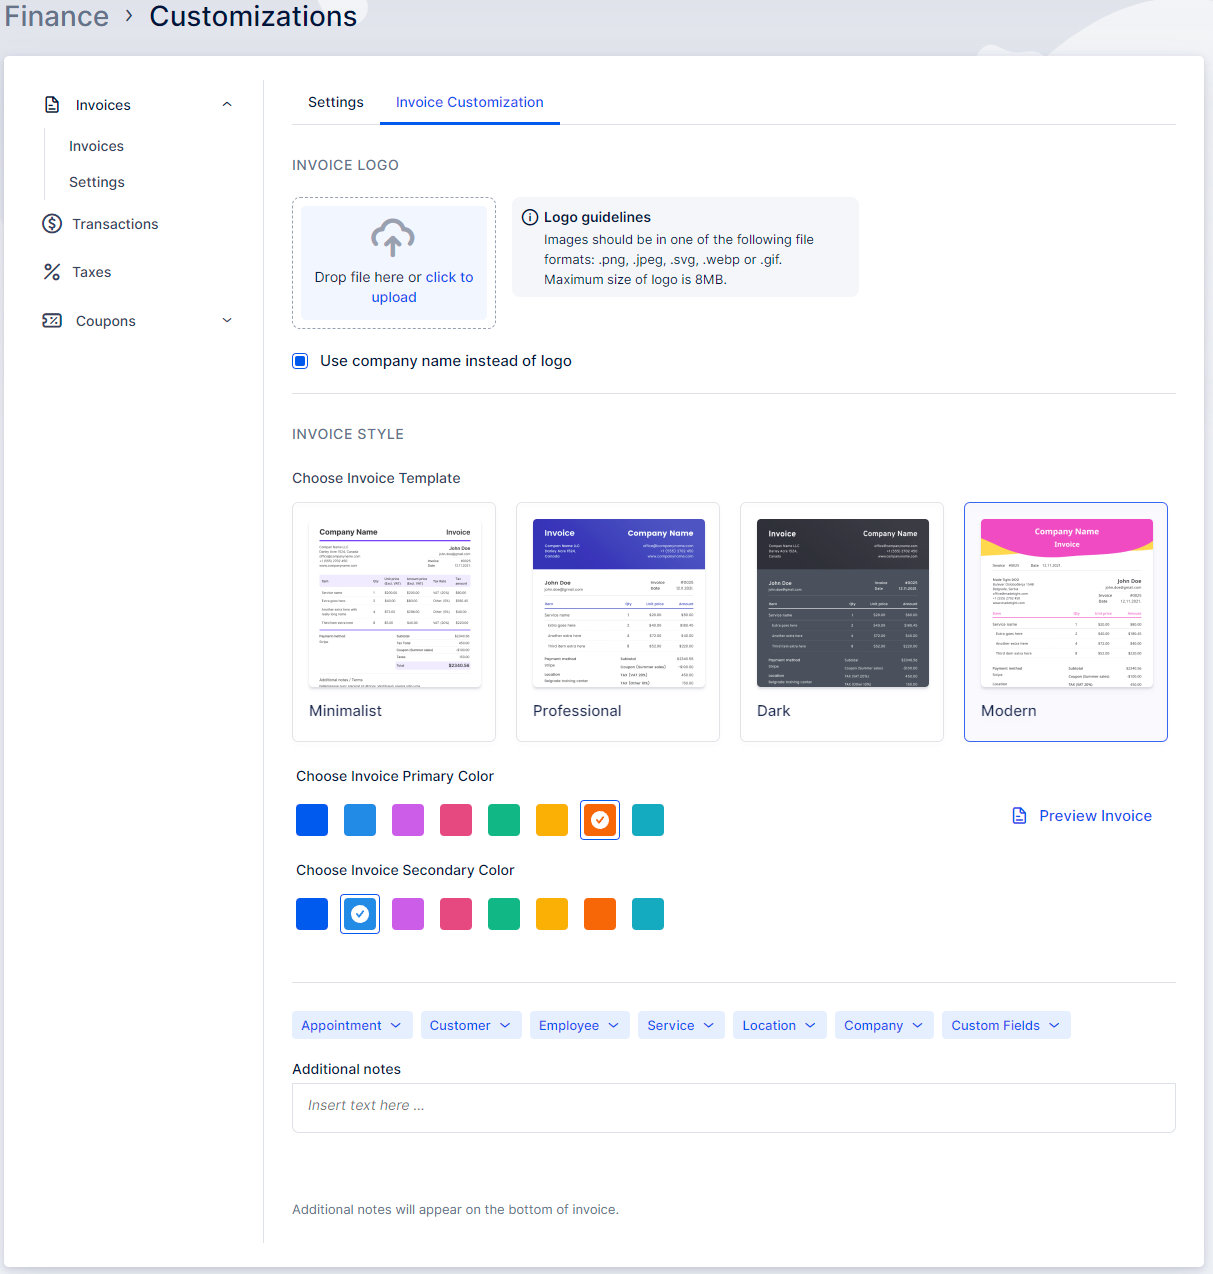
Invoice Customization Tab:
Invoice Logo:
- Upload Logo: You can upload your logo to be displayed on the invoice. The maximum file size is 8 MB, and supported formats include .png, .jpeg, .svg, .webp, and .gif.
- Use Company Name: Alternatively, you can opt to display the company name instead of the logo. If you choose this option, you’ll need to delete any previously uploaded logo from this section.
Invoice Style:
- Choose Template: Trafft offers 4 Invoice Styles for you to select from.
- Color Customization: You can customize the primary and secondary colors of the invoice, depending on the selected template. Note that the “Dark” template doesn’t offer color alterations, while the “Modern” template allows customization of both primary and secondary colors.
- Preview Invoice: After saving your changes, use this option to preview the invoice layout before it’s sent to your customers.
Additional Notes: Any additional notes you’d like to include at the bottom of the invoice can be entered here. You can use placeholders, similar to those used in notification templates, to automatically populate appointment-related information in the invoice.
If you have entered your company’s bank account number in the Company Settings, it will automatically be included in the invoice. This can serve as a convenient option for customers to make payments via bank transfer. You can utilize the “Additional Notes” section mentioned above to inform your customers that they can make payments using the bank account number provided in the invoice.
Transactions
In the Transactions section, you can view a comprehensive overview of all paid or partially paid appointments. Similar to the Invoices section, it includes a Search field along with filters for Customer, Service, and Employee. Additionally, there is a date range filter that enables you to narrow down transactions based on the transaction date (the date when the appointment was paid or partially paid).
When you click on a transaction, a detailed view appears on the right side of the screen. This view provides specific details such as the payment method, total price, appointment details, and more. It offers a similar layout and functionality to the side menu in the Invoices section, allowing you to efficiently manage and track your financial transactions.
If the appointment was paid online, it will also contain the Transaction ID and the option to Refund the Payment, while all transactions (online and on-site) will include the “Set as Refunded” option that allows you to mark the transaction as refunded if you refunded the customer in person, for example.
Taxes
In the Taxes section, you have the ability to manage taxes for your services and extras. You can create multiple taxes; however, please note that, at this time, it’s possible to assign only one tax to a service or an extra.
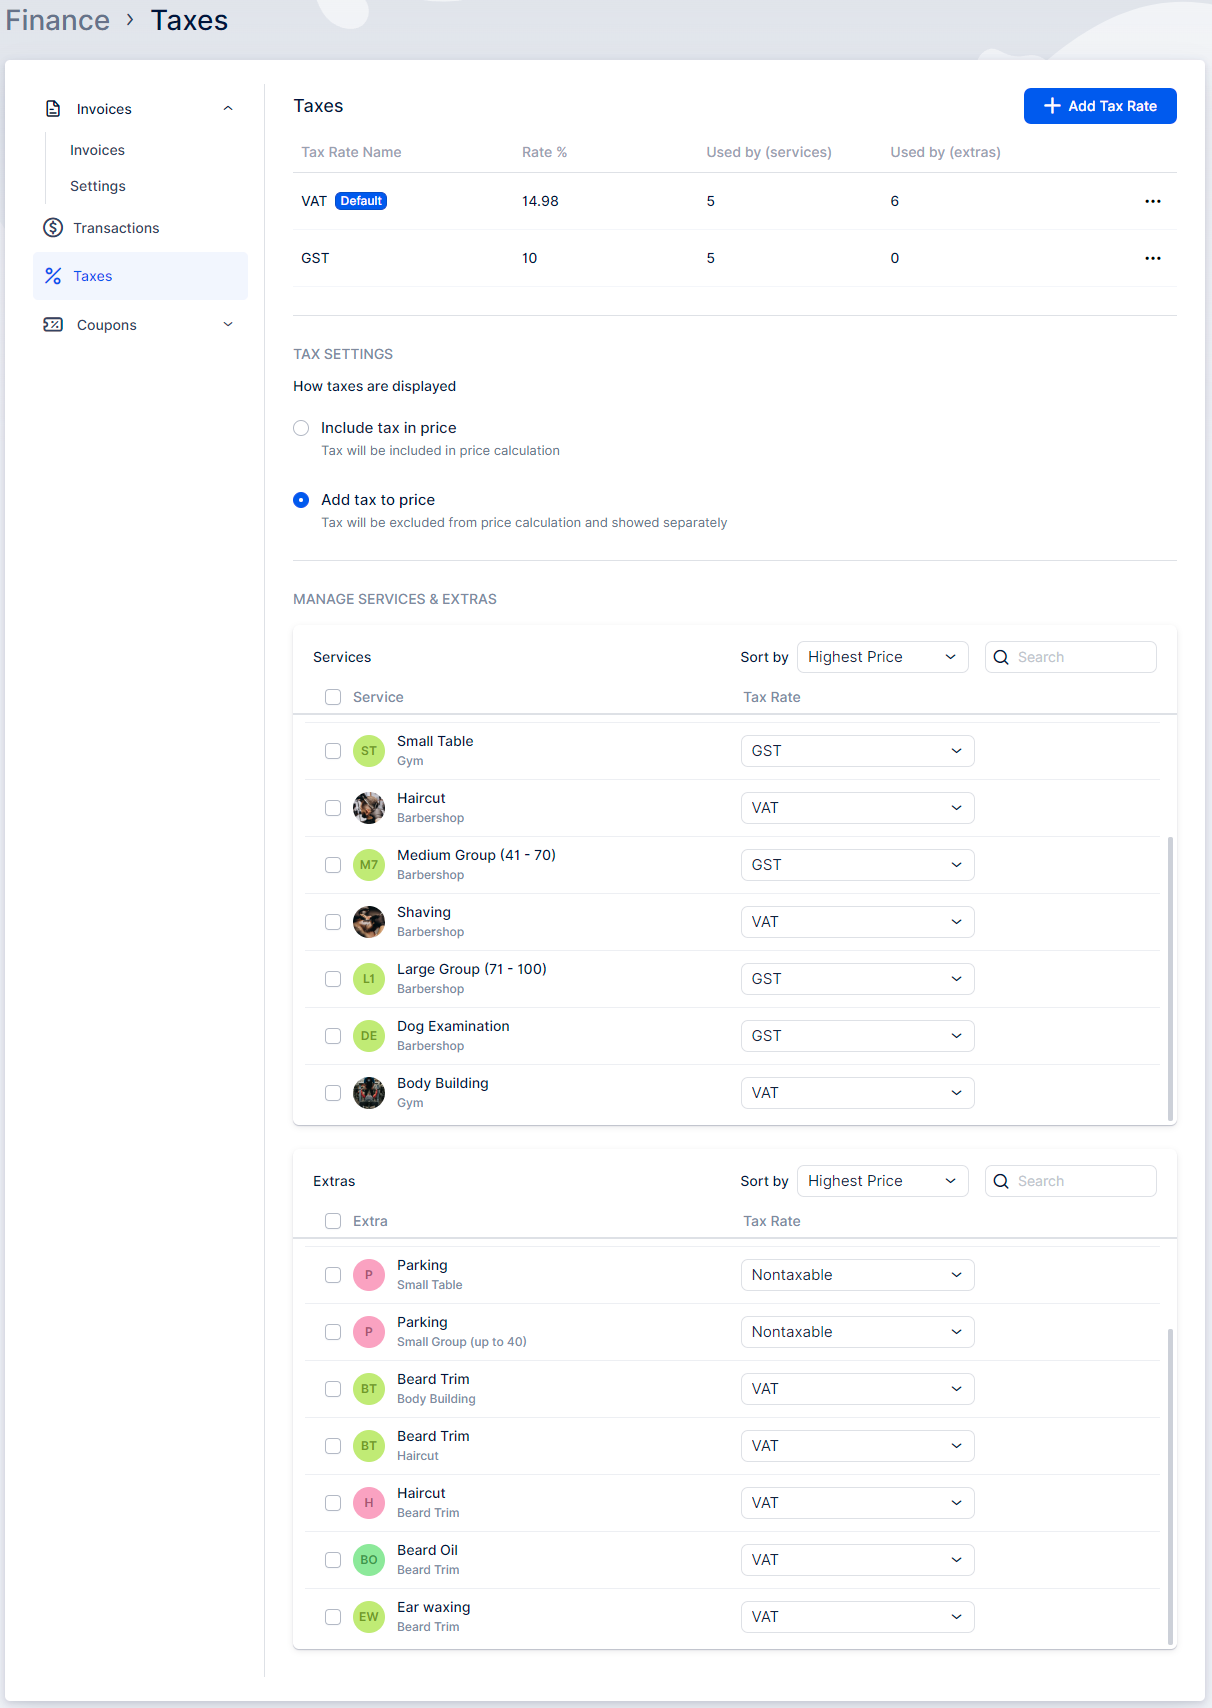
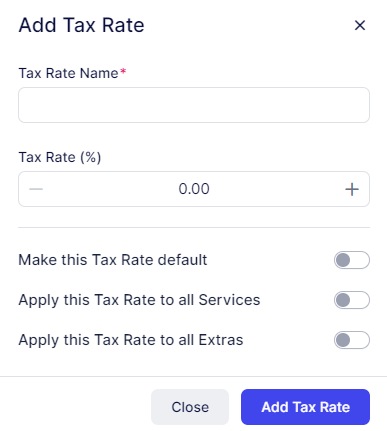
To add a new tax rate, click on the “Add Tax Rate” button. A pop-up will appear where you can input the following details:
- Name: Enter the name of the tax rate.
- Rate: Specify the rate in percentage (%).
- Options:
- Make this Tax Rate default: Enabling this option will set this tax rate as the default for all future services.
- Apply this Tax Rate to all Services: Enabling this option will apply the new tax rate to all existing services.
- Apply this Tax Rate to all Extras: Enabling this option will apply the new tax rate to all existing extras, if the extra feature is activated.
Please note that once you’ve configured these options, click “Save” to apply the changes.
In the “Tax Settings” section, you have two options for how your taxes will be calculated in relation to the service price:
- Include tax in price: If this option is selected, the tax amount will be included in the service price calculation. For example, if your service price is set at $100 and the tax rate is 20%, the tax will be calculated as follows: service price – (service price / (1 + tax rate)) – specifically: 100 – (100 / (1 + 0.2)). So in this case, the tax amount would be $16.67, making the total price $100.
- Add tax to price: When this option is chosen, the tax will be added to the total price of the service and displayed separately. For instance, if your service price is $100 and the tax rate is 20%, the tax amount will be $20, making the total amount payable $120.
Choose the option that best fits your pricing strategy, and remember to save your changes after making a selection.
In the “Manage Services and Extras” section, you have an overview of all your services and extras along with the taxes assigned to them. Here, you can set a specific tax for each extra or service. If you prefer not to apply tax to a particular service or extra, you can set it to “Nontaxable”.
Additionally, you have options to sort, search, or perform bulk edits on this list for better organization and management.
Your configured taxes will be displayed on your booking website, visible during the booking process under the “View detailed pricing” option. They are also shown on the invoices generated by Trafft.
Coupons
Coupons are a powerful tool to engage existing customers and attract new ones. With Trafft, you can create and manage coupons easily. These unique codes can be shared with your clients so they can enjoy discounts when booking appointments.
Once you create a coupon code, you can manually add it on the Appointments page for your clients, or you can send the code directly to your customers. They can then use the coupon during the booking process to get the discount.
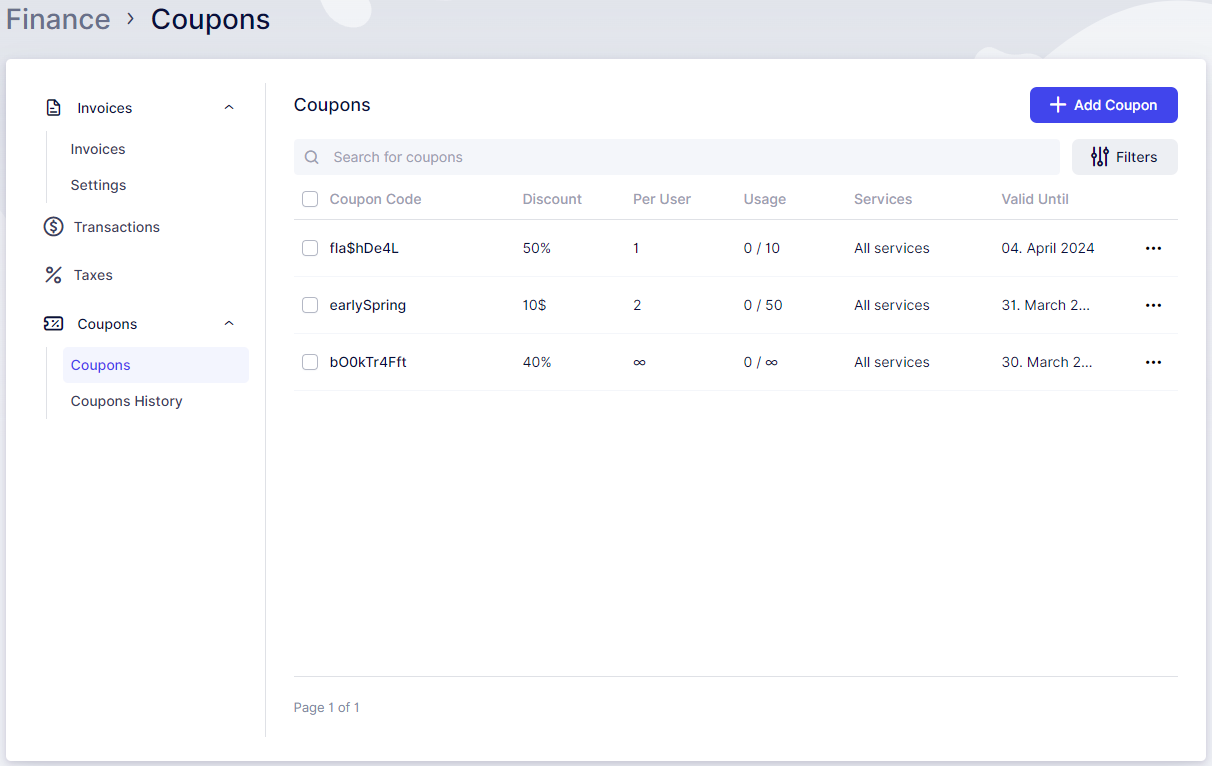
To create a coupon, click on “+ Add Coupon,” which will open a form where you need to enter:
- Coupon Code: This is the code you’ll share with your customers (for example, FLASHDEAL).
- Expiration Date: The date when the coupon will expire.
Other options are not mandatory, so you can set up:
- Usage Limit: The number of times a coupon can be used. For example, if set to 5, customers can only use the coupon up to 5 times. Enabling “Coupon has no usage limit” removes this restriction.
- Limit Per User: The number of times a single customer can use the same coupon. For instance, if set to 1, the customer can only use the coupon once. Enabling “Coupon has no limit per user” removes this restriction.
Under Services, you can decide whether the coupon applies to all services or only specific ones.
Discount Type: Choose how the coupon will be applied:
- Fixed Amount: For example, deduct $10 from the service price.
- Percentage: For example, deduct 10% from all service prices.
Sending Options:
- Send Coupons to Customers: This option is enabled by default. If “Manually select customers” or “Filter customers” is not enabled, the coupon will not be sent. Disable this option if you plan to send the coupon privately or in person.
- Manually Select Customers: Choose specific customers to send the coupon to. Once selected and saved, the coupon will be emailed to these customers.
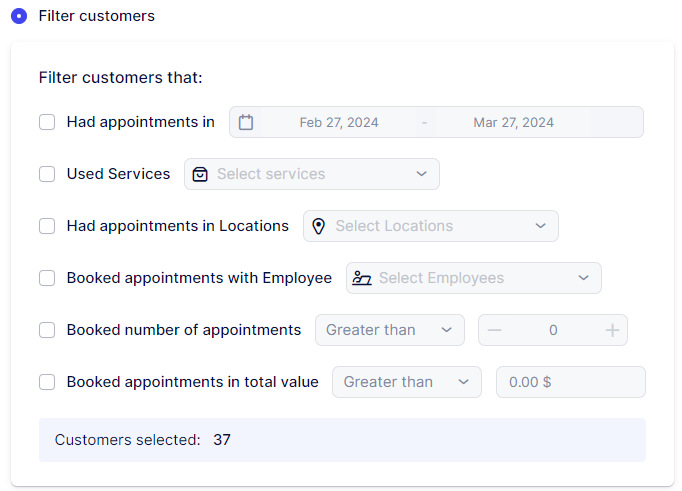
- Filter Customers: Select criteria to send the coupon to customers who:
- Had appointments between specific dates
- Used specific service(s)
- Had appointments at specific location(s)
- Booked appointments with a specific employee
- Booked a number of appointments greater or lower than a fixed number
- Booked appointments totaling a value greater or less than a fixed amount
- Disable Coupon Sharing: If you disable sharing, customers who received a coupon will not be able to use it with a different email. This option ensures that the coupon is tied to the specific email it was sent to. It’s important to note that this option will not work if you don’t send coupons to customers.
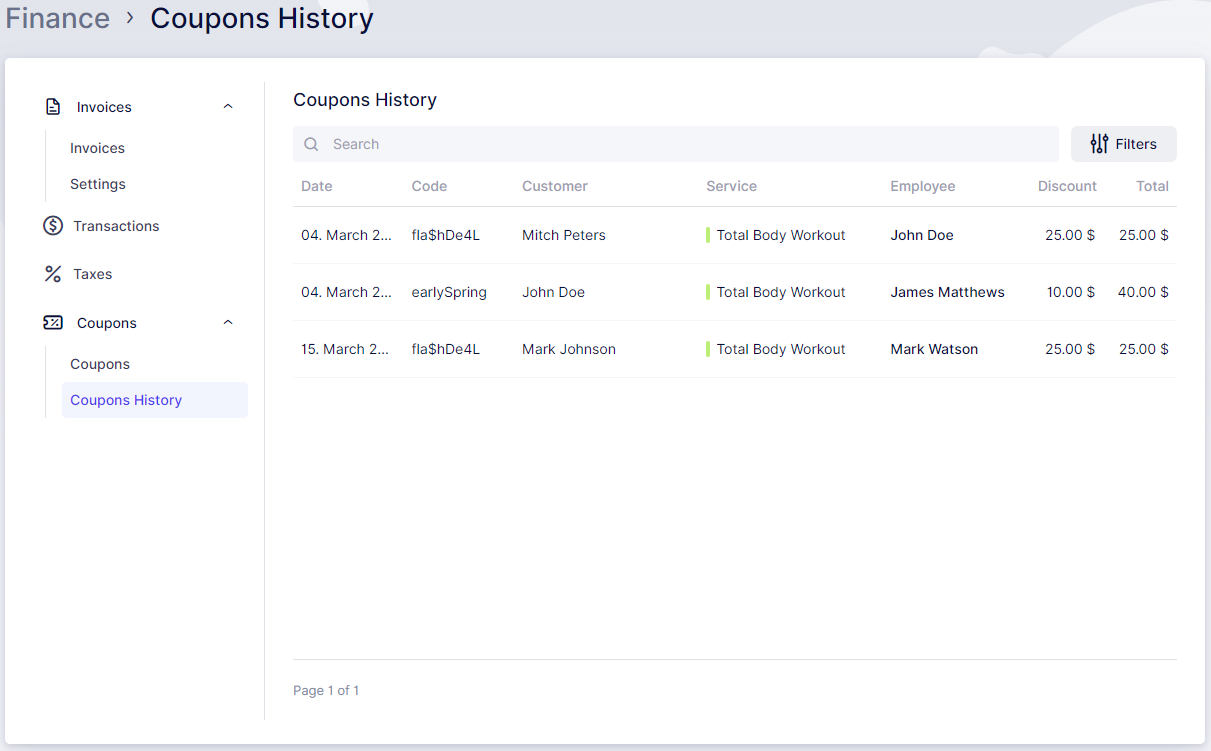
Coupon History
The Coupon History section provides a detailed overview of coupon usage for appointments. Here’s what you can find:
- Date: The date when the coupon was used.
- Coupon Code: Displays the coupon code that was used.
- Used By: Shows which customer used the coupon.
- Services: Indicates the services booked using the coupon.
- Employee: Displays the employee providing the service.
- Discount: Displays the amount of the discount generated by the coupon usage.
- Total: Shows the total amount for the appointment.
You can search through the list of used coupons and filter it by Service, Employee, and Customer, making it easy to track coupon usage and its impact on appointments.
Have more questions?
If you face an issue, and cannot find an answer in the documentation, feel free to submit a support ticket!