


 Agency (White Label)Getting Started
 Configuring TrafftBooking WebsiteCustom FeaturesIntegrationsAdmin Views
The primary method of notifications in Trafft is through Email Notifications. These notifications are essential for informing both your customers and employees about various updates such as new appointments, rescheduled appointments, cancelations, and rejections, as well as appointment reminders and follow-ups.
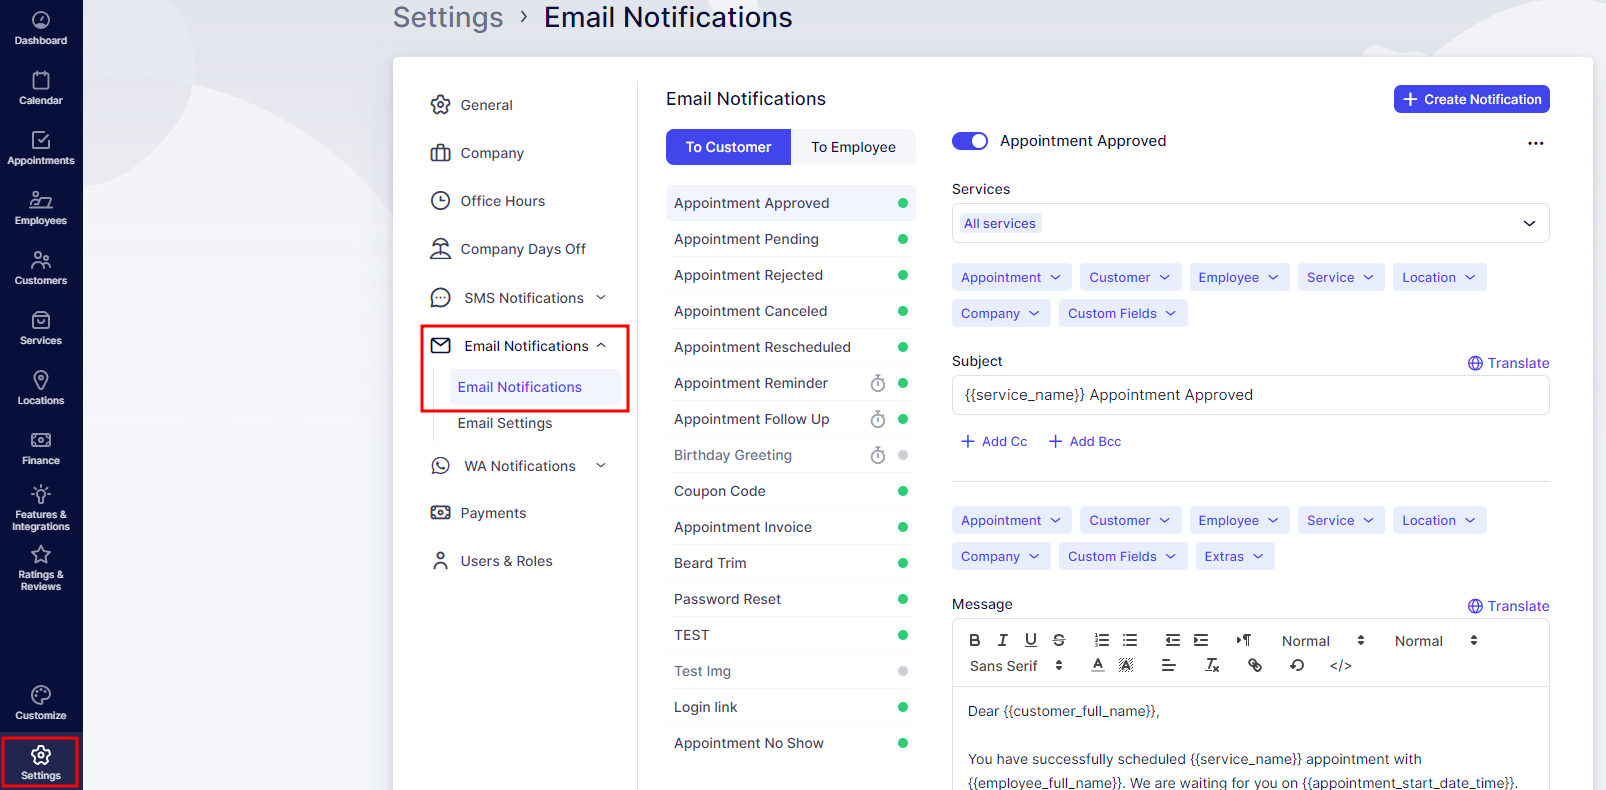
To access the Email Notifications templates, navigate to the “Settings” tab in the bottom left corner. From there, expand the Email Notifications section and select “Email Notifications“. This will take you directly to the templates for customer notifications.
There are two types of email notifications in Trafft:
- Action-triggered notifications: These notifications are triggered when specific actions are completed. The actions include “Appointment Booked”, “Appointment Rejected”, “Appointment Canceled”, “Appointment Status Changed”, and “Appointment Rescheduled”.
- Scheduled notifications: These notifications are triggered based on the defined time before or after an appointment. The scheduled notifications include Reminder and Follow-up email templates.
All email templates in Trafft allow you to add up to 3 Cc and 3 Bcc email addresses, ensuring the emails are sent to these additional recipients.
By default, all templates except for the Birthday Greeting
are enabled. However, you have the option to disable any template you don’t want to be sent. Simply click on a template, and you’ll find a toggle button next to the template name (above the Subject).
There are 6 notification templates that are shared between Customers and Employees. These templates need to be configured separately to ensure the right emails are sent to the right recipients:
- Appointment Approved
- Appointment Pending
- Appointment Rejected
- Appointment Canceled
- Appointment Rescheduled
- Appointment Reminder
Additionally, default notification templates for Customers include:
- Appointment Follow Up
- Birthday Greeting
- Coupon Code
- Appointment Invoice
- Password Reset
- Login link
- Appointment No Show
For Employees, default notification templates include:
- Password Reset
- Login Password
- Login Link
We will now delve into each of these notification types in detail below.
Beneath the subject field, you have the option to add Cc (Carbon Copy) and/or Bcc (Blind Carbon Copy) email addresses. This feature allows other members of your company to receive the emails that are automatically sent out by Trafft.
You can add up to 3 additional email addresses for both Cc and Bcc fields, totaling 6 email addresses. To add multiple addresses, simply type each email address manually and press ENTER after each entry.
Appointment Approved
This template will be sent when the appointment status is set to “Approved”. To ensure this template is sent immediately after the booking is made, the Default Appointment Status in the General Settings of Trafft needs to be set to “Approved”. If the default status is set to “Pending”, this notification will be sent after the appointment’s status is manually changed to Approved on the Appointments page.
This notification is available for both customers and employees, but it can be disabled by toggling the button above the Subject of the template.
Appointment Pending
If the Default Appointment Status in General Settings is set to Pending, this notification will be sent as soon as the appointment is booked. Similar to the Appointment Approved notification, this one exists for both customers and employees. You can toggle the slider above the Subject of the template to disable it if needed.
Appointment Rejected
This template serves the purpose of informing customers and employees that the appointment has been rejected.
Changing the status of the appointment to “Rejected” in the Appointments section will automatically trigger this notification (if enabled) for both the customer and the employee.
Appointment Canceled
The Appointment Canceled email template is slightly different from the “Appointment Rejected” template. Customers can cancel their appointments in two ways: (1) by using the appointment cancellation placeholders added to the “Appointment Approved” and/or “Appointment Pending” email templates, or (2) through their customer profile if they are a registered user with access to log into their profile on your Booking Website. When a customer cancels their appointment, this notification will be sent to the customer and the employee (if both are enabled).
Additionally, you can also cancel an appointment from the Appointments section by changing its status. The purpose of keeping this status available in the back-end is to differentiate between a rejected appointment, which may be due to past customer behavior, and a canceled appointment, which might occur due to unforeseen circumstances such as an employee falling ill and no one being available to cover the appointment.
Ultimately, the choice of status in the back-end and the content and enablement of these templates are up to you.
Appointment Rescheduled
The Appointment Rescheduled notification is triggered when you change the date and/or time of an appointment.
Customers can also reschedule their appointments using the appointment rescheduling placeholders in the “Appointment Approved” and/or “Appointment Pending” email templates. Additionally, registered customers can reschedule by logging into their customer profiles on your Booking Website.
Appointment Reminder
This is a default notification template designed to remind your customers and employees about upcoming appointments, which can significantly reduce no-shows.
Under the template’s Subject, you’ll find the “Before Appointment” drop-down menu where you can select how long before the appointment this notification will be sent. By default, it’s set to “1 day”. For example, if an appointment is scheduled for December 2nd at 12:00, this email will be sent on December 1st at 12:00.
The shortest interval is “30 minutes” and the longest interval is “1 week” before the appointment.
Appointment Follow Up
The Appointment Follow Up template is designed for reaching out to customers after their appointments. This email can serve various purposes, such as thanking customers for choosing your business, providing additional information, inviting them for future treatments, or kindly asking for a positive review. Utilizing this template can significantly increase customer retention rates.
Below the Subject line, you’ll find the “After Appointment” option where you can select when the email will be sent after the appointment ends. The intervals range from “30 minutes” to “1 week” after the appointment.
This is the first default email template that is exclusively for customers. If you also want to send a follow-up email to your employees, you can enable the Custom Notifications feature and configure a new notification for them.
Birthday Greeting
The Birthday Greeting notification is initially disabled, so you’ll need to enable it by toggling the slider next to the template title.
This notification is exclusive to customers and is primarily used to send birthday wishes along with any special offers you may have for their special day.
To trigger this email, customers must have their Date of Birth filled out in their profile. Below the Subject line, you’ll find the “Scheduled For” dropdown where you can set the time of day when the email will be sent on a customer’s birthday. The default time is set to 17:00 (5 pm).
Coupon Code
The Coupon Code notification is triggered when you click on the “Send to Customer” option next to each coupon created on the Coupons Page. This email notification allows you to engage in email marketing by offering discounts to your valued customers when they book your services.
Appointment Invoice
The Appointment Invoice notification is triggered when you click on the “Send Invoice” option next to each created invoice on the Invoice page. This email notification assists you in tailoring email messages for sending invoices to your customers.
Password Reset
The Password Reset notification allows you to personalize password recovery emails for both customers and employees with various customizations. This email is triggered when the customer or employee clicks on the “Reset Password” option during the login process.
Password Reset
This template is sent when the customer clicks the “Forgot Password” option when they try and log into their profile either through the booking process, or in the front end Customer Panel.
Login Link/Login Password
These two notifications serve different purposes in inviting users to log into their accounts. The “Login Link” template is applicable to both customers and employees. It invites the user to set a password by visiting a link provided in the email.
On the other hand, the “Login Password” notification is specifically for employees. It provides the user with the password that was configured when enabling login for the employee.
Appointment No Show
The “No Show” template is triggered when an appointment status is changed to “No-Show”. This status can only be set after the appointment’s scheduled start time has passed. In case a customer misses their appointment, changing the status will automatically send this template to the customer. It’s designed to inquire about the reasons for missing the appointment. As with all templates, you have the flexibility to customize the content to suit your needs.
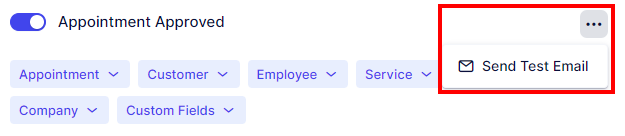
Testing the Email Templates
Each email template can be tested to preview what it looks like for your customers. Simply click on the three-dots menu in the top right corner of the template editor, then select “Send Test Email”.
Please note that test emails will not convert auto-generated placeholders (such as Zoom links, Google Meet links, Microsoft Teams links, Zoom Meeting links, etc.), so if you see a placeholder in the test email, that is expected.
It’s important to know that the test emails are automatically sent to your own email address and cannot be redirected to another email. Additionally, any Cc and Bcc email addresses added to the template will not receive these test emails.
Using Placeholders in Email Notification Templates
Each of these notifications allows you to see options above the body of the email where you can choose and add email placeholders. Place your cursor in the template where you want to add a new placeholder, open any of the dropdowns, and click on the placeholder that you need.
The placeholder will be automatically added to the template. You can add as many as you want. All these placeholders will be replaced with real data from bookings, services, employees, locations, company details, etc. If on the other hand, there is no data for that placeholder then the placeholder will be replaced with an empty space.
Once you finish setting up all email templates – don’t forget to click “Save Settings”.
Adding the Reschedule Link in Notification Templates
You can allow your customers to reschedule the appointment directly from one of the notifications that they receive, by adding the “Reschedule Link” placeholder, which can be found in the Appointment dropdown. This placeholder will be replaced by a link in your notifications, which will redirect your customers to choose the new date and time for their appointment, after which the appointment will be rescheduled.
There are two available placeholders: {{appointment_reschedule_link_short}} which will send out a shortened link for rescheduling, and {{appointment_reschedule_link}} which will send out a full-length link for rescheduling.
Adding the Cancelation Link in Notification Templates
If you want to allow your customers to cancel the appointment directly from one of the notifications that they receive, you can add either the “Cancel Link“, or the “Cancel Link Short” placeholder, which you can find in the Appointment dropdown. These placeholders will be replaced by a link in your notifications so that your customers can click on it and their appointment will be canceled.
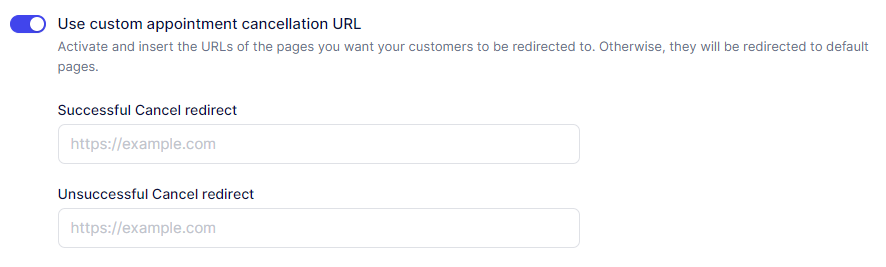
You can also set the redirection pages, where the customer will be redirected after clicking on the cancelation link. To set this, you need to access the Customize section, enable the “Use custom appointment cancellation URL” option, and enter the URL link for a page they will be redirected to if their cancelation is successful and the URL link for a page they will be redirected to if their cancelation is not successful.
If you don’t wish to set these pages, and you leave the option disabled, your customers will be guided to special pages on your booking website that confirm either a successful or unsuccessful cancelation.
“Reply to” option
Customers can answer emails sent from Trafft, so we’ve implemented the option where admins will be able to add an email address for replies. If your customers want to ask you something or update some information, they will send it directly to your email address after they receive the email(s) you enabled in the settings as automated notifications.
By default “Set email for replies” is disabled. When you enable it, you need to enter the email address that the customer’s responses will go to.
Custom Notifications
Custom Notifications is a custom feature that needs to be enabled in the Features & Integration section on the left-hand side menu.
Once enabled, you can click on the “Create Notification” button in the top right corner of Email Notifications and create new (custom) notifications for specific services, specific appointment statuses, or custom scheduled notifications.
You can read more about this feature on this page.
Have more questions?
If you face an issue, and cannot find an answer in the documentation, feel free to submit a support ticket!